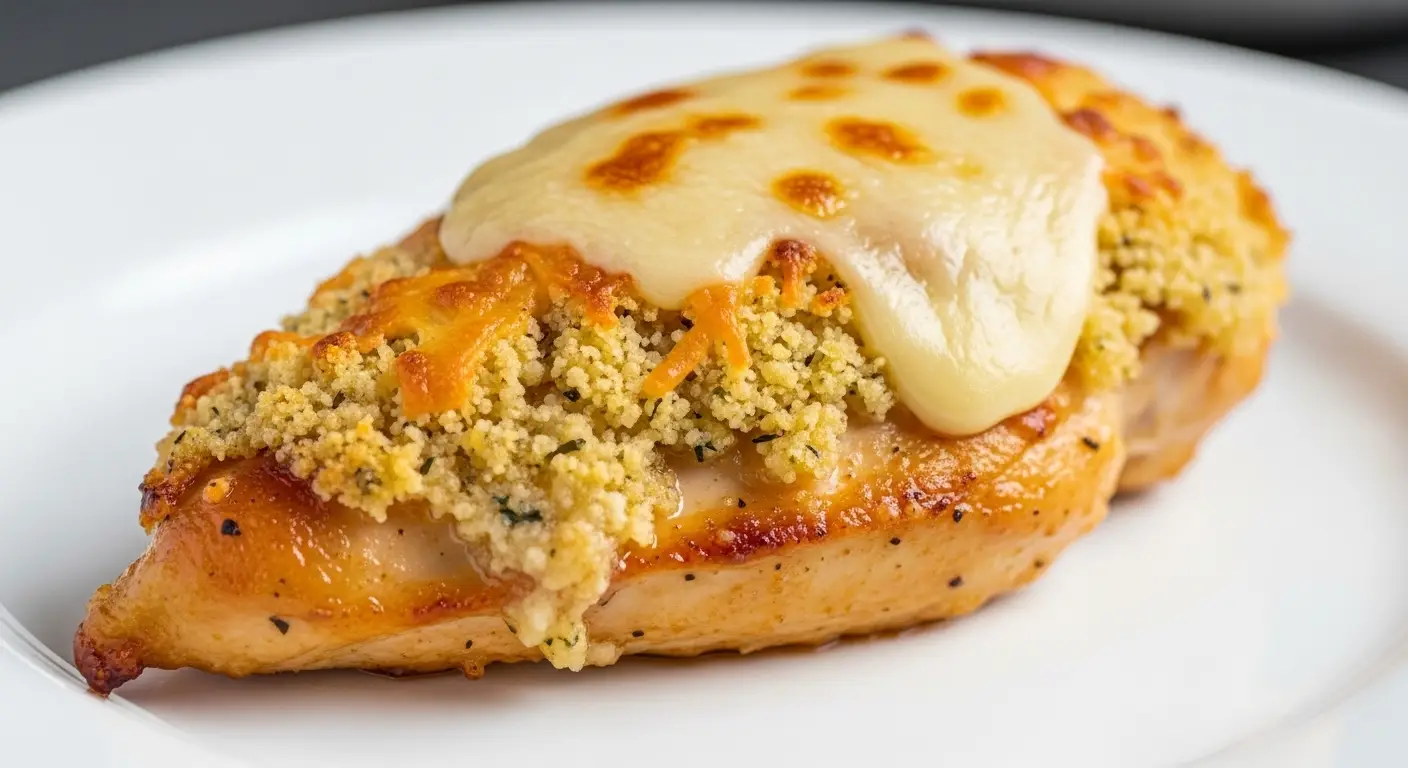
Melt in Your Mouth Chicken
Have you ever cooked chicken that turned out dry and tough? It is a sad feeling when you sit down for dinner and the meat feels like a piece of wood. I used to have this problem all the time. No matter how much I watched the clock, my chicken breast always felt a bit chewy. Then I found a trick that changed everything in my kitchen. This recipe makes the meat so soft that you barely need a knife to cut it.
This dish is famous for a good reason. It uses a thick topping that keeps all the juices inside while the oven does the work. You do not need any fancy tools or expensive spices to make this happen. In fact, you probably have most of the items in your pantry right now. I am going to show you exactly how to get that perfect texture every single time without any stress.
By the time you finish reading, you will know the secret to making chicken that truly lives up to its name. It is great for a busy weeknight when you are tired but still want a warm, home-cooked meal. Get your apron ready and let’s get started on the best chicken you will ever taste.
Ready to see the magic happen in your own oven?
Everything You Need to Get Started
Before we start cooking, we need to gather our tools and food. Using the right items makes the job much easier. I learned the hard way that using a pan that is too big can make the sauce burn. Now, I always pick a dish where the chicken fits snugly but not crowded. This helps the topping stay thick and creamy instead of running off into the corners of the pan.
Most people think they need to marinate meat for hours to make it soft. That is not true with this method. The magic is all in the coating. You will need a bowl for mixing and a brush or a spoon to spread the goodness on top. Make sure your chicken is thawed all the way through if it was in the freezer. Cooking frozen meat makes it release too much water, which ruins the crust we want to build.
The Short List of Ingredients

You only need a few things to make this dish. I like to keep it simple because simple food often tastes the best. You will need four main items for the chicken itself. First, get about four large chicken breasts. Try to find ones that are the same size so they finish cooking at the same time. This prevents one piece from being dry while another is still raw.
- Four boneless, skinless chicken breasts
- One cup of real mayonnaise
- Half a cup of shredded parmesan cheese
- One teaspoon of garlic powder
- A pinch of salt and black pepper
Wait, mayonnaise? Yes! I know some people do not like mayo, but please trust me on this one. You will not taste the mayo at all once it bakes. It turns into a rich, buttery sauce that protects the meat. If you try to swap it for low-fat mayo, it might not work as well. The fat is what keeps the chicken from getting tough in the high heat of the oven. IMO, the full-fat version is the only way to go for this recipe.
The Best Kitchen Tools for the Job

You do not need a lot of gear for this. A 9×13 inch baking dish is the perfect size for four pieces of meat. I prefer glass or ceramic dishes because they heat up evenly. If you use a thin metal pan, the bottom might get too hot too fast. You also want a small mixing bowl to stir the topping together. A fork works just fine for mixing, but a small whisk is even better if you have one.
I also suggest using a meat thermometer. This is the one tool that saved my cooking life. For a long time, I just guessed when the meat was done by poking it. That is a bad idea because you let the juices leak out every time you poke it. A thermometer tells you the exact heat inside without making a big mess. It is the secret weapon for anyone who wants perfect results every single time.
How to Cook Your Melt in Your Mouth Chicken
Now we get to the fun part. Cooking should be a happy time, not a scary one. This recipe is very forgiving, which means it is hard to mess up. Even if you are not a pro in the kitchen, you can do this. The main goal is to cover every inch of that chicken with the magic sauce. This creates a seal that locks in the moisture while the parmesan cheese gets golden and bubbly on top.
One mistake I made when I first started was not drying the chicken. If the meat is wet when you put the sauce on, the sauce will slide right off. Use a paper towel to pat each piece dry before you start. It seems like a small step, but it makes a huge difference in how the topping sticks. Once the chicken is dry, you are ready to build those layers of flavor.
Step One: Preheating and Prep

First, turn your oven on to 375 degrees. Do this before you do anything else so the oven is hot and ready. A cold oven will make the chicken cook too slowly, and the topping won’t get that nice crust. While the oven heats up, take your baking dish and spray it with a little bit of oil. This stops the chicken from sticking to the bottom, which makes cleaning up much easier later.
Lay your dried chicken breasts in the dish. Space them out so they are not touching each other too much. If they are crowded, they will steam instead of bake. Steaming makes the meat gray and soft in a bad way. We want the heat to move all around each piece. This helps the edges get a little bit crispy while the inside stays like butter. If your pieces are very thick, you can gently flatten them with a heavy pan so they are even.
Step Two: Mixing the Magic Sauce

In your small bowl, mix the mayonnaise, parmesan cheese, and garlic powder. Add a little salt and pepper too. Stir it until it looks like a thick paste. It should look creamy and a bit chunky from the cheese. I once tried to add extra cheese, and it was a bit too salty, so stick to the half-cup measurement for your first try. You can always add more next time if you love salt!
The garlic powder is important here. Fresh garlic is great, but in this recipe, it can sometimes burn and taste bitter. The powder mixes perfectly into the mayo and gives a smooth flavor to every bite. Make sure you scrape the sides of the bowl so you use every bit of the sauce. You want enough to put a thick layer on every single piece of chicken in your pan.
Step Three: Coating the Chicken

Take a spoon and put a big dollop of the sauce on each chicken breast. Use the back of the spoon to spread it out. You want to cover the top and the sides of the meat. Think of it like putting a warm blanket on the chicken. This blanket is what keeps the heat from drying out the meat. The thicker the layer, the better it will taste when it comes out of the oven.
If you have extra sauce left over, do not throw it away! Just pile it on top. There is no such thing as too much topping in this recipe. I like to make sure the very edges of the chicken are covered too. This prevents the thin parts of the meat from getting hard. Once all the pieces are covered, you are ready to put the dish in the oven. It already looks good, but the magic happens in the next thirty minutes.
Step Four: Baking to Perfection

Put the dish on the middle rack of your oven. Set a timer for 30 minutes. Every oven is a little bit different, so yours might take 25 minutes or it might take 35. This is where your meat thermometer comes in handy. You want the inside of the chicken to reach 165 degrees. When it hits that number, take it out right away! If you let it go to 180 degrees, it won’t be as soft.
During the last five minutes of cooking, I like to peek through the oven window. The top should be turning a light golden brown. Some spots might even be bubbling. This is the cheese and mayo working together to create a crust. If it looks too pale, you can leave it in for two more minutes, but be careful not to overcook the meat itself. The smell in your kitchen will be amazing at this point.
Recipe Quick Info
- Prep Time: 10 minutes
- Cook Time: 30 minutes
- Servings: 4 people
- Difficulty: Very Easy
Step Five: The Secret Resting Period

This is the hardest part of the whole recipe. When you take the chicken out of the oven, you must wait. Let it sit in the pan for at least five to ten minutes. I know it smells great and you are hungry, but don’t touch it yet! When meat cooks, the juices move to the outside. If you cut it right away, all those juices will run onto your plate and the meat will become dry instantly.
By waiting, you let the juices soak back into the middle of the chicken. This is what makes it melt in your mouth. While you wait, you can set the table or finish your side dishes. I usually cover the pan loosely with some foil to keep it warm, but don’t wrap it tight or the crust will get soggy. This short rest is the difference between a good meal and a great one.
Tips to Make This Meal Even Better
Once you master the basic recipe, you can start to have a little fun with it. I have cooked this dish hundreds of times, and I found a few ways to change it up. Some people like a little crunch, while others want a bit of spice. The base of mayo and cheese is like a blank canvas. You can add different things to the sauce to match whatever you are craving that day.
It is also important to think about what you serve with the chicken. Since the meat is very rich and creamy, it goes well with simple sides. I usually pick something green and something starchy. This balances the plate and makes the meal feel complete. Don’t worry about being too fancy. Even a bag of salad from the store works perfectly with this dish. FYI, my kids love this with mashed potatoes because they can mix the extra sauce into the potatoes.
Adding Different Flavors

If you want to change the taste, try adding some dried herbs. A teaspoon of Italian seasoning or some dried parsley works very well. If you like a little kick, you can add a pinch of red pepper flakes to the mayo mixture. It gives a tiny bit of heat that cuts through the richness of the cheese. Sometimes I even add a teaspoon of Dijon mustard for a tangy bite.
You can also change the cheese. While parmesan is the classic choice, sharp cheddar or even pepper jack can be fun. Just remember that different cheeses melt differently. Hard cheeses like parmesan give a better crust, while soft cheeses like cheddar will be more gooey. I usually stick to at least half parmesan to keep that signature texture. Mixing two types of cheese is a great way to use up what you have in the fridge.
Common Cooking Mistakes
- Using Cold Meat: Let the chicken sit out for 15 minutes before cooking so it bakes more evenly.
- Low-Fat Mayo: This often separates in the heat and makes the dish oily instead of creamy.
- Crowding the Pan: Leave space between pieces so the air can circulate and brown the tops.
Serving Suggestions

This chicken is the star of the show, so keep your sides simple. I love serving it over a bed of white rice. The rice soaks up any of the sauce that drips off the meat. Steamed broccoli or roasted carrots are also great choices. The bright colors of the vegetables look beautiful next to the golden chicken. It makes the whole plate look like it came from a restaurant.
If you want a lighter meal, you can slice the cooked chicken and put it on top of a big green salad. The creamy topping acts almost like a dressing for the lettuce. It is a great way to eat leftovers the next day too. Just make sure to reheat it slowly so it stays soft. I usually pop it in the toaster oven for a few minutes instead of the microwave to keep the crust from getting rubbery.
Your Questions Answered
Whenever I share this recipe, people always have a few questions. It sounds too simple to be true, so people get a bit worried. Don’t worry! I have made all the mistakes already so you don’t have to. Here are the things most people ask me when they are about to make this for the first time. Reading these will help you feel like a pro before you even turn on the oven.
Can I use Greek yogurt instead of mayonnaise?
You can, but the texture will change. Yogurt is more watery and tangy. It won’t be quite as rich or soft as the mayo version, but it still tastes good if you want to save some calories.
How do I store the leftovers?
Put the chicken in a container with a tight lid. It will stay good in the fridge for up to three days. To reheat, use the oven at 350 degrees until it is warm all the way through.
What if my chicken breasts are very thin?
If they are thin, check them at 20 minutes. Thin meat cooks much faster. Use your thermometer to make sure they don’t go over 165 degrees so they stay juicy.
Can I use chicken thighs instead?
Yes! Thighs are very juicy. They might take about 5 to 10 minutes longer to cook because they have more fat. Just make sure the skin is removed first.
Is this recipe gluten-free?
Yes, it is! As long as your mayonnaise and cheese do not have hidden wheat, this dish is naturally gluten-free. It is a safe and tasty choice for people with those needs.
Enjoy Your New Favorite Meal
I really hope you love this chicken as much as I do. It is a lifesaver on days when I am too tired to think about cooking. Remember to dry the meat, use plenty of sauce, and let it rest before you eat. These small steps make a big impact on the final taste. This recipe is a great way to show your family you love them with a warm and cozy dinner. Happy cooking and enjoy every bite!