Parmesan Crusted Chicken
Making a good dinner does not have to be hard. I love food that tastes like it came from a fancy shop but was made in my own kitchen. Parmesan crusted chicken is one of those meals. It has a loud crunch when you bite into it. Inside, the meat stays soft and full of juice. My family asks for this every week. I am happy to make it because it only takes a few steps. You do not need to be a pro chef to get this right. I will show you how to do it perfectly every single time.
In this article, you will learn how to pick the right meat and cheese. I will explain how to make the breading stick so it does not fall off. You will also see the best ways to cook it so it stays crispy. I have made many mistakes with this dish in the past. Now, I know the secrets to making it great. This guide covers everything from the grocery store to the dinner table. You will feel like a kitchen hero once you serve this to your friends or kids.
Check out these steps to master the best chicken dinner ever.
Getting Started with Your Ingredients
The secret to great food is starting with good stuff. You might think all chicken is the same, but that is not true. If the meat is too thick, it will be dry. If the cheese is from a green can, it will not melt right. I learned this the hard way a long time ago. One night, I tried to rush and used cold chicken that was way too big. The outside burned and the inside was still raw. It was a mess! Now, I take my time to pick the right items at the store.
You need to look for fresh chicken breasts. I also like to use a mix of crumbs for the coating. Some people just use flour, but that is boring. Using real cheese makes a huge difference in the flavor. It smells amazing while it cooks in the pan or oven. Most of these things are likely in your pantry right now. Let us look at what makes each part of this dish work so well for your family.
Choosing the Right Chicken
When you buy chicken, look for pieces that are even in size. I prefer thin cutlets. If you buy big, thick breasts, you should cut them in half. This helps them cook fast. If they cook fast, they stay juicy. Big pieces often get tough because they spend too much time in the heat. I always look for meat that is pink and firm. Avoid anything that looks gray or feels slimy. Fresh is always best for the best taste.
If you cannot find thin cutlets, you can make your own. I put a piece of plastic wrap over the meat and hit it with a heavy pan. This makes it flat and even. It is a great way to get out some energy after a long day! Making the meat flat means every bite will be the same. No one wants a piece of chicken that is cooked on one side and pink on the other. This simple step saves your dinner from being a failure.
The Best Cheese to Use

Parmesan cheese is the star here. It adds a salty and nutty taste. I always tell people to grate their own cheese. The stuff in the shaker can has weird powder in it to keep it from sticking. That powder stops the cheese from melting onto your chicken. I use a small grater to make fine shreds. It sticks to the meat much better than big chunks do. It feels like a little extra work, but the taste is worth it.
You can also mix in some other cheeses if you want. Sometimes I add a little bit of sharp cheddar for a different color. But Parmesan is the boss for this recipe. It gets very crispy when it hits the heat. This is what creates that golden brown crust we all love. If you use fresh cheese, the smell in your house will be like a pizza shop. It is hard to wait for it to finish cooking because it smells so good.
Breadcrumbs and Extra Crunch

I use two kinds of breadcrumbs for my chicken. I use regular fine crumbs and Panko crumbs. Panko crumbs are bigger and airier. They come from Japan and they are very crunchy. Mixing them together gives you the best of both worlds. The fine crumbs cover every tiny spot on the meat. The Panko crumbs add big bumps of crunch. This mix is what makes people ask for your recipe. It looks beautiful on the plate too.
You can also add dry herbs to your crumbs. I like to add a little bit of garlic powder and dried parsley. It makes the crust look pretty with green spots. Don’t add fresh herbs to the breading though. Fresh herbs have water in them and can make the crust soggy. We want a dry mix so it stays loud and crunchy. FYI, you can even crush up some crackers if you run out of breadcrumbs. It works in a pinch!
How to Bread and Cook the Chicken
Breading chicken can be a messy job. If you are not careful, your fingers end up with more coating than the meat! I used to hate the cleanup after making this. My hands would be covered in thick paste. Then I learned the “dry hand, wet hand” trick. This simple rule keeps your kitchen cleaner. It makes the whole process faster and much more fun. You will feel like a pro when you see how clean your workspace stays.
Cooking the chicken is the final big step. You have two main choices here. You can fry it in a pan or bake it in the oven. Both ways are good, but they give different results. I usually choose based on how much time I have. If I am in a hurry, the pan is faster. If I want to clean up while it cooks, the oven is better. Let’s go over how to make the breading stick and stay there until it hits your mouth.
The Three-Step Breading Method

To make the crust stay on, you need three bowls. The first bowl has flour. The second bowl has beaten eggs. The third bowl has your cheese and crumb mix. First, you put the chicken in the flour. Shake off the extra. The flour makes the meat dry so the egg can stick. Then, dip it in the egg. Let the extra drip off. Finally, press it hard into the crumbs. I mean really press it! You want those crumbs to become part of the meat.
This method is the only way to ensure the crust does not peel off in the pan. If you skip the flour, the egg will slide right off the wet meat. If the egg slides off, the crumbs have nothing to hold onto. I once tried to just throw crumbs on wet chicken to save time. It was a disaster. The coating stayed in the pan and I just had plain boiled-looking meat. Take the extra minute to do all three steps. Your taste buds will thank you later.
Pro Tips for Clean Hands
- One Hand Only: Use your left hand for wet stuff like eggs and your right hand for dry stuff like flour.
- Shake it: Shake the bowl of crumbs to cover the chicken instead of touching it too much.
- Prep First: Line up all your bowls before you touch the raw meat.
Pan Frying for Extra Crisp
If you want the loudest crunch, use a pan. I like to use a little bit of oil and a tiny bit of butter. The oil stops the butter from burning. The butter adds a rich taste. You need to make sure the pan is hot before you put the chicken in. If the oil is cold, the breading will just soak it up like a sponge. That makes the chicken oily and gross. Put a tiny crumb in the oil. If it bubbles, you are ready to go.
Cook the chicken for about 4 or 5 minutes on each side. Don’t move it around too much! Let it sit so the crust can get hard and brown. If you flip it too soon, the breading might tear. I use tongs to gently lift a corner and check the color. Once it looks like a gold coin, flip it over. This method gives you that classic fried chicken feel without using a giant pot of oil. It is fast, easy, and very tasty for a weeknight meal.
Baking for a Healthier Option
Baking is great if you are cooking for a lot of people. You can put many pieces on one tray. My secret for crispy baked chicken is a wire rack. I put the rack on top of a baking sheet. Then I put the chicken on the rack. This lets the hot air move under the meat. If you put it right on the flat tray, the bottom gets soggy. The rack keeps it crunchy all the way around. It is a total game-changer for oven cooking.
I usually bake it at 400 degrees. It takes about 15 to 20 minutes. You can spray the top with a little bit of oil to help it brown. While it bakes, I can make a salad or set the table. It is much less stress than standing over a hot stove. However, I should note that this might not work as well if your oven is old and doesn’t get very hot. You really need that high heat to make the cheese get crispy instead of just melting away.
Perfect Sides and Serving Ideas
Now that your chicken is done, you need something to eat with it. Parmesan chicken is great because it goes with almost anything. It is like a blank canvas. I have tried it with pasta, rice, and even in a sandwich. Since the chicken is salty and crunchy, I like to serve it with something fresh or soft. It balances out the meal so you don’t feel too heavy after eating. IMO, a good side dish is just as important as the main meat.
Serving the food nicely makes it taste better too. I like to put a little bit of green on the plate. It makes the golden chicken pop. You can also use different sauces. My kids love dipping theirs in red pasta sauce. I like mine with a squeeze of lemon juice. The sour lemon cuts through the rich cheese and makes everything taste bright. Let’s look at some of the best ways to round out your dinner plate tonight.
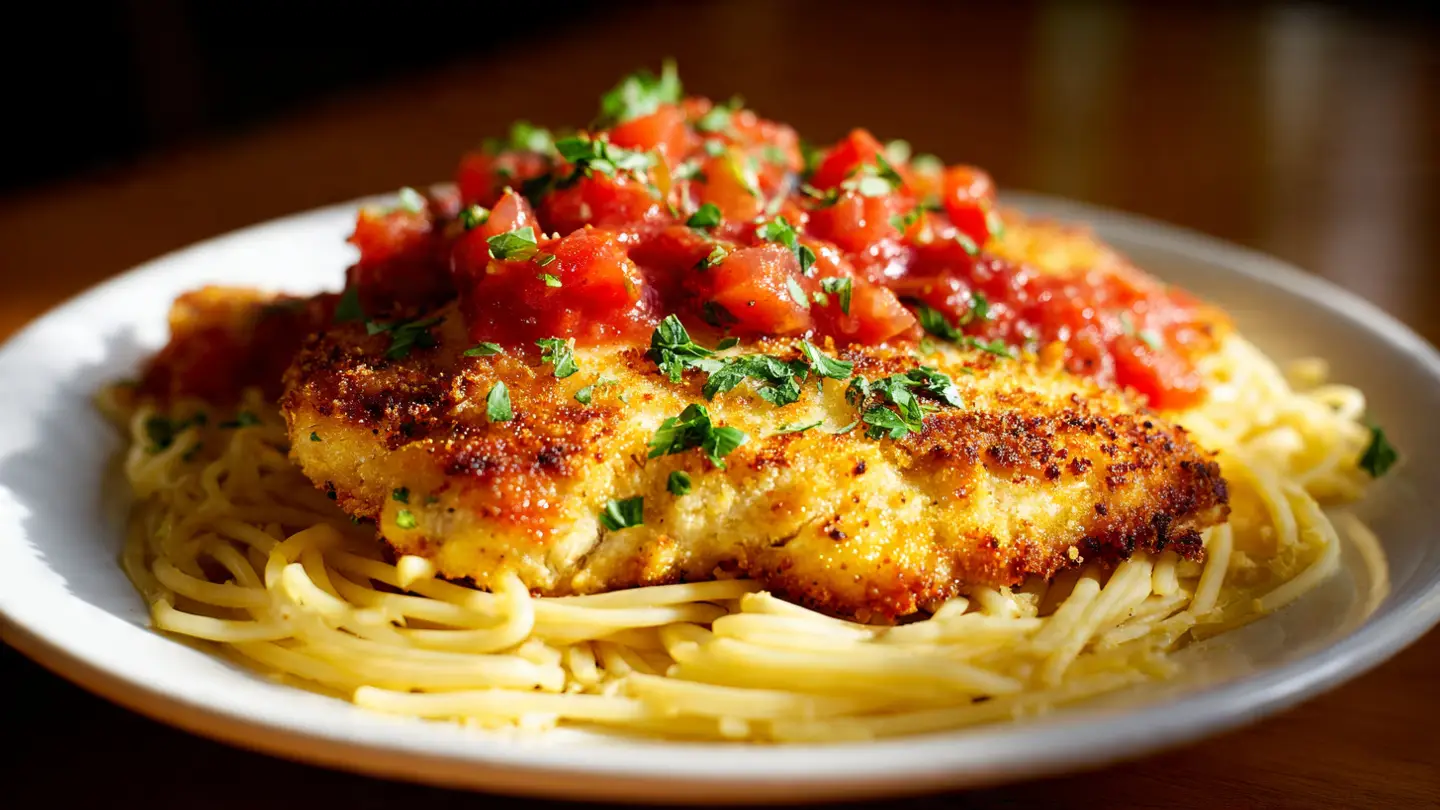
Pasta and Marinara Sauce

This is the most classic way to eat this chicken. It is basically a dry version of chicken parmesan. I cook some thin spaghetti and toss it with a good red sauce. Then I put the crispy chicken right on top. Don’t put the sauce on top of the chicken! If you do that, the crust will get soft. Keep the sauce on the pasta or on the side. This keeps every bite of meat as crunchy as possible. It looks like a meal from a nice Italian place.
I like this because it is very filling. If you are extra hungry, this is the way to go. You can also sprinkle a little more cheese over the whole plate. You can never have too much Parmesan! It is a simple meal that feels very special. If I have leftover chicken, I slice it up and put it on top of pasta the next day for lunch. It stays good in the fridge and is easy to heat back up in a toaster oven.
A Fresh Green Salad
If you want a lighter meal, go with a salad. I love a cold Caesar salad with hot chicken. The creamy dressing and the crunchy greens go perfectly with the warm cheese crust. It is a great choice for a hot summer day when you don’t want a big bowl of hot pasta. I just chop up some Romaine lettuce and toss it with dressing. Then I slice the chicken into strips and lay them on top. It looks very pretty and tastes even better.
A simple garden salad with oil and vinegar also works well. The vinegar helps clean your palate between bites of cheesy chicken. This is a good way to get some veggies into your day too. Sometimes I add some cherry tomatoes or cucumber for extra crunch. Since the chicken already has a lot of flavor, the salad doesn’t need to be fancy. Just some fresh greens will do the trick nicely. It is a fast and healthy way to finish your dinner.
Making a Chicken Sandwich

Sometimes I am just in the mood for a sandwich. This chicken is perfect for a bun. I toast a soft roll and put some mayo on it. Then I add the chicken, a slice of tomato, and some lettuce. It is much better than any chicken sandwich you can buy at a fast food place. The crust stays crunchy even inside the bread. You can even add a slice of mozzarella cheese on top of the chicken while it is still hot to make it extra cheesy.
This is a great idea for weekend lunches. It is easy to hold and eat while you are watching a game or hanging out outside. I usually serve it with some potato chips or a few pickles. It is a very realistic meal for a busy family. If you have kids who are picky eaters, they will almost always eat a chicken sandwich. It is familiar and delicious. Just make sure the bun is big enough to hold the whole piece of chicken!
Common Questions and Tips
People often ask me if they can freeze this chicken. The answer is yes! You can bread the chicken and then freeze it before you cook it. Just put the pieces on a tray in the freezer for an hour. Once they are hard, put them in a bag. When you are ready to eat, you can cook them straight from the freezer. You just need to add a few more minutes to the cooking time. It is a great way to have a quick meal ready for a busy night.
Another tip is to always let your meat rest for a few minutes after cooking. If you cut it right away, all the juice will run out onto the plate. If you wait just three minutes, the juice stays inside. This makes the meat much more tender. I know it is hard to wait when it smells so good, but it makes a big difference. Patience is a key part of being a good cook. Now, let’s look at some common things people wonder about when making this dish.
Your Quick Cooking Guide
Can I use an air fryer?
Yes! Cook at 375 degrees for about 12-15 minutes. Flip it halfway through. It gets very crispy without using much oil.
What if I don’t have eggs?
You can use mayo or heavy cream instead. Mayo actually makes the chicken very moist and helps the crumbs stick well.
Is this gluten-free?
It can be if you use gluten-free breadcrumbs or crushed pork rinds. The Parmesan cheese is already gluten-free.
How do I store leftovers?
Keep them in a sealed container in the fridge for up to 3 days. Reheat in an oven or air fryer to keep the crunch.
Can I use chicken thighs?
Yes, but they take longer to cook. Make sure they reach an internal temperature of 165 degrees so they are safe to eat.
Enjoy Your Homemade Meal
You are now ready to make amazing Parmesan crusted chicken. Remember to use fresh cheese and the three-step breading way. Whether you fry it or bake it, it will be a hit. Enjoy your crispy and cheesy dinner with your favorite sides!