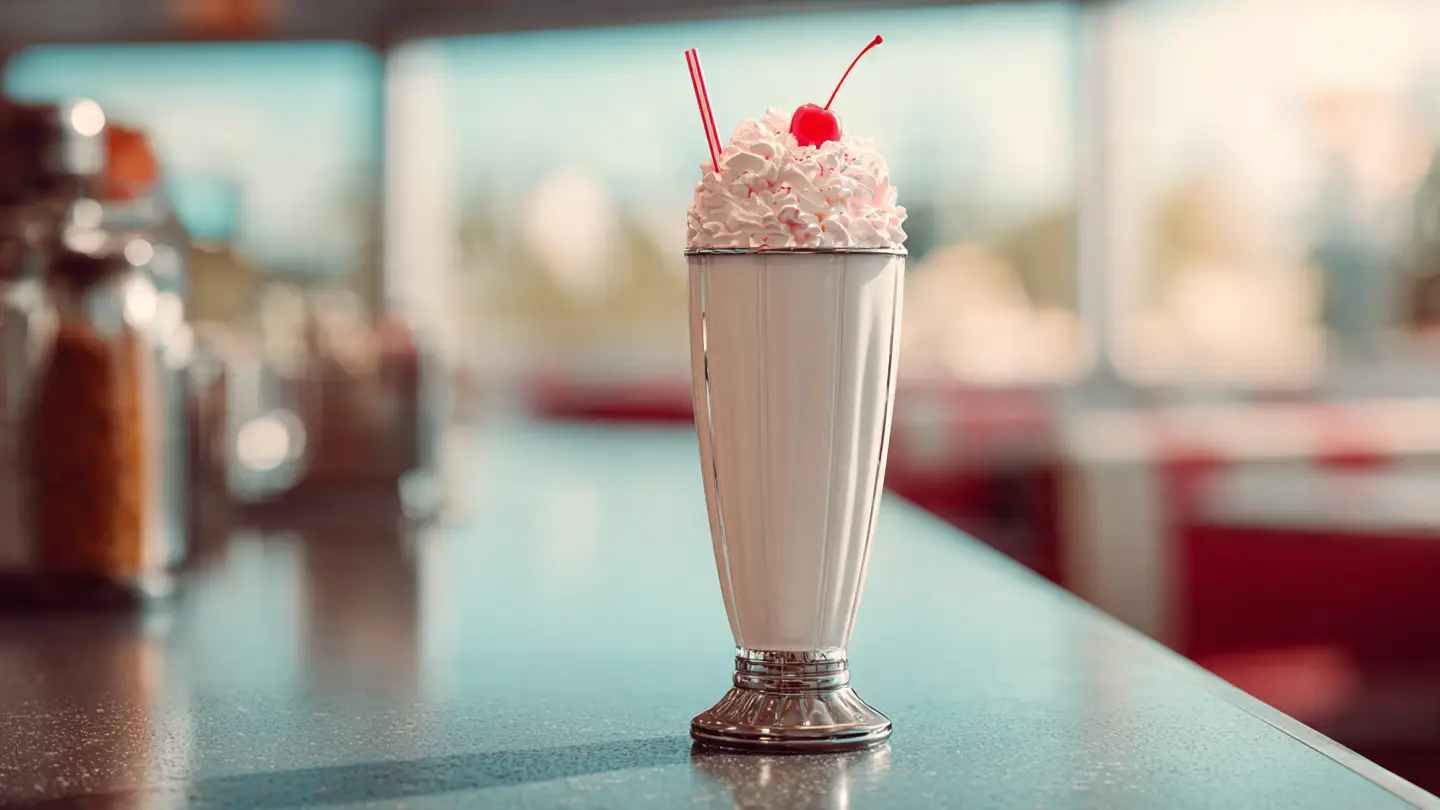
Old Fashioned Diner-Style Milkshakes
Making a great milkshake is like magic. You take cold, hard ice cream and turn it into a thick drink you can enjoy through a straw. I remember going to the local diner with my dad every Saturday. The best part was always the tall glass filled with a vanilla shake and a big cherry on top. It felt special because it was so thick and cold.
In this article, I will show you how to make that same diner-style milkshake at home. You do not need a fancy machine or a lot of money. I will teach you the right way to scoop, the right way to pour, and the secret to getting that perfect thickness every single time. It is much easier than you think once you know a few small tricks.
Are you ready to satisfy your sweet tooth? Let us get started on making the creamiest treat you have ever had in your own kitchen. Grab your blender and your favorite ice cream!
Check out my favorite tips below to get started.
The Secret to a Perfect Shake
Most people think a milkshake is just ice cream and milk thrown into a jar. While that is mostly true, the way you mix them changes everything. If you use too much milk, you get a thin soup. If you use too little, your blender might get stuck. I learned this the hard way when I tried to make my first shake at age eight. I put in a whole cup of milk and it ended up looking like white water!
The real secret is using the best ice cream you can find. Cheap ice cream has a lot of air in it. When you blend it, the air leaves and the shake becomes thin. I always look for a brand that feels heavy in my hand. That means it is dense and full of cream. This helps the shake stay thick even after it sits on the counter for a few minutes while you look for a spoon.
The Short List of Ingredients

You only need three main items to make a classic shake. I like to keep things simple because the flavor of the cream should be the star. You will need high-quality vanilla ice cream, whole milk, and a little bit of vanilla extract. Some people skip the extract, but I think it adds a nice punch that makes it taste like it came from a real restaurant.
- 3 large scoops of vanilla ice cream
- 1/2 cup of cold whole milk
- 1/2 teaspoon of vanilla extract
- Whipped cream and a cherry (optional but highly recommended)
Make sure your milk is very cold. I usually keep mine in the back of the fridge where it is the coldest. If the milk is warm, it will melt the ice cream too fast. We want to blend the ice cream, not melt it into a puddle. This recipe works best for one large shake or two small ones to share with a friend.
Steps to Blend it Right

First, take your ice cream out of the freezer. Let it sit on the counter for about five minutes. I know it is hard to wait, but this is a pro tip. If the ice cream is rock hard, you have to add too much milk to get it to move. Letting it soften just a tiny bit allows it to blend with less liquid. This keeps the shake thick and rich.
- Place three big scoops of ice cream into your blender.
- Add the 1/2 cup of milk and the vanilla extract.
- Pulse the blender on a low setting 5 to 10 times.
- Check the thickness with a long spoon.
- If it is too thick, add one tablespoon of milk and pulse again.
I once made the mistake of leaving the blender on high for a full minute. The friction from the blades actually warmed up the milk! It turned my treat into a warm latte. Now, I always use the pulse button. It breaks up the big chunks without making the whole thing too runny. You want small bits of ice cream still in there for that authentic texture.
Tips for the Best Texture

Texture is the most important part of a diner shake. If you can drink it easily through a thin straw, it might be too thin. IMO, a real shake should require a thick straw or even a long spoon. One trick I use is to chill my glass in the freezer for ten minutes before I start. This keeps the edges of the shake from melting the moment they touch the glass.
Another thing to watch out for is the type of milk you use. I always suggest whole milk because of the fat. Fat carries the flavor and keeps the bubbles small. If you use skim milk, the shake will feel icy and thin. It just won’t have that velvety feel on your tongue that makes a milkshake so good. If you are avoiding dairy, try full-fat coconut milk or a creamy oat milk instead.
Recipe Quick Info
- Prep Time: 5 minutes
- Cook Time: 0 minutes
- Servings: 1 large shake
- Difficulty: Very Easy
Fun Flavor Variations

Once you master vanilla, you can make any flavor you want. My favorite is a chocolate malt. You just add two tablespoons of chocolate syrup and one tablespoon of malt powder to the blender. It tastes like a classic candy bar. If you like fruit, you can throw in three or four frozen strawberries. Frozen fruit is better than fresh for shakes because it adds to the cold thickness without making it watery.
You can also try a cookies and cream version. Simply drop in two or three chocolate sandwich cookies after you have blended the base. Pulse it just twice so you still have big crunchy bits of cookie. This is always a hit at my house when I have guests over. You can even mix in peanut butter or a spoonful of caramel sauce if you feel like something really rich.
Serving Your Masterpiece

Presentation makes the food taste better. This is why diners use those tall, heavy glasses. When you pour your shake, leave about an inch of space at the top. This gives you room for a big swirl of whipped cream. I like to use the kind from a can for that classic look, but homemade is fine too. Don’t forget the cherry! It is the iconic finishing touch.
I always serve mine with a long metal spoon. Sometimes the shake is so thick you need to eat the top half like ice cream before you can use the straw. If you want to be extra fancy, you can drizzle chocolate or caramel sauce down the inside of the glass before you pour the shake in. It creates cool stripes that look like a professional made it. It is an easy way to impress your family.
Milkshake Pro Tips
- Cold Glass: Always freeze your glass for 10 minutes to prevent melting.
- Pulse Only: Do not run the blender on high; it creates too much heat.
- Heavy Cream: For an ultra-rich shake, swap 2 tablespoons of milk for heavy cream.
How to Store Leftovers

Honestly, milkshakes are best when they are fresh. If you leave one in the fridge, it will turn into flavored milk. If you find yourself with too much, you can pour the leftover shake into an airtight container and put it back in the freezer. It will get hard like ice cream again, but it won’t be quite the same texture as before.
When you want to eat the leftovers, let the container sit on the counter for ten minutes to soften. You can also put it back in the blender with a tiny splash of milk to bring it back to life. Another fun idea is to pour leftover shake mix into popsicle molds. They make great creamy fudge pops for later! It is a good way to make sure nothing goes to waste in your kitchen.
Common Questions About Milkshakes
Why is my milkshake so thin?
You likely used too much milk or blended it for too long. Try using more ice cream and only pulse the blender until just mixed.
Can I make a shake without a blender?
Yes! Put softened ice cream and milk in a large mason jar. Shake it very hard by hand for 2 minutes until it is smooth and creamy.
What is the best milk to use?
Whole milk is the best. It has more fat, which makes the shake taste richer and stay thicker than low-fat or skim milk options.
Can I use frozen yogurt instead?
You can, but it will be much thinner and tangier. You might need to use even less milk to keep it from becoming a smoothie.
Time to Enjoy Your Shake
You now have all the tools to make a perfect diner-style milkshake. Remember to use cold ingredients and do not over-mix. Whether you like classic vanilla or a wild cookie mix, the base is always the same. Go make a tall, cold glass of happiness today!