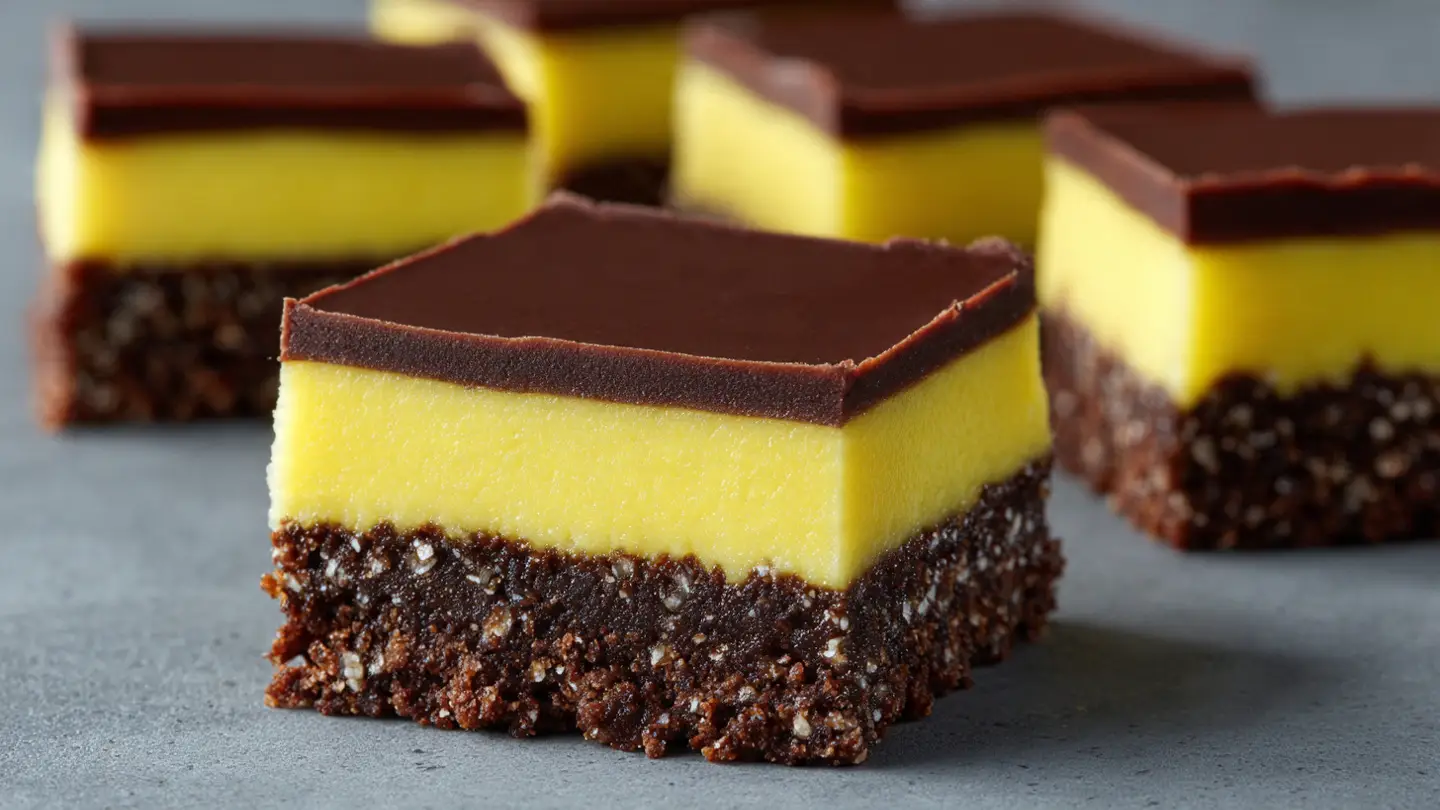
Traditional Nanaimo Bars from Canada
I love making treats that do not need an oven. Nanaimo bars are my favorite thing to make when I want something sweet and easy. These bars come from a city in Canada called Nanaimo. They have three layers that taste amazing together. The bottom is a crunchy chocolate layer with coconut and nuts. The middle is a thick yellow cream that tastes like vanilla. The top is a smooth layer of melted chocolate.
You will learn how to make each layer perfectly in this guide. I will show you the right way to mix the base so it stays together. I will also teach you how to make the custard filling so it is light and fluffy. These bars are very sweet, so a little bit goes a long way. Let us get started on this classic Canadian dessert.
Check out the steps below to make your own batch at home!
Recipe Quick Info
- Prep Time: 45 minutes
- Cook Time: 0 minutes (No-bake!)
- Servings: 16 bars
- Difficulty: Easy
Gathering Your Ingredients for Success
Before you start, you need to get all your items ready on the counter. This is a no-bake recipe, but it has a few steps. Having everything in front of you makes it much faster. I once forgot the coconut and had to run to the store halfway through. It was not fun! Make sure your butter is soft so it mixes well with the sugar and cocoa. You also need a special kind of powder for the middle layer to get that real yellow color.
The Bottom Layer Ingredients

The base is the foundation of the bar. It needs to be firm but easy to bite. You will need graham cracker crumbs for the crunch. I like to crush my own crackers in a bag with a rolling pin. It is a good way to get some energy out! You also need shredded coconut. Use the sweet kind if you like it extra sugary. Most people use unsweetened coconut to balance the rich chocolate.
Walnuts add a nice nutty taste. If you do not like walnuts, you can use pecans or just leave them out. You also need butter, sugar, and cocoa powder. These things hold the crumbs together. One time I tried to use oil instead of butter. It did not work well at all. The bars were too oily and fell apart. Stick with butter for the best results. It makes the base taste like a brownie but with more texture.
The Middle Filling Ingredients

The middle layer is what makes a Nanaimo bar special. It is a thick custard cream. You need butter, heavy cream, and a lot of powdered sugar. The secret ingredient is custard powder. In Canada, we use a brand called Bird’s Custard Powder. It gives the middle a bright yellow color and a soft vanilla flavor. If you cannot find it, you can use instant vanilla pudding mix, but the taste will be slightly different.
This layer is very thick. It should look like stiff frosting. If it is too runny, the top layer will sink into it. I always make sure my butter is very soft before I mix it. Cold butter leaves lumps in the cream. Nobody wants a lump of plain butter in their dessert! Take your butter out of the fridge an hour before you start. This simple tip makes a huge difference in how smooth the filling feels on your tongue.
The Top Chocolate Layer

The top is the simplest part but it needs care. You only need two things: chocolate and a little bit of butter. I use semi-sweet chocolate chips because they melt fast. The butter is important because it keeps the chocolate soft. If you only use chocolate, it will get very hard in the fridge. When you try to cut the bars, the hard chocolate will crack and break. Adding butter makes the chocolate bend just enough so you get a clean slice.
You can use dark chocolate if you want it less sweet. IMO, dark chocolate is actually better because the middle layer is so sugary. The bitter chocolate helps balance the whole treat. Make sure your bowl is dry when you melt the chocolate. Even one drop of water can make chocolate turn into a dry, clumpy mess. This is called seizing, and it is hard to fix. Just keep everything dry and you will be fine.
How to Make Traditional Nanaimo Bars
Making these bars is like building a house. You do it one floor at a time. Each layer needs to set in the fridge before you add the next one. This takes patience! I used to try to rush it when I was younger. I would pour the warm chocolate onto the soft middle. It just turned into a big swirl of mess. It still tasted good, but it looked terrible. Give yourself plenty of time to let each part cool down properly.
Mixing and Pressing the Base

First, you need to melt the butter, sugar, and cocoa in a big bowl over some hot water. This is called a double boiler. Once it is smooth, add a beaten egg. Stir it fast so the egg cooks into a thick sauce. Now, stir in your crumbs, coconut, and nuts. It will look like dark, wet sand. This is exactly what you want. It smells amazing at this stage!
- Line an 8-inch square pan with parchment paper. Leave some hanging over the sides so you can lift the bars out later.
- Dump the chocolate mixture into the pan.
- Press it down very hard with a spoon or the bottom of a flat cup.
- Make sure it is even in the corners.
- Put the pan in the fridge for 20 minutes to get firm.
Pressing hard is the key. If you are gentle, the base will crumble when you eat it. You want a solid block that can hold up the heavy cream and chocolate on top. I like to use a heavy glass to squash it down until it looks like a flat floor.
Whiping the Custard Filling

While the base chills, you can make the middle. Use a hand mixer or a big spoon to beat the soft butter. Add the custard powder and cream. Slowly add the powdered sugar. If you add it too fast, a big cloud of white sugar will cover your kitchen! I have done that many times. It is messy and hard to clean up. Mix until it is very smooth and thick like toothpaste.
Spread this yellow cream over your chilled base. Use a flat knife or a spatula to make the top as flat as possible. If the top is bumpy, the chocolate will look bumpy later. Once it is smooth, put the pan back in the fridge. This layer needs at least 30 minutes to get cold. It should feel firm to a light touch. If your finger leaves a deep hole, it is not ready yet. Patience is your best friend here.
Melting and Spreading the Top

The last step is the chocolate top. Melt your chocolate and butter together. You can use a microwave for 30 seconds at a time. Stir it every time so it does not burn. Once it is shiny and smooth, let it sit on the counter for a few minutes. You do not want it boiling hot when you pour it onto the cold cream. If it is too hot, it will melt the middle layer and mix together.
Pour the chocolate over the middle layer. Tilt the pan from side to side so the chocolate flows to all the corners. Do not use a knife to spread it if you can help it. Tilting makes it much smoother. Put the bars back in the fridge for at least one hour. Two hours is even better. The chocolate needs to be totally set before you try to cut them into squares. I know it is hard to wait, but it is worth it!
Pro Tips for Perfect Bars
- Hot Knife Trick: Dip your knife in hot water and wipe it dry before every cut. This keeps the chocolate from cracking.
- Room Temp: Let the bars sit on the counter for 10 minutes before cutting. This softens the chocolate just enough.
- Nut Free: You can use extra graham cracker crumbs or crushed pretzels if you have a nut allergy.
Serving and Storing Your Treats
Now that your Nanaimo bars are done, you need to know how to handle them. They are very rich, so I usually cut them into small squares. About one inch by one inch is a good size. If you make them too big, people might not be able to finish them. These are great for parties because you can make them a few days early. They actually taste better after sitting in the fridge for a day because the flavors blend together.
Best Ways to Serve

I like to serve these bars cold right from the fridge. They are soft and creamy when cold. If they sit out in a hot room for too long, the middle layer can get very soft. It might get a bit messy to eat with your fingers. They are perfect with a cup of hot coffee or a glass of cold milk. The bitterness of coffee goes so well with the sweet sugar. It is a match made in heaven!
You can also get creative with how you show them. Sometimes I sprinkle a little bit of sea salt on top of the chocolate before it sets. This makes them look fancy and cuts down on the sweetness. If you are having a party, put them in small paper cupcake liners. This makes it easy for guests to grab one without getting chocolate on their hands. It also looks like you bought them from a bakery. FYI, everyone will ask you for the recipe!
Storing for Later

Nanaimo bars keep very well. You can keep them in an airtight container in the fridge for up to two weeks. I doubt they will last that long because they are so yummy! If you want to keep them longer, you can freeze them. Put a piece of parchment paper between each layer so they do not stick together. They can stay in the freezer for three months. Just take one out whenever you have a craving.
To eat a frozen bar, just let it sit on the counter for 15 minutes. It will be the perfect texture. Some people even like to eat them frozen like a chocolate ice cream bar! One limitation to remember is that these do not travel well in a hot car. If you are taking them to a picnic, keep them in a cooler bag with an ice pack. If they melt, they turn into a chocolate soup. It still tastes good, but you will need a spoon!
Common Questions About Nanaimo Bars
Can I make these without eggs?
Yes. You can leave the egg out of the base. Just add an extra tablespoon of milk or melted butter to help the crumbs stick together. The texture will be slightly softer but still tasty.
What if I cannot find custard powder?
You can use instant vanilla pudding mix instead. Use the same amount as the recipe asks for. It won’t be as yellow, but it will still taste like vanilla cream.
Why does my chocolate top always crack?
This happens if the chocolate is too cold and hard. Make sure to add butter to the melted chocolate. Also, use a hot knife to slice them and let them sit out for 10 minutes first.
Are Nanaimo bars gluten-free?
Not usually. Graham crackers have wheat. To make them gluten-free, use gluten-free graham cracker crumbs. Double-check your custard powder too, though most are safe.
Can I use different nuts?
Yes! Almonds or pecans work great. You can also use shredded coconut only if you want to avoid nuts completely. It still adds a nice chew to the bottom layer.
Enjoy Your Canadian Treats
You now know how to make real Canadian Nanaimo bars! These three-layer treats are easy to make and taste like they came from a fancy shop. Remember to press the base hard and let the layers cool. This is a great recipe to share with friends and family. I hope you love making them as much as I do. Happy snacking!