Rustic Berry Galette: An Easy Free-Form Pie
Making a pie can feel very scary. I used to worry about the crust breaking or the bottom getting soggy. Then I found the galette. It is a French word for a flat cake, but really, it is just a lazy pie. You do not need a special pan. You just roll out the dough, pile on the fruit, and fold the edges over. It looks fancy because it looks messy. People call it rustic, which is a nice way to say it is not perfect. I love that because I am not perfect either.
In this guide, I will show you how to make a berry galette from start to finish. You will learn how to make a flaky crust that does not fall apart. We will talk about how to keep the fruit juice from leaking everywhere. By the end, you will have a warm, golden dessert that smells like a dream. If you can use a rolling pin, you can do this. Let us get into the kitchen and start baking something sweet.
Check out the steps below to make your own berry treat!
The Basics of a Great Galette
Before we grab the flour, we need to know why this recipe works. A galette is different from a regular pie. A pie sits inside a deep dish with high walls. A galette sits right on a flat baking sheet.
This means the oven heat hits the crust from all sides. It gets much crispier than a pie in a tin. It is the best choice for beginners who want a win. I remember the first time I made one; I forgot to chill the dough, and it turned into a puddle. Lesson learned: keep things cold!
What You Will Need

The list of things you need is short. Most of these are likely in your kitchen right now. I like to use fresh berries when they are in season because they taste like sunshine. If it is winter, you can use frozen ones, but do not let them thaw first.
The crust needs fat to be flaky. I always use unsalted butter so I can control the salt myself. A little bit of sugar goes into the dough and the fruit to make it pop. You also need a tiny bit of cornstarch. This is the secret glue that turns fruit juice into a thick syrup so the crust stays dry.
- 1 ½ cups all-purpose flour
- 1 stick of cold unsalted butter (cut into small cubes)
- 2 tablespoons granulated sugar (plus more for topping)
- ½ teaspoon salt
- ¼ cup ice-cold water
- 3 cups mixed berries (blueberries, raspberries, or blackberries)
- 1 tablespoon cornstarch
- 1 egg (for the egg wash)
How to Make the Perfect Crust

The crust is the most important part of the galette. To get those flaky layers, you must keep the butter cold. If the butter melts before it hits the oven, the crust will be tough. I use my fingers to pinch the butter into the flour. You want the bits of butter to look like small peas. Some people use a food processor, but I think it is too easy to over-mix it that way. If the dough looks like wet sand, you went too far. Stop while you still see chunks of butter. It feels wrong, but it is actually right.
Once the butter is mixed in, add the ice water one tablespoon at a time. I usually only need about four tablespoons. You want the dough to just hold together when you squeeze it. Wrap it in plastic and put it in the fridge for at least thirty minutes. This rest time lets the flour soak up the water. It also makes the dough easier to roll out later. IMO, skipping the fridge rest is the biggest mistake you can make. It makes the dough sticky and hard to handle. Be patient and let it chill.
Preparing the Berry Filling

Berries are great because they don’t need much work. You don’t have to peel them like apples or pit them like cherries. Just wash them and pat them very dry. If they are wet, the crust will get soggy. I like to use a mix of whatever looks good at the store. Blueberries add a nice pop, while raspberries give a tart kick. Toss them in a bowl with sugar and cornstarch. The sugar draws out the juice, and the cornstarch makes sure that juice stays inside the galette instead of running all over your pan.
Sometimes I add a little lemon zest or a splash of vanilla. It makes the berries taste even more like berries. Be careful not to add too much sugar. If the fruit is very sweet, you only need a little bit. You want to taste the fruit, not just a sugar cube. If you are using frozen berries, toss them with an extra teaspoon of cornstarch. They tend to release more water than fresh ones. This little trick has saved many of my desserts from becoming a berry soup on a tray.
Putting It All Together
Now comes the fun part where the galette takes shape. You get to be an artist here. There is no wrong way for a galette to look. If the edges are jagged, it just looks more rustic. If a little juice leaks out, it turns into a chewy candy on the edges. I actually like when that happens! My first galette looked like a smashed hat, but my family still ate every crumb. Don’t worry about making it a perfect circle. A weird oval tastes just as good as a perfect round shape. Let us roll out the dough and get baking.
Rolling and Folding the Dough

Take your chilled dough out of the fridge. Put it on a piece of parchment paper. This paper is a lifesaver. It stops the dough from sticking and makes it easy to move to the pan. Roll the dough out until it is about twelve inches wide. It should be thin, like a pancake. Pile the berries right in the middle. Leave about two inches of empty dough all around the edge. This is your folding zone. If you put fruit all the way to the edge, you won’t be able to close it up.
Now, gently fold the edges of the dough over the berries. You will need to pleat the dough as you go. Just fold one piece over the next until you have a nice border. The center of the fruit should still be showing. It is like the berries are wearing a little dough coat. Press down lightly on the folds to make sure they stick. If the dough cracks, just pinch it back together. This is a very forgiving recipe. It won’t hold a grudge if you make a mistake.
The Final Golden Touch

Before the galette goes into the oven, we need to make it shine. Beat one egg with a splash of water. Use a brush to paint this egg wash onto the dough border. This is what makes the crust turn a beautiful golden brown. Without it, the crust looks pale and dusty. After the egg wash, sprinkle some coarse sugar over the dough. This adds a nice crunch when you take a bite. It also looks very pretty, like little diamonds on the crust.
Slide the parchment paper with the galette onto a large baking sheet. Bake it at 400 degrees for about 30 to 35 minutes. You are looking for two things: the crust must be dark golden, and the berry juice should be bubbling in the center. If the juice is not bubbling, the cornstarch has not done its job yet. I once took a galette out too early, and the middle was a watery mess. Let it cook until it looks ready. Your nose will tell you when it is close!
Step-by-Step Cooking Guide

Preheat your oven to 400 degrees. Line a flat baking sheet with parchment paper.
Mix flour, sugar, and salt in a large bowl. Pinch in the cold butter until it looks like crumbs.
- Add ice water slowly until the dough forms a ball. Wrap and chill for 30 minutes.
- In a separate bowl, toss berries with sugar and cornstarch.
- Roll out dough on parchment paper into a 12-inch circle.
- Place berries in the center and fold the edges inward.
- Brush dough with egg wash and sprinkle with sugar.
- Bake for 35 minutes until golden and bubbling. Let cool before slicing.
Baker Secrets
Keep it Cold: If the dough gets too warm while you are working, put the whole tray in the fridge for 10 minutes before baking.
Fruit Swap: You can use sliced peaches or plums instead of berries. Just slice them thin.
Bottom Heat: Bake on the lowest rack of the oven to make sure the bottom crust gets extra crispy.
Serving Suggestions

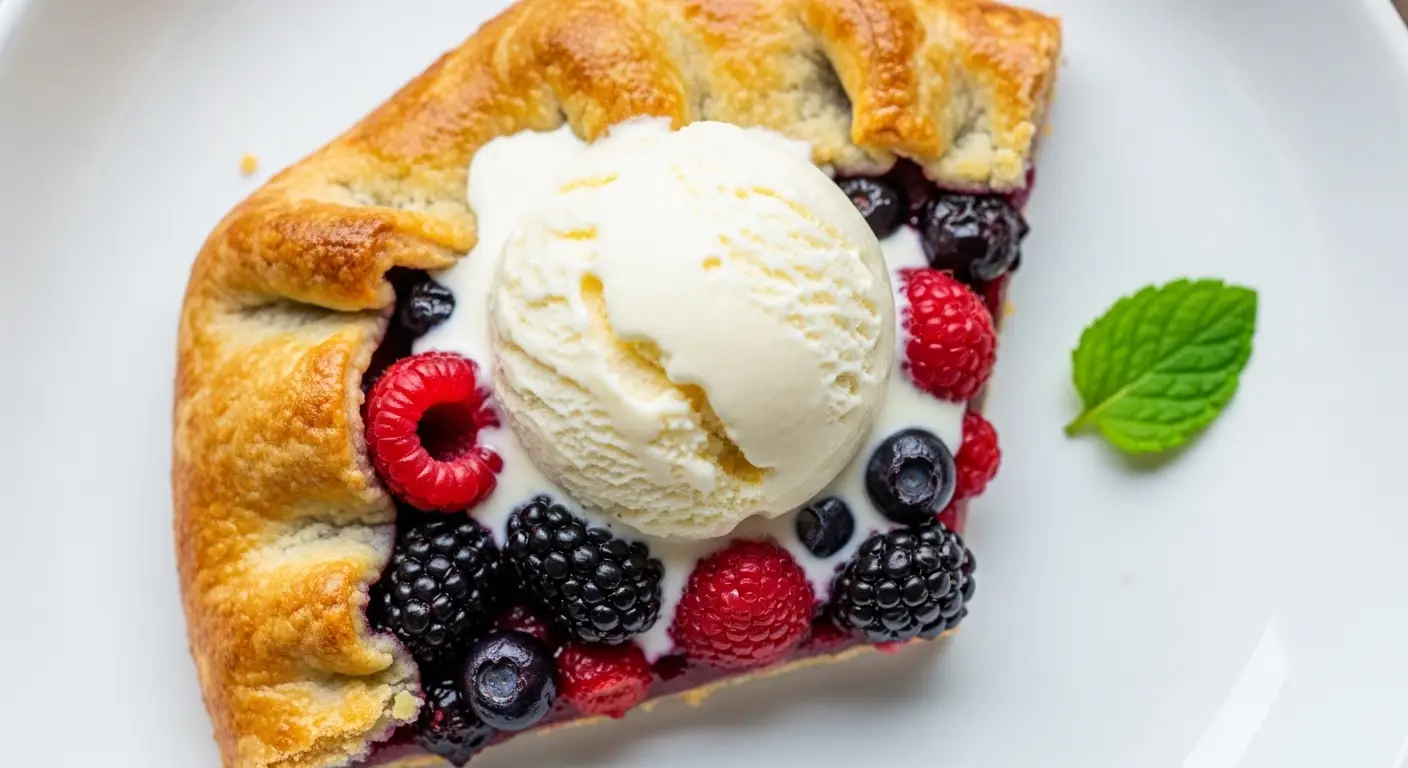
A galette is best when it is still a little warm. The crust is at its crispiest right after it cools down for about fifteen minutes. If you cut it too soon, the juices will run everywhere. Let it sit! I love to serve mine with a big scoop of vanilla ice cream. The cold cream melts into the warm berry juice and creates a wonderful sauce. If you don’t like ice cream, a dollop of whipped cream or even a spoonful of Greek yogurt works well too.
This dessert is great for a casual dinner with friends. You don’t need fancy plates or forks. You can even cut it into wedges and eat it with your hands like a slice of pizza. FYI, it also makes a great breakfast the next morning with a cup of coffee. The crust loses some crunch after a day, but the flavors soak into the dough and make it taste like a berry muffin. It is a very versatile treat that everyone seems to love.
Common Questions About Galettes
Can I use store-bought pie dough?
Yes, you can. It saves time and works well. Just make sure to roll it out a bit thinner and follow the same folding steps. It will still taste great!
Why did my galette leak juice?
This usually happens if the dough has a small hole or if you didn’t use enough cornstarch. Don’t worry, the leaked juice turns into a tasty jam on the pan.
Can I make this ahead of time?
You can make the dough two days early. You can also assemble the galette and keep it in the fridge for a few hours before baking it fresh for dinner.
How do I store leftovers?
Keep leftovers in an airtight container at room temperature for one day or in the fridge for up to three days. Reheat in the oven to get the crust crisp again.
Is this recipe vegan?
Not as written, but you can use vegan butter and a milk wash instead of an egg wash. It works almost exactly the same way.
Enjoy Your Rustic Creation
You have now learned how to make a beautiful, rustic berry galette. It is a simple dessert that looks like it came from a fancy bakery. Remember to keep your butter cold and don’t worry about making it perfect. The messy parts are what make it special. I hope you enjoy every flaky, fruity bite of your homemade treat. Happy baking!