Quick and Easy Breakfast Quesadillas for Kids
Mornings at my house used to be very loud and very messy. I would try to make big pancakes or fancy oatmeal, but my kids just wanted to play or sleep. Most of the time, we ended up eating dry cereal while running out the door. I knew I needed a change that was fast and kept everyone full until lunch time. That is how I started making these cheesy breakfast quesadillas. They are simple, warm, and you can hold them with one hand.
In this guide, I will show you how to make the best breakfast quesadilla in under ten minutes. You will learn what ingredients to keep in your fridge and how to cook them so they are crunchy on the outside and gooey on the inside. These have become my go-to meal because they use basic stuff I already have in the kitchen. Even if you are not a great cook, you can master this dish today.
Ready to make your morning routine much smoother? Let’s get cooking!
Why This Recipe Works for Busy Parents
I love this recipe because it is very flexible. If you run out of one thing, you can usually swap it for something else. It also works for kids who are picky about their food. You can hide little bits of spinach or peppers inside the cheese, and they usually won’t even notice. It is a great way to get some protein into their bellies before they head off to school or daycare.
The best part is that you only need one pan. I hate doing dishes, and cleaning up five pots before 8:00 AM is my idea of a nightmare. With this meal, you just wipe out the skillet and you are done. It is a win for the kids because it tastes like a grilled cheese sandwich, and a win for me because it is so fast. FYI, you can even make the filling the night before to save more time.
Recipe Quick Info
- Prep Time: 5 minutes
- Cook Time: 5 minutes
- Servings: 2 kids
- Difficulty: Very Easy
The Simple Ingredients You Need

To start, you need some basic items from your pantry and fridge. I always keep a big bag of flour tortillas in my freezer. They thaw out in just a few seconds. For the cheese, I like to use mild cheddar because it melts well and kids love the bright orange color. You can also use mozzarella if you want that long, stretchy cheese pull that looks so good in photos.
You will also need eggs. Two large eggs are usually enough for two small quesadillas. I add a tiny splash of milk to my eggs to make them extra fluffy. For the filling, I use whatever is left in the fridge. Sometimes it is ham, sometimes it is leftover bacon from Sunday breakfast. If your kids like veggies, you can chop up some mild bell peppers or onions very small. Just make sure everything is pre-cut so you aren’t rushing while the pan is hot.
Essential Kitchen Tools

You do not need a lot of fancy gear for this. My favorite tool is a 10-inch non-stick skillet. This is important because eggs love to stick to metal pans, and that makes a huge mess. A good non-stick surface lets the quesadilla slide right out onto the plate. I also use a wide, flat spatula. This helps you flip the tortilla without all the eggs falling out of the sides.
I also suggest using a small whisk or even just a fork to beat your eggs. You want them to be one solid color with no streaks of clear egg white showing. This ensures the filling cooks evenly. I once tried to just crack the eggs directly onto the tortilla, but it was a disaster. The yolk stayed in one spot and the edges got too crispy. Trust me, mixing them in a bowl first is the way to go.
Step-by-Step Cooking Guide

- Whisk your eggs in a small bowl with a pinch of salt and pepper.
- Heat your non-stick skillet over medium heat and add a tiny bit of butter or oil.
- Pour the eggs into the pan and move them around with your spatula until they are mostly cooked but still a little wet.
- Remove the eggs from the pan and set them on a plate for a moment.
- Wipe the pan clean and lay one tortilla down. Sprinkle a layer of cheese over the whole thing.
- Spread the cooked eggs and any extra toppings (like ham) over one half of the tortilla.
- Fold the tortilla in half and press down gently with your spatula.
- Cook for 2 minutes on each side until the cheese is melted and the outside is crunchy.
The secret here is the double-cook method. By cooking the eggs first, you make sure they are safe to eat without burning the bread. I used to try cooking the egg inside the folded tortilla, but the bread always got black before the egg was done. Doing it in two fast steps makes it perfect every time. My kids call it the “Crunchy Cloud” sandwich because of how the textures feel.
Adding Fun and Healthy Fillings

Once you know the basics, you can get creative. My daughter loves it when I add black beans and a little bit of corn. It feels like a taco but stays together better. If you want to be sneaky with health, try chopping spinach very fine. When it hits the hot cheese, it wilts down and almost disappears. Most kids won’t even taste it because the cheddar is so strong.
Another idea is to make a sweet and salty version. You can use a tiny bit of cream cheese instead of cheddar and add very thin slices of apple. It sounds strange, but the crunch of the apple with the soft egg is actually very tasty. IMO, the more colors you add, the more likely kids are to try it. I tell my kids we are making a “Rainbow Breakfast” and they get excited to see what is inside.
Pro Kitchen Tips
- Don’t Overfill: If you put too much stuff inside, the quesadilla will burst when you flip it. Stick to a thin layer.
- Low Heat is Key: If the pan is too hot, the tortilla burns before the cheese melts. Keep it on medium or low-medium.
- The Butter Trick: Swipe a cold stick of butter across the hot tortilla while it is in the pan for a diner-style crust.
Serving Suggestions for Kids

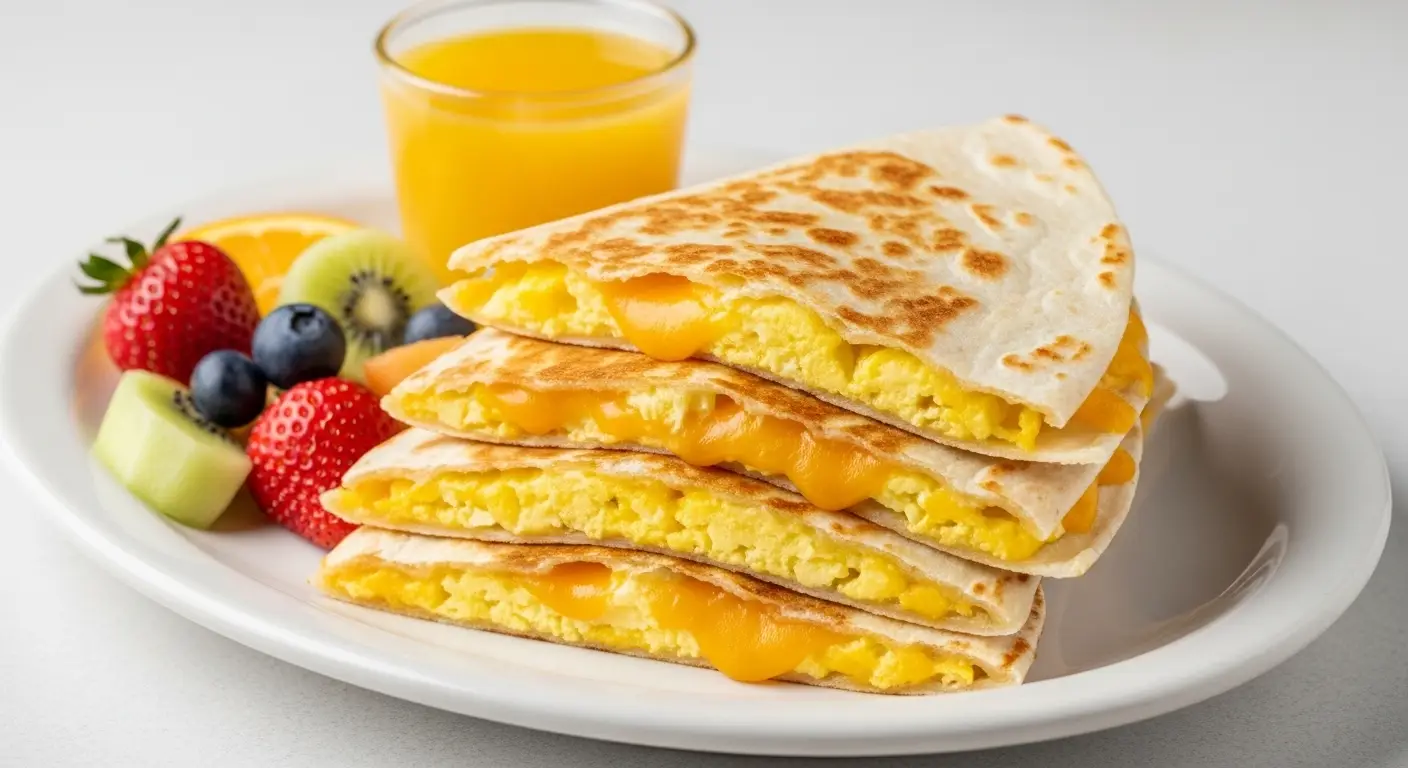
How you serve the food is just as important as how you cook it. I always cut the quesadillas into small triangles using a pizza cutter. It is much faster than a knife and makes perfectly straight edges. Triangles are easier for small hands to pick up and dip. Speaking of dipping, I usually put a small dollop of sour cream or mild salsa on the side. If your kids don’t like spice, plain Greek yogurt is a great healthy swap for sour cream.
I also like to add some fruit to the plate to make it a full meal. Sliced strawberries or grapes work well because they provide a sweet contrast to the salty cheese. Sometimes I even use a cookie cutter to turn the quesadilla into fun shapes like stars or hearts. It takes an extra ten seconds, but the look on my kids’ faces makes it worth it. A happy kid is a kid who finishes their breakfast!
Storage and Reheating Tips

You can actually make a big batch of these on Sunday and keep them in the fridge for three days. To store them, let them cool down completely on a wire rack first. If you put them in a bag while they are still hot, the steam will make them soggy. I wrap each one in a paper towel and then put them in a plastic bag. This keeps the moisture away from the tortilla.
When it is time to eat, don’t use the microwave if you want them to stay crunchy. A microwave makes the bread soft and chewy like rubber. Instead, pop them in a toaster oven for three minutes or back into a dry skillet for a minute on each side. It brings back that fresh-cooked crunch in no time. This is a huge help on those mornings when I oversleep and only have five minutes to get everyone out the door.
Avoiding Common Mistakes

The biggest mistake people make is using too much oil. You only need a tiny bit to stop the egg from sticking. If the tortilla sits in a pool of oil, it gets greasy and heavy. Another mistake is using the giant burrito-sized tortillas. These are way too big for kids and hard to flip in a standard pan. Stick to the small “street taco” size or the medium “fajita” size. They are much easier to handle.
Lastly, make sure you don’t use pre-shredded cheese that has too much white powder on it. Some brands put potato starch on the cheese to keep it from sticking in the bag. This can stop the cheese from melting smoothly. I prefer to grate my own cheese from a block when I have time, but if you are in a rush, just look for a high-quality shredded brand. If your cheese isn’t melting, try putting a lid on the pan for thirty seconds to trap the heat.
Your New Morning Best Friend
I hope these tips help you reclaim your morning. Cooking for kids doesn’t have to be a battle. When you have a recipe that is this fast and this tasty, everyone starts the day in a better mood. I have learned that the best meals aren’t the ones that take hours to make. They are the ones that bring the family together at the table without any stress. Grab your skillet and give this a try tomorrow morning!
Common Questions About Breakfast Quesadillas
Can I make these vegan?
Yes! Use a plant-based cheese that melts well and swap the eggs for a tofu scramble or a liquid plant egg. It works just as well.
What if I don’t have a non-stick pan?
You can use a stainless steel pan, but you will need to use more butter or oil to keep the eggs from sticking. Heat it up well before adding the eggs.
Are these good for cold school lunches?
They are safe to eat cold, but they lose their crunch. Most kids still like the cheesy taste even when they aren’t hot.
Can I use corn tortillas instead?
You can, but corn tortillas break more easily when you fold them. Warm them up first so they are soft before you try to bend them.
How do I stop the filling from falling out?
Put a little cheese on the very bottom and the very top of the filling. The cheese acts like glue to hold the tortilla shut.
Start Your Morning Right
Breakfast quesadillas are the perfect mix of fast, healthy, and fun. You can change the fillings every day so your kids never get bored. With a crispy outside and a warm, cheesy inside, it is a meal that will make everyone smile. Give it a go!