Refreshing Watermelon Sorbet Without Added Refined Sugar
Summer heat can feel very heavy. When the sun is high and the air is hot, nothing feels better than a cold treat. Most ice cream has a lot of milk and white sugar. This can make some people feel slow or heavy after eating it. That is why I love making fruit sorbet at home. It is cold, light, and very sweet. The best part is that it only uses fruit. You do not need to buy bags of white sugar to make this taste great.
Watermelon is the star of this show. It is mostly water, which helps you stay hydrated. It also has a natural sweetness that gets even better when you freeze it. In this guide, I will show you how to turn a big melon into a smooth dessert. You do not even need a fancy ice cream machine. Just a simple blender and a freezer will do the job. My kids ask for this every time we have a backyard party. It is easy on the wallet and good for the body.
Get your blender ready and let us look at what you need to make this happen.
Picking the Best Fruit and Tools
Before you start cutting, you need the right melon. Not every watermelon is the same. Some are crunchy and sweet, while others can be mushy or tasteless. Since we are not adding extra sugar, the fruit must be perfect on its own. Look for a melon that feels heavy for its size. This means it is full of juice. A heavy melon is usually a sweet melon. Check the bottom for a yellow spot. That spot shows where it sat on the ground to ripen in the sun. If the spot is white or green, it was picked too early. It will not be sweet enough for sorbet.
You also need a good blender or food processor. A high-speed blender makes the smoothest sorbet. If your blender is older, you might need to stop and stir it a few times. That is totally fine! I once tried to use a tiny smoothie maker, and it got stuck. I learned that day to cut the fruit into very small pieces first. Small pieces are much easier for any machine to handle. If you have a large tray for your freezer, that will help too. Spreading the fruit out helps it freeze faster and more evenly.
The Short List of Ingredients

You do not need much to make this sorbet. In fact, you might already have everything in your kitchen right now. The main thing is the watermelon. I suggest getting a seedless one if you can. It saves a lot of time. If you have a melon with black seeds, you must take them all out first. Eating a frozen seed is not a fun surprise! The lime juice is there to make the flavor pop. It adds a little zing that balances the sweetness of the fruit. I also like to keep a bit of honey or maple syrup nearby. Sometimes a melon is just not as sweet as I hoped. A tiny drizzle of natural syrup can fix that quickly.
- 6 cups of fresh watermelon cubes (seeds removed)
- 2 tablespoons of fresh lime juice
- 1 tablespoon of honey or maple syrup (only if the melon is not sweet)
- A tiny pinch of sea salt to bring out the flavor
- Fresh mint leaves for garnish (optional but pretty)
How to Prep Your Watermelon

The first step is cutting the fruit. I always start by cutting the melon in half. Then I cut those into long strips. Use a sharp knife to peel the green skin off. You only want the bright red part. Cut the red fruit into cubes about one inch big. If they are too big, they are hard to blend. If they are too small, they turn into mush too fast. I once made the mistake of freezing a whole half-melon. It took hours to thaw enough to cut! FYI, always cut before you freeze. It makes your life much easier and saves your arm muscles from hard work.
Once you have your cubes, put them on a flat tray. I like to use a baking sheet with paper on it. Make sure the cubes do not touch each other too much. If they stick together, they form a giant ice brick. Put the tray in the freezer for at least four hours. I usually leave mine overnight. When the cubes are hard like ice, they are ready. You can test one by trying to squeeze it. If it does not move, it is ready for the blender. This freezing step is what gives the sorbet its thick, icy texture without needing a machine to churn it.
Step-By-Step Blending Instructions

Now comes the fun part. Take your frozen cubes out of the freezer. Let them sit on the counter for about five minutes. This lets them soften just a tiny bit so your blender does not break. Put the cubes into the blender. Add your lime juice and the tiny pinch of salt. If you think you need it, add your honey now too. Start the blender on a low speed. You will hear a lot of noise as the blades hit the ice. This is normal! Use a spoon or a tamper to push the fruit down toward the blades. Make sure the blender is OFF when you do this! Safety is important in the kitchen.
- Place frozen cubes into the blender or food processor.
- Add lime juice and any natural sweetener you like.
- Pulse the blender 5-10 times to break up the large chunks.
- Turn to medium speed and blend until the mixture looks like thick slush.
- Stop and scrape the sides with a spatula to make sure every piece is smooth.
- Blend one last time on high for 20 seconds until it looks like soft-serve ice cream.
If the mixture is too thick and won’t move, add one tablespoon of water or orange juice. Don’t add too much! You want sorbet, not a drink. When it looks smooth and pink, you are done. It should be thick enough to stay on a spoon when you hold it upside down. IMO, this is the best moment because you get to taste the first spoonful right out of the jar. It is so fresh and cold.
Tips for the Best Texture

Sometimes sorbet can get too hard in the freezer. Since there is no fat or cream, it freezes into a solid block. To keep it soft, you can add a tiny bit of fruit juice with a high sugar content, like pineapple juice. The natural sugar acts like an anti-freeze. Another trick is to blend it twice. If you have leftovers that got too hard, just toss them back in the blender for a minute. It will become creamy again instantly. I learned this the hard way when I tried to chip away at a frozen bowl with a fork. It was like hitting a rock! Just a quick re-blend makes it perfect again.
If you want a really fancy texture, you can add half of a frozen banana. You won’t really taste the banana, but it makes the sorbet feel more like real ice cream. This is great for kids who might miss the creamy feel of dairy. Also, try to use the sorbet within a week. Because it has no chemicals or preservatives, the color might fade after a few days. It still tastes good, but it looks best when it is fresh and bright pink. Always store it in a container with a tight lid to keep out smells from the fridge.
Recipe Quick Info
- Prep Time: 15 minutes (plus freezing time)
- Cook Time: 0 minutes
- Servings: 4 people
- Difficulty: Easy
Serving Suggestions and Toppings

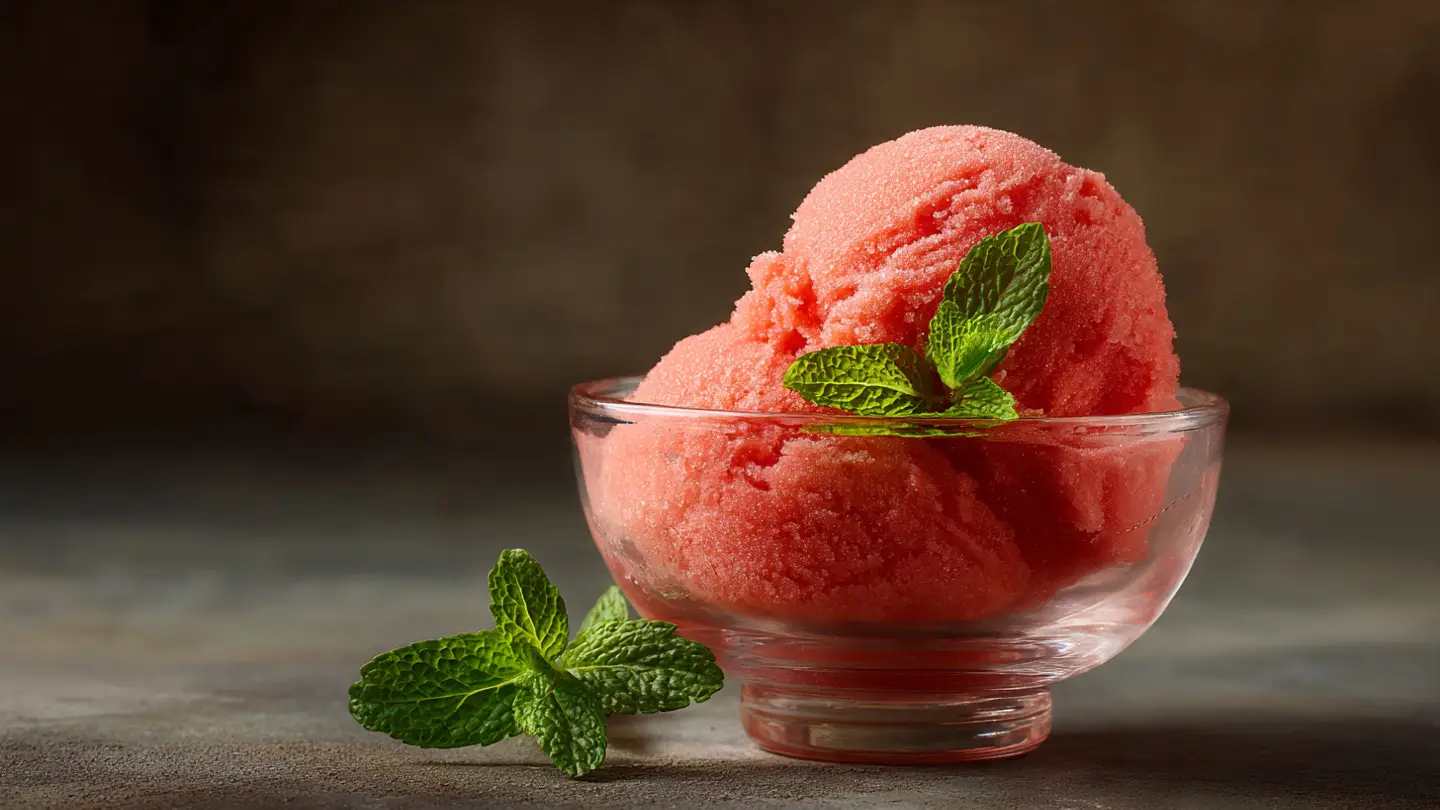
How you serve this treat is up to you! I love putting a few scoops into a cold bowl. If you want to be fancy, you can use a hollowed-out watermelon half as a bowl. This looks amazing at a party. For toppings, keep it simple. Fresh mint leaves add a cool smell and look great against the pink. You could also sprinkle a little bit of chili powder or lime zest on top. Some people like a little heat with their sweet! It sounds strange, but the salt and spice make the watermelon taste even stronger. It is a very popular way to eat fruit in many warm countries.
Another idea is to make sorbet floats. Put a scoop of sorbet into a glass and pour some bubbly water over it. It makes a fizzy, fruity drink that is very refreshing. If you are having a fancy dinner, you can serve a small scoop between meals. This cleans the palate, which is just a fancy way of saying it clears your taste buds for the next food. No matter how you eat it, make sure to serve it fast. Without sugar and chemicals, this sorbet melts quicker than the stuff you buy at the store. It is meant to be enjoyed right away!
Ways to Change the Flavor

You do not have to stick to just watermelon. This recipe is like a base for many ideas. You can mix other fruits in with the melon. Strawberries are a great choice. They match the color and add a different kind of sweetness. Raspberries are also good but they have seeds. If you use raspberries, you might want to strain the juice first. I once tried mixing in blueberries, and the color turned a bit gray. It tasted fine, but it didn’t look as pretty. Stick to red or orange fruits for the best look. Mango and watermelon are a match made in heaven.
You can also play with herbs. If you don’t like mint, try basil. It sounds like it belongs in pasta, but basil and watermelon are actually best friends. Just blend a few leaves in with the fruit. It gives the sorbet a fresh, earthy taste. If you like things sour, add more lime or even some lemon. The beauty of this recipe is that you can taste it as you go. Add a little, blend, and taste. You are the boss of your blender! This is a great way to use up fruit that is getting a little too soft to eat plain. Never throw away fruit when you can freeze it and turn it into sorbet.
Keeping Your Sorbet Fresh
Once you make your sorbet, you might have some left over. Storing it the right way is key. You want to keep the air out. Air is what causes ice crystals to grow on top of your food. I like to press a piece of wax paper right onto the surface of the sorbet before putting the lid on. This keeps it smooth and prevents that crunchy ice layer. If you have small kids, you can even pour the blended mix into popsicle molds. This makes it a grab-and-go snack that is much healthier than the sugary popsicles from the grocery store.
Pro Storage Tips
- Use Flat Containers: Sorbet stays at a better texture in a shallow, flat dish than a deep bowl.
- The Thaw Rule: Let the container sit on the counter for 10 minutes before scooping for the best feel.
- Double Blend: If it gets too icy, throw it back in the blender for 30 seconds to fix the texture.
Remember that this treat is a “limited time offer” in your freezer. Since it is just fruit and juice, it doesn’t have the stabilizers that store-bought tubs have. It is best eaten within 5 to 7 days. After that, it might start to lose its bright flavor. But honestly, in my house, it never lasts more than two days anyway! It is just too good to sit there. If you find yourself making it often, keep a bag of frozen watermelon cubes in the freezer at all times. That way, you are always only five minutes away from a healthy dessert.
Common Questions About Fruit Sorbet
Can I use a different fruit instead of watermelon?
Yes! You can use cantaloupe, mango, or pineapple. Just make sure the fruit is very ripe and sweet before you freeze the pieces.
Why is my sorbet grainy and not smooth?
This usually happens if the fruit pieces were too large or not frozen solid. Try blending it longer or adding a tiny bit of juice to help the blades spin.
Is this sorbet okay for people who don’t eat dairy?
Absolutely. There is no milk, cream, or butter in this recipe. It is 100% plant-based and safe for vegans or people with milk allergies.
Do I have to use lime juice?
The lime juice helps keep the color bright and adds flavor. If you don’t have lime, you can use lemon juice or just skip it, but the taste might be a bit flat.
How do I make it sweeter without using sugar?
You can add a very ripe banana, a few drops of liquid stevia, or a tablespoon of honey. Choosing a very ripe watermelon is the best way to get natural sweetness.
Cool Down with Nature’s Candy
This watermelon sorbet is a simple way to enjoy summer. It uses real fruit to give you a sweet treat that feels good to eat. You don’t need a lot of money or fancy tools to make something delicious. Just freeze, blend, and enjoy your healthy snack!