Salami Cream Cheese Roll Ups
Are you looking for a snack that is fast and tastes great? I have the best recipe for you today. These salami cream cheese roll ups are a huge hit at every party I host. They are salty, creamy, and have a little crunch if you add a pickle. You only need a few things from the store to make them. They are perfect for kids and adults alike.
I first made these when I was in a rush for a school lunch. I realized that simple food is often the best food. You do not need to spend hours in the kitchen to make something that people will love. These little rolls look fancy on a plate but they are very easy to put together. I will show you exactly how to make them so they stay together and taste fresh.
By the end of this page, you will know the best way to spread the cheese and how to pick the right meat. You will also learn how to keep them from getting soggy in the fridge. These are great for game day, picnics, or just a quick bite after work. Let us get started with this simple snack! Check out my tips below to make them perfectly every time.
Recipe Quick Info
- Prep Time: 10 minutes
- Cook Time: 0 minutes
- Servings: 24 rolls
- Difficulty: Very Easy
What You Need for Salami Roll Ups
Before you start making these snacks, you need to gather your items. I like to keep things very simple. You only need three main things to make the basic version of this recipe. If you want to get fancy, you can add more, but the basics are always a win. I always make sure my ingredients are cold before I start because it makes the job much cleaner.
The Ingredients List

To make these rolls, you need specific types of food. I find that thin meat works much better than thick slices. If the meat is too thick, it will crack when you try to roll it up. Here is exactly what I use for my family.
- 12 to 15 slices of large deli salami (Italian or hard salami works best)
- 1 block of full-fat cream cheese (8 ounces)
- 12 small dill pickles or cornichons
- A sprinkle of dried oregano or black pepper (optional)
I suggest using the block of cream cheese rather than the kind in a tub. The tub kind is too soft and might leak out the sides. The block stays firm and keeps the roll together. You can also use flavored cream cheese if you want to skip the extra spices. Chive and onion flavor is a personal favorite of mine when I want more zing. FYI, make sure the salami is not too greasy or the cheese won’t stick!
Choosing the Best Salami

Not all salami is the same. I once bought the very cheap kind that was very oily. It was a big mistake because the cream cheese just slid right off the meat. Now, I always look for dry-aged salami or a good hard salami from the deli counter. It has a better salt level and stays flat when you spread the cheese on it.
The size of the slice matters a lot. You want slices that are about four or five inches wide. This gives you enough room to roll it at least twice. If the slices are too small, they will just be tiny bites that fall apart. Large circles are the way to go for the best looking snack tray. If you can, ask the person at the deli to slice it thin but not so thin that you can see through it.
How to Make Salami Roll Ups Step by Step
Making these is very easy, but there is a trick to getting them right. If you just slap the cheese on and roll, they might look messy. I have learned a few ways to make them look like they came from a professional caterer. It is all about the temperature of the cheese and the way you move your hands. Let me walk you through my process.
Step by Step Instructions

Follow these steps to get a perfect result every time. I like to set up a small station on my counter so I can work fast. This keeps the meat cold while I work. Here is the best way to do it:
- Take the cream cheese out of the fridge about 20 minutes before you start. It needs to be a little soft but still cool.
- Lay one slice of salami flat on a clean plate or cutting board. Pat it dry with a paper towel if it looks shiny or wet.
- Use a butter knife to spread about one tablespoon of cream cheese over the whole slice. Leave a tiny bit of space at the very top edge.
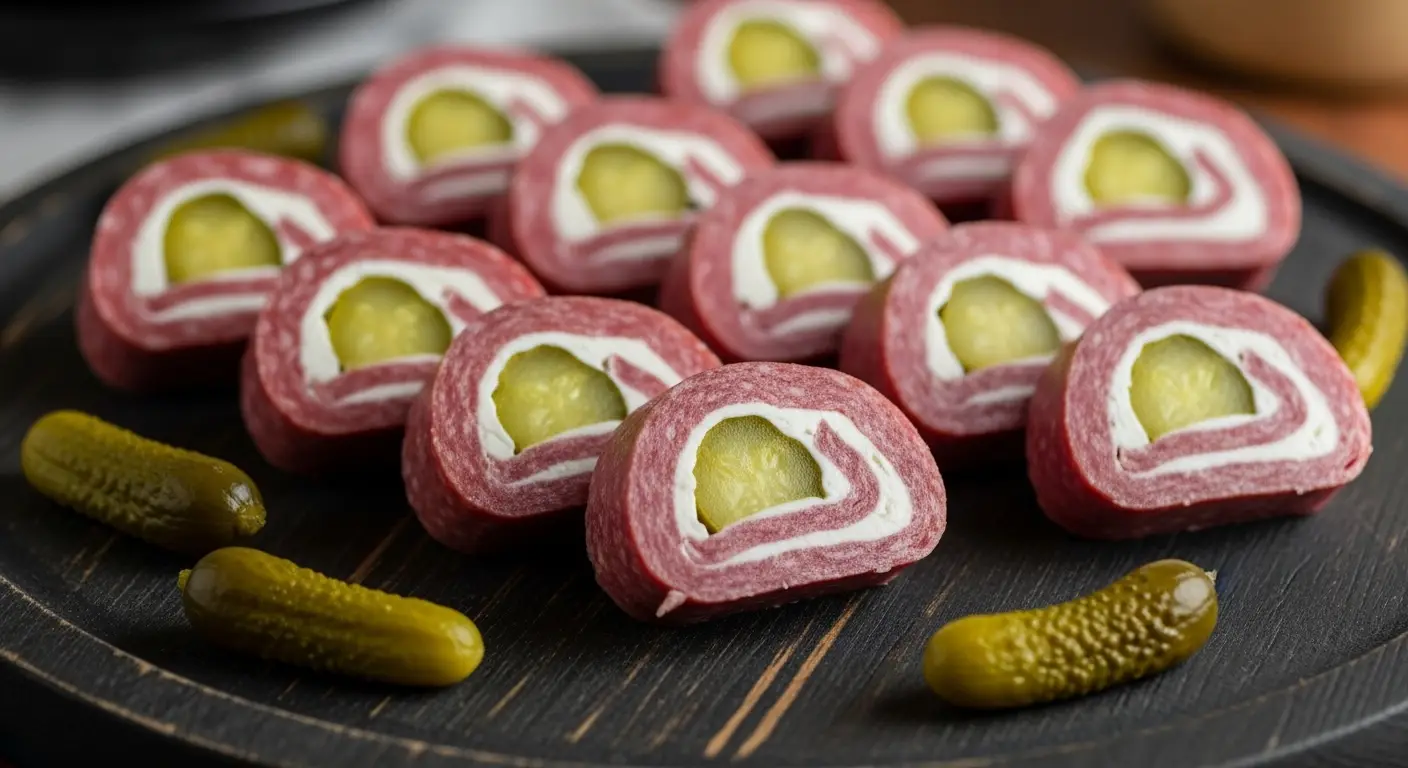
- Place a small pickle at the bottom edge of the salami slice.
- Roll the meat upward tightly around the pickle. Press the top edge down to seal it with the cheese.
- Place the roll on a plate with the seam side down so it stays closed.
I usually make a whole batch and then put them in the fridge for 30 minutes. This helps the cheese firm up again. Once they are cold, they are much easier to slice into smaller rounds if you want bite-sized pieces. If you leave them whole, they are great for kids to grab and eat like a savory snack bar.
The Secret to a Perfect Roll

One thing I learned the hard way is that you must pat the meat dry. Salami can be a bit sweaty when it comes out of the package. If there is moisture on the surface, the cream cheese will act like it is on ice. It will slide around and make a giant mess. I use a clean paper towel and just press down on each slice before I start spreading. It takes an extra minute, but it saves so much trouble.
Another tip is to use a very sharp knife if you plan to cut them. If your knife is dull, it will squish the roll and the cheese will pop out the ends. I like to use a serrated knife, like a bread knife, and use a sawing motion. This keeps the round shape perfect. IMO, cutting them into one-inch pieces makes them look much more expensive and fancy for a party plate.
Tips for the Best Salami Appetizers
Once you know the basics, you can start to play with the recipe. I have tried many different versions of these. Some worked great and some were not so good. I want to share my favorite ways to change things up so you can find what your family likes best. This is where you can get creative and use what you have in your kitchen.
Variations and Extra Flavors

You do not have to stick to just pickles and cheese. I love to add a little heat sometimes. You can put a thin slice of jalapeño inside instead of a pickle. Or, you can mix a little hot sauce into the cream cheese before you spread it. If you like herbs, try mixing in some fresh dill or chives. It makes the rolls look very fresh and bright.
For a different texture, try using a slice of bell pepper or even a green bean. The crunch is the best part of this snack. If you have someone who does not like pickles, you can just use a plain cream cheese filling. They will still taste great because the salami has so much flavor on its own. Just remember that if you add wet items like roasted peppers, you need to dry them off first too.
Serving Suggestions for Parties

When I serve these at a party, I like to put them on a white tray. The dark red of the meat and the green of the pickles really pop against a white background. I usually put a toothpick through each one if I have cut them into small pieces. This makes it easy for guests to pick them up without getting their fingers messy. It also keeps the rolls from opening up if someone bumps the tray.
These go really well with other finger foods. I often serve them alongside some olives, crackers, and maybe some grapes. The salty meat and creamy cheese balance out sweet fruit perfectly. If you are having a big game day party, these are great because they can sit out for a little while without losing their shape. Just make sure they don’t sit in the hot sun if you are outside!
Pro Kitchen Tips
- Cold Meat: Always keep your salami in the fridge until the second you need it. Warm salami gets soft and hard to roll.
- Seam Down: Always rest your rolls on the seam. This uses gravity to keep them sealed shut while the cheese sets.
Storage and Making Ahead

You can definitely make these the night before. I actually think they taste better after they have sat in the fridge for a few hours. The flavors blend together and the cheese gets nice and firm. However, do not make them more than 24 hours in advance. After a day, the moisture from the pickle can start to make the meat a little soft, which isn’t the best texture.
To store them, put them in an airtight container. If you have to stack them, put a piece of wax paper or parchment paper between the layers. This stops them from sticking to each other. If you have leftovers, they make a great snack the next day for lunch. Just keep them cold and they will stay fresh and delicious for about two to three days in total. This may not work if you use very watery vegetables inside, so stick to pickles for the longest shelf life.
Common Questions About Salami Snacks
Can I use low fat cream cheese?
You can, but it is much softer. The rolls might not stay together as well as they do with full-fat cheese. I suggest sticking to the regular block for best results.
What if my salami is too small to roll?
If your meat is small, you can overlap two slices to make a bigger surface. Just put a little cream cheese between the overlap to act like glue.
Can I freeze these roll ups?
I do not recommend freezing them. Cream cheese changes texture when it freezes and thaws. It can become grainy and the meat might get watery.
How do I keep them from being too salty?
Salami is naturally salty. To balance it, use a very mild cream cheese and a low-sodium pickle. You can also add a little bit of honey to the cheese for a sweet and salty mix.
Are these rolls keto friendly?
Yes! These are a great low-carb snack. Most salami and cream cheese have very few carbs. Just check the label on your pickles to make sure they don’t have added sugar.
Enjoy Your Easy Salami Snack
These salami cream cheese roll ups are the perfect answer to “what should I bring to the party?” They are fast, cheap, and everyone loves them. I hope you enjoy making these as much as I do. They are a staple in my home now!