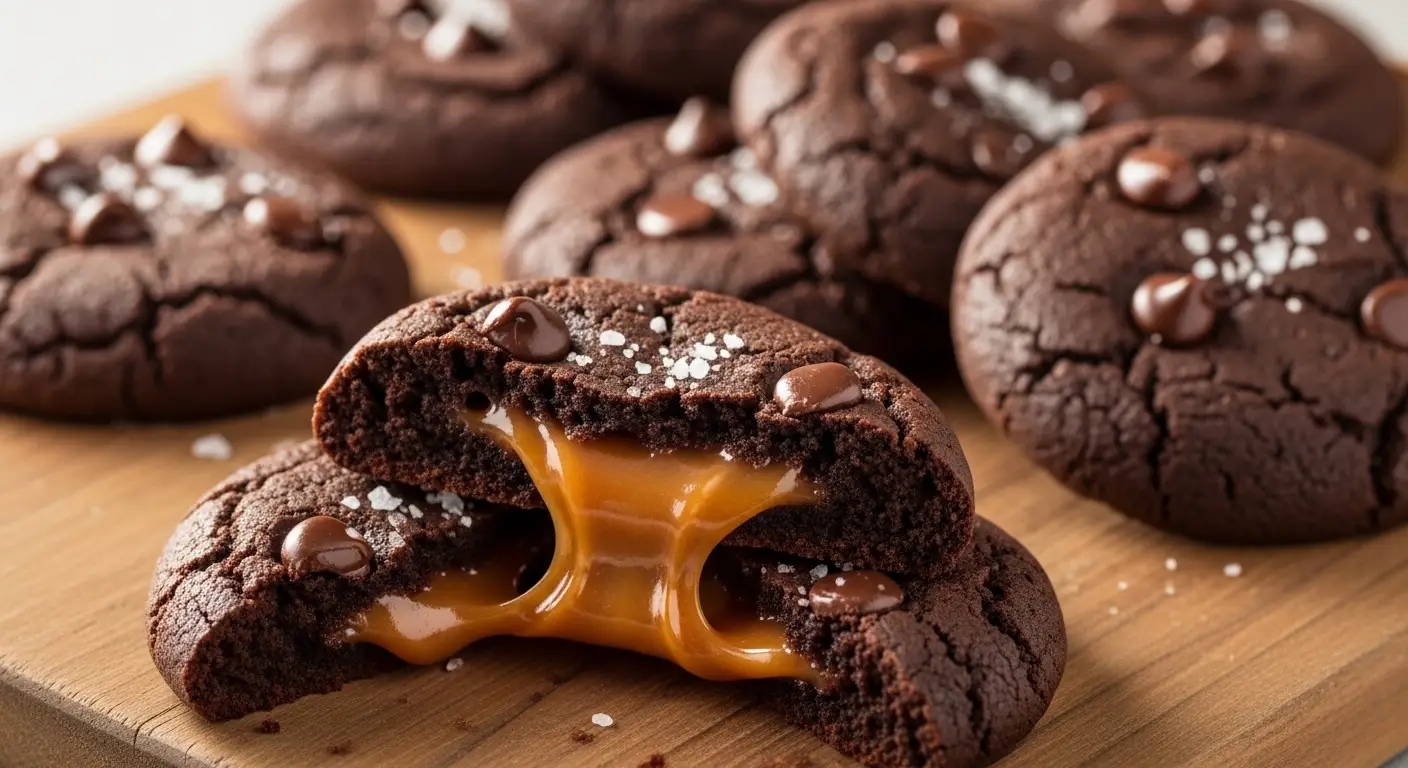
Salted Caramel Chocolate Cookies for a Sweet Fix
I love a good cookie that has a surprise inside. There is something so special about biting into a soft, dark chocolate treat and finding a river of warm caramel. It feels like a tiny gift you give to yourself. These salted caramel chocolate cookies are exactly that. They are thick, rich, and have just the right amount of salt to make the sugar taste even better. If you have a sweet tooth that never stays quiet, this is the fix you need today.
Making these cookies is not hard at all. You do not need to be a pro chef to get them right. I will show you how to mix the dough, hide the caramel inside, and bake them until they are just right. We will use simple things you likely already have in your kitchen. By the end of this page, you will know how to make a batch of cookies that will make your friends and family very happy. Let’s get our bowls ready and start baking something amazing together.
Want to see how easy it is to make these gooey treats? Check out the steps below.
Getting Ready for Your Baking Session
Before we turn on the oven, we need to make sure we have everything we need. Baking is like a science project where you get to eat the results. If you miss one thing, the whole batch might turn out flat or hard. I always lay my tools out on the counter first. This helps me stay calm and not make a mess. You will need a big bowl, a whisk, and some baking sheets. It also helps to have some parchment paper so the caramel does not stick to your pans.
The Ingredient List

To make these cookies, you need a few basic things. First, you need flour to give the cookie shape. Then you need cocoa powder to make it chocolatey. I like to use dark cocoa because it looks like a brownie. You also need butter, which should be soft but not melted. If the butter is too hot, your cookies will spread out like pancakes. We also use brown sugar and white sugar. Brown sugar makes the cookie chewy, while white sugar makes the edges a little crispy.
- 2 cups of all-purpose flour
- 2/3 cup of unsweetened cocoa powder
- 1 teaspoon of baking soda
- 1/2 teaspoon of table salt
- 1 cup of unsalted butter (softened)
- 3/4 cup of white sugar
- 3/4 cup of light brown sugar
- 2 large eggs
- 2 teaspoons of vanilla extract
- 24 soft caramel candies (the chewy kind)
- Coarse sea salt for the top
I found out the hard way that using cold eggs makes the butter get lumpy. Try to take your eggs out of the fridge an hour before you start. This makes the dough much smoother. Also, make sure your caramels are the soft, chewy kind you find in the candy aisle. Hard caramels will not melt correctly inside the oven and might hurt your teeth later. IMO, the soft squares wrapped in clear plastic work the best for this recipe.
Essential Kitchen Tools

You do not need fancy machines to make these. A simple hand mixer or even a sturdy wooden spoon will work. I usually use a whisk for the dry stuff and a spatula for the wet stuff. Using a spatula helps you scrape the sides of the bowl so no sugar is left behind. You also need a cookie scoop if you want them all to be the same size. If you do not have one, a big spoon works just fine too.
Baking sheets are very important here. I suggest using light-colored metal pans. Dark pans can get too hot and burn the bottoms of your cookies before the middle is done. If you only have dark pans, just keep a close eye on them. Also, parchment paper is your best friend. When caramel leaks out of a cookie, it turns into glue. Parchment paper lets you peel the cookie off without any drama. It makes cleaning up so much faster, which is a big win in my book.
Recipe Quick Info
- Prep Time: 20 minutes
- Cook Time: 10 minutes
- Servings: 24 cookies
- Difficulty: Medium
How to Make the Cookie Dough
The secret to a great cookie is how you mix the dough. You want it to be thick enough to hold the caramel but soft enough to melt in your mouth. We start by mixing the dry parts and the wet parts in different bowls. This ensures that the baking soda is spread out evenly. If you don’t mix the baking soda well, one cookie might rise a lot while another stays flat. I once forgot to mix my dry ingredients and ended up with a cookie that tasted like soap because of a big clump of soda!
Mixing the Dry Ingredients

First, grab a medium bowl. Put your flour, cocoa powder, baking soda, and table salt inside. Use a whisk to stir them together until the color is a light, dusty brown. You want to make sure there are no big lumps of cocoa powder. Cocoa likes to stick together, so pressing it through a sifter can help if you see big balls of powder. This step is fast but it sets the stage for a smooth dough.
Why do we use both cocoa and flour? The flour is the bones of the cookie. The cocoa is the flavor. If you use too much cocoa, the cookie will be dry and bitter. This balance is just right. It makes the cookie taste like a rich piece of chocolate cake. This base is great for kids and adults. Even people who don’t like super sweet things usually love this chocolate base because the cocoa is a bit earthy.
Creaming the Butter and Sugar

Now, take your big bowl. Put the soft butter and both types of sugar inside. Use your mixer or spoon to beat them together. You want the mixture to look light and fluffy. This is called creaming. It adds air to the dough so the cookies aren’t like bricks. Do this for about two or three minutes. Once it looks pale and creamy, add your eggs and vanilla. Mix again until it looks like thick pudding.
I have a tip for the butter. If you forgot to take it out of the fridge, do not melt it in the microwave. Melted butter changes the texture completely. Instead, cut the cold butter into tiny cubes and let them sit for ten minutes. They will soften much faster that way. This little trick has saved me many times when I was in a hurry to bake. Mixing the eggs in one at a time also helps the dough stay smooth and combined.
Combining Everything Together

Now comes the fun part. Turn your mixer to a low speed. Slowly add the dry flour mixture into the wet butter mixture. Do not dump it all in at once or you will get a face full of flour dust! Mix it just until you don’t see any more white streaks. If you mix it too much, the cookies will become tough. I stop as soon as it looks like a dark chocolate ball. The dough should be thick and a little bit sticky.
If your kitchen is very warm, the dough might feel too soft. If that happens, put the bowl in the fridge for 15 minutes. Cold dough is much easier to handle when we start adding the caramel. I usually do this in the summer because my kitchen gets very hot. It makes rolling the balls much cleaner and stops the dough from sticking to my palms. It feels a bit like playing with clay, which is actually pretty relaxing.
Pro Baking Tip
- Don’t Overmix: Stop stirring as soon as the flour disappears to keep the cookies soft and tender.
Assembling and Baking Your Cookies
This is where the magic happens. We are going to hide a piece of caramel inside each cookie ball. When the oven heats up, that caramel will turn into a gooey center. It is very important to seal the dough around the caramel perfectly. If there is a hole, the caramel will run out like lava. I have had many cookies end up with an empty middle because I didn’t pinch the dough shut well enough. It still tastes good, but it is not as fun to eat.
Stuffing the Cookies

Take about two tablespoons of dough. Roll it into a ball in your hands. Now, use your thumb to make a deep hole in the center. Place one unwrapped caramel into that hole. Gently push the dough back over the top of the caramel. Roll it again until you have a smooth ball that looks like a normal chocolate cookie. You shouldn’t be able to see the caramel at all. It is like a secret waiting to be found.
Place the balls on your baking sheet. Make sure you leave plenty of space between them. These cookies like to spread out as they bake. I usually put only 8 to 10 cookies on a standard sheet. If they are too close, they will grow into each other and you will have one giant square cookie. While that sounds funny, it makes them hard to serve. Keep them about two inches apart to give them room to breathe.
The Perfect Bake Time

Set your oven to 350 degrees Fahrenheit. Once it is hot, slide your trays in. These cookies only need about 10 to 12 minutes. This is the hardest part because they smell so good, but you must wait. The cookies will look soft and a little under-baked when you take them out. That is okay! They will firm up as they cool on the pan. If you bake them until they look hard, they will be too crunchy once they cool down.
A good sign they are done is when the edges look set but the middle still looks a bit wet. This ensures the caramel stays liquid and the cookie stays soft. Every oven is a bit different. My oven at home is very hot, so I usually take them out at exactly 10 minutes. FYI, you should check them at the 9-minute mark just to be safe. It is better to have a slightly soft cookie than a burnt one.
Adding the Finishing Touch

As soon as you take the cookies out of the oven, grab your sea salt. Sprinkle a tiny bit on top of each warm cookie. The heat helps the salt stick to the surface. This salt is what makes the caramel flavor pop. It cuts through the sugar and makes the chocolate taste deeper. If you don’t like salt, you can skip this, but I really think it makes the cookie ten times better. It makes them taste like they came from a fancy bakery.
Let the cookies sit on the hot pan for at least five minutes. This gives the caramel time to settle down. If you try to move them right away, they might fall apart or the caramel might spill out. After five minutes, move them to a wire rack to finish cooling. This lets air get to the bottom so they don’t get soggy. The wait is tough, but it is worth it for the perfect texture.
Serving Suggestions

These cookies are best when they are still a little warm. That is when the caramel is the stretchiest. I love serving them with a big glass of cold milk. The cold milk and the warm chocolate go together perfectly. You can also serve them with a scoop of vanilla ice cream for a big dessert. If you are having a party, put them on a nice wooden board and watch how fast they disappear. They are always the first thing to go.
If you have leftovers, you can put them in a sealed container. They will stay soft for about three days. If the caramel gets hard, just put a cookie in the microwave for five or ten seconds. It will melt the middle right back to gooey perfection. I often do this for my midnight snacks. It makes the cookie taste like it just came out of the oven again. It is a simple trick that keeps the magic alive for days.
Your Baking Questions Answered
Baking can be tricky sometimes, and it is normal to have questions. I have made these cookies dozens of times, and I have seen almost everything go wrong. From leaky caramel to flat dough, I have learned how to fix it all. Here are some of the things people ask me most often when they try this recipe for the first time.
Can I use caramel sauce instead of candy?
No, sauce is too thin. It will leak out and make a huge mess. Stick to the soft chewy candy squares for the best results.
Why did my caramel leak out of the cookie?
This usually happens if the dough has a small hole or crack. Make sure you roll the dough tightly around the candy and pinch it shut.
Can I freeze the dough for later?
Yes! You can freeze the stuffed balls. Just add two extra minutes to the bake time when you are ready to eat them.
What if I don’t have sea salt?
You can use regular salt, but use very little. Flaky sea salt is better because it adds a nice crunch without being too salty.
My cookies came out very flat. What happened?
Your butter might have been too soft or melted. Try chilling the dough balls in the fridge for 30 minutes before baking next time.
Happy Baking Friends
I hope you have a blast making these salted caramel chocolate cookies. They are a true treat for anyone who loves a sweet and salty mix. Just remember to seal those caramels tight and don’t over-bake them. You now have the secret to a perfect cookie fix whenever you need it!