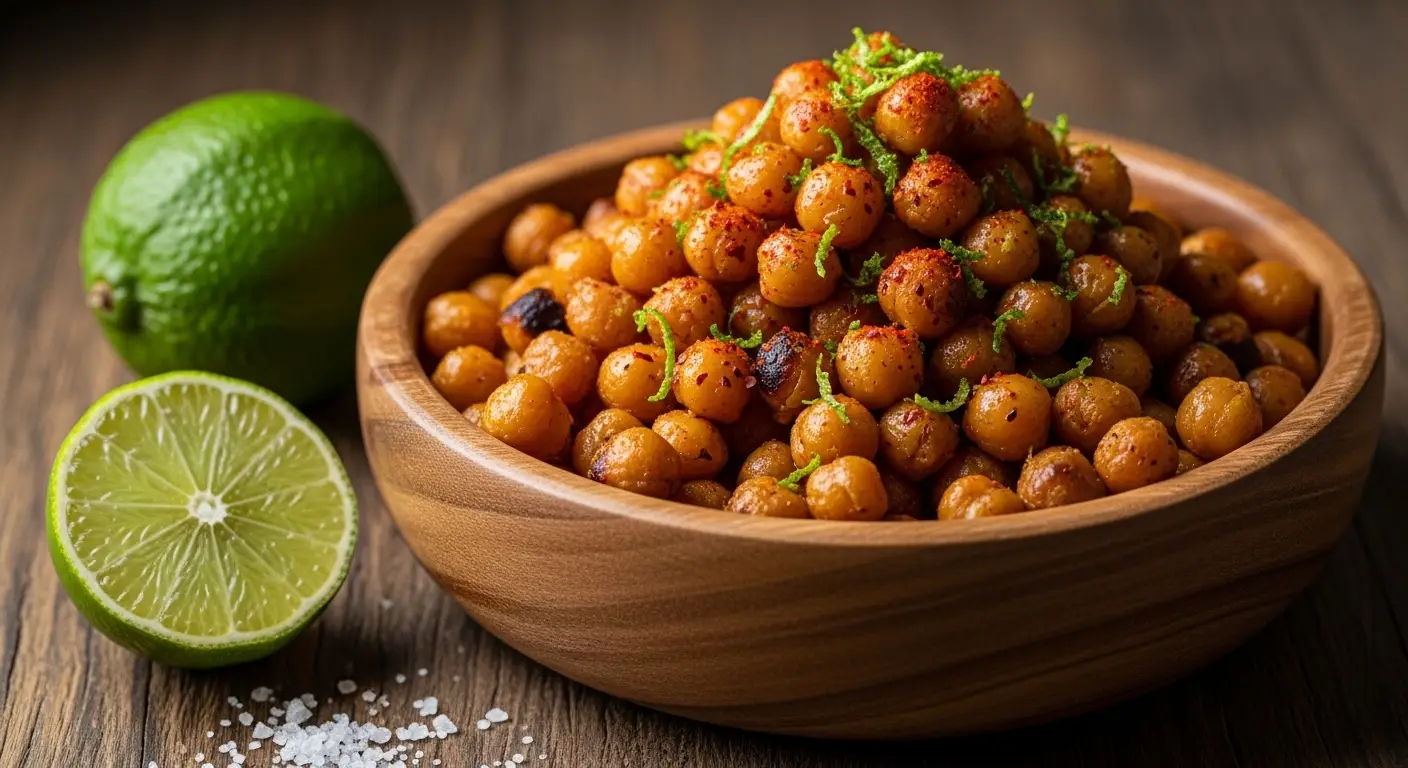
Savory Roasted Chickpeas with a Bold Chili Lime Kick
Are you looking for a snack that is both crunchy and healthy? I used to buy bags of chips every single day until I found this recipe. These roasted chickpeas are salty, tangy, and have just enough heat to make your mouth happy. They are much better than store-bought snacks because you know exactly what goes into the oven.
In this guide, I will show you how to turn a simple can of beans into a golden, crispy treat. You do not need fancy tools or hard-to-find spices. Just a few pantry staples and a little bit of patience will give you the best snack you have ever had at home. I make these every Sunday so I have something to munch on during the week.
Ready to get cooking? Let’s go!
Getting Everything Ready for Your Chickpeas
Before we turn on the oven, we need to talk about the beans. Most people use canned chickpeas because they are fast. I always keep a few cans in my cupboard for last-minute snack cravings. You can also use dried beans if you soak them overnight, but it takes a lot longer. For this recipe, we want to keep things quick and easy.
The secret to a great snack is how you treat the beans before they bake. If they are wet, they will never get crunchy. They will just get mushy and soft in the middle. I learned this the hard way when I first started cooking. I rushed the drying part and ended up with a soggy mess that tasted okay but felt weird. Now, I take my time to make sure they are bone dry before they touch any oil.
The Short List of Ingredients

You only need a few things to make this magic happen. First, get two cans of chickpeas. You also need two tablespoons of olive oil. For the flavor, grab one fresh lime and some chili powder. I like to use sea salt because the big flakes taste better than table salt. If you like things very spicy, you can even add a tiny bit of cayenne pepper.
It is important to use fresh lime juice. The bottled stuff just does not have the same zing. I tried using the plastic lime juice once, and it tasted like chemicals. Stick to the real fruit for the best results. You will also need the zest from the skin of the lime. That is where all the bold smell and flavor live. This snack is all about that bright, fresh kick.
Step One: Preparing the Beans

Open your cans and pour the chickpeas into a strainer. Rinse them under cold water until the bubbles go away. That liquid in the can is thick and salty, so we want it all gone. Once they are rinsed, dump them onto a clean kitchen towel or a few layers of paper towels. This is the most important part of the whole process.
Roll the beans around gently. You might see some clear skins falling off. I usually pick those off and throw them away. They tend to burn in the oven and look a bit messy. You don’t have to get every single one, but removing the loose ones helps. Let the beans sit there for at least 15 minutes. The drier they are, the louder the crunch will be when you bite into them later.
How to Roast Them Right

- Heat your oven to 400 degrees Fahrenheit. This high heat helps the water evaporate fast.
- Put the dry chickpeas in a big bowl. Pour the olive oil over them and toss until every bean is shiny.
- Add the chili powder and salt. Do not add the lime juice yet! If you add juice now, the beans will stay soft.
- Spread them out on a baking sheet. Make sure they are not touching each other too much. They need space to breathe.
- Bake for 20 minutes, then take the pan out and shake it. This moves them around so they brown on all sides.
- Bake for another 15 to 20 minutes. Keep an eye on them so they do not turn black.
I once left mine in for 45 minutes without checking. They turned into little rocks that almost broke my tooth! Every oven is different, so start checking them at the 30-minute mark. You want them to look dark gold and feel light when you shake the pan. If they still feel heavy, they need more time.
Adding the Bold Lime Kick

Once the chickpeas are out of the oven, it is time for the flavor explosion. While they are still piping hot, squeeze the fresh lime juice over them. You will hear a little sizzle. This is good! The heat helps the juice soak into the crispy shell without making it soggy. It is a neat trick I learned from a chef friend.
Next, sprinkle the lime zest all over the tray. The heat from the beans will release the oils in the zest. It makes your whole kitchen smell like a tropical vacation. Toss them one last time to make sure the lime and chili are mixed well. I usually sneak a taste here, but be careful because they are very hot. IMO, this is the part where the snack goes from good to amazing.
Recipe Quick Info
- Prep Time: 15 minutes
- Cook Time: 40 minutes
- Servings: 4 people
- Difficulty: Very Easy
Tips for the Perfect Crunch Every Time
Even though this recipe is simple, there are a few ways to make it even better. Most people fail because they are in a rush. If you treat these beans with love, they will reward you with a sound that sounds like a cracker when you bite down. I have spent a lot of time testing different ways to bake these, and I found a few secrets that most blogs won’t tell you.
One thing to remember is that these beans will continue to crisp up as they cool. When you take them out, they might feel just a tiny bit soft. Give them ten minutes on the counter. The air hitting them helps the outside harden. If you eat them right away, they are still tasty, but wait a bit for that true chip-like texture. It is hard to wait, I know, but it is worth it.
The Secret of the Cooling Oven

If you have the time, here is a pro tip. After the cooking time is up, turn off the oven. Crack the door open just a few inches. Let the chickpeas sit in the cooling oven for another ten minutes. This slowly draws out any last bit of moisture inside the bean. This makes them stay crunchy for days instead of just a few hours.
This method works best if you live in a place that is very humid. If the air is wet, your chickpeas might get soft quickly. Letting them dry out in the warm oven helps fight the humidity. I do this every time now. It makes a big difference in how they feel the next day. FYI, this also works for roasting nuts or seeds!
Best Ways to Serve Your Snack
These are great just by themselves in a bowl while you watch a movie. But you can do so much more! I love tossing them on top of a salad. They act like croutons but have way more protein. They also taste great on top of a bowl of creamy tomato soup. The spicy kick of the chili goes perfectly with the sweet tomatoes.
You can also pack them in small bags for school or work lunches. They don’t need to be kept cold, which makes them a perfect travel snack. My kids love them because they are fun to eat. Just make sure to tell them they are a little bit spicy! If you are hosting a party, put them in small jars with a few lime wedges on the side. It looks very fancy but cost you almost nothing to make.
Easy Swaps and Variations

Don’t have chili powder? No problem. You can use smoked paprika for a deeper, woody flavor. It isn’t as spicy, but it tastes very rich. I sometimes use garlic powder and onion powder too. If you want a sweet snack, you can skip the chili and lime. Use cinnamon and a little bit of sugar instead. The options are endless once you know how to roast the beans correctly.
Some people ask if they can use oil spray instead of liquid oil. You can, but it is harder to get an even coat. I think regular olive oil works best because it gets into all the little cracks of the chickpea. If you are watching your fat intake, just use one tablespoon instead of two. Just know that they might not get quite as golden brown. It is a trade-off, but they will still be yummy.
Mistakes to Avoid
- Not Drying Enough: If they are wet, they steam instead of fry.
- Too Much Oil: If they swim in oil, they will stay greasy and soft.
- Crowded Pan: Give them space or they won’t get crunchy.
How to Store Your Leftovers

If you don’t eat them all at once, you need to store them right. Do not put them in a plastic bag while they are still warm. This will create steam and make them soggy fast. Let them cool down all the way to room temperature. Once they are cold, put them in a glass jar or an airtight container. They will stay crunchy for about three to four days.
If they do get a little soft after a few days, don’t throw them away! You can put them back in the oven at 350 degrees for five minutes. This “wakes them up” and makes them crispy again. I usually do this if I find a forgotten jar in the back of the pantry. It is a great way to save food and still enjoy a good snack. Just remember not to overcook them the second time!
Frequently Asked Questions
Can I use an air fryer for this?
Yes! Cook them at 390 degrees for 12 to 15 minutes. Shake the basket every few minutes so they cook evenly. It is faster than the oven!
Why are my chickpeas still soft in the middle?
They probably needed more time in the oven or were not dry enough before cooking. Try roasting them for 5 more minutes next time.
Is this snack good for weight loss?
Chickpeas have lots of fiber and protein. They keep you full for a long time. Just watch the salt if you are careful about your heart health.
Can I use other beans like black beans?
Black beans are smaller and thinner. They can work, but they burn very fast. Chickpeas are the best for roasting because they are sturdy.
My lime juice made them soggy, what happened?
Only use a little bit of juice while they are very hot. If you use too much, it will soak in. The zest gives more flavor without the wetness.
Enjoy Your Homemade Crunchy Snack
Making your own snacks is a great way to eat better and save money. These chili lime chickpeas are proof that simple food can be the most delicious. I hope you have a blast making these in your own kitchen today. They are perfect for sharing with friends or keeping all to yourself. Once you try this bold flavor, you will never want plain old chips again. Happy snacking!