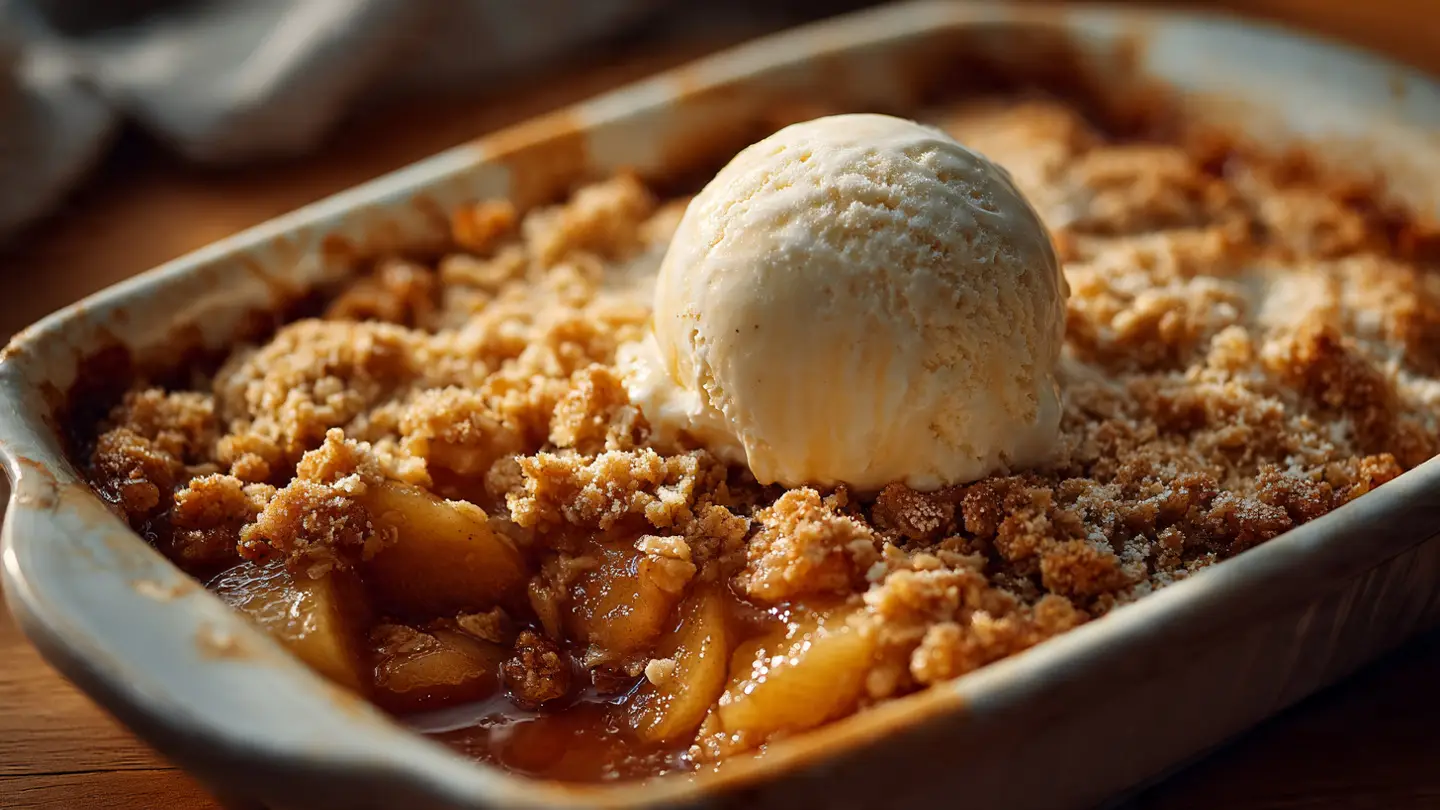
Warm Apple Crisp with a Streusel Topping
Warm apple crisp is the best treat for a cold day. It makes your house smell like cinnamon and sweet fruit. I love making this recipe because it is much easier than making a whole pie. You do not have to worry about a messy pie crust or fancy dough shapes. All you need are some fresh apples and a few pantry items. This dessert is very sweet, soft, and crunchy all at once.
In this guide, you will learn how to pick the right apples for baking. I will show you how to make a topping that stays crunchy after it leaves the oven. We will also talk about how to serve it so everyone asks for more. This recipe is a favorite in my home, and I think it will be a favorite in yours too. It is great for kids to help with because mixing the topping is like playing with sand.
Ready to bake something amazing? Let’s get started on this cozy dessert!
Why This Apple Crisp Recipe Works for Everyone
This recipe is great because it is very hard to mess up. Unlike a cake, you do not have to measure everything to the exact tiny gram. If you have a few more apples, just toss them in. If you like more crunch, make more topping. It is a very flexible way to bake. Most people already have sugar, flour, and butter in their kitchen. That makes this a cheap and easy treat to whip up any time.
I remember one time I forgot to peel my apples. I was very worried that the dessert would be ruined. But guess what? It still tasted great! The skins got soft in the oven and added some nice color. This taught me that you can be relaxed with this dish. It is a rustic dessert, which just means it is supposed to look a little messy and homemade. It feels like a warm hug in a bowl.
The Best Apples for Your Crisp

Picking the right apple is the first step to a great crisp. You want an apple that stays firm when it gets hot. Some apples turn into mush or liquid in the oven. That is not what we want. I usually pick Granny Smith apples because they are sour and hard. The sour taste goes very well with the sweet sugar in the topping. If you only use sweet apples, the whole dish might feel too sugary.
IMO, mixing two kinds of apples is the secret trick. I like to use three Granny Smith apples and three Honeycrisp apples. This gives you different textures in every bite. Some pieces will be soft and some will be a bit more firm. Always look for apples that feel heavy and have no soft spots. If an apple feels soft when you squeeze it, it will definitely be mushy after baking. Avoid Red Delicious apples for this recipe because they do not hold their shape well at all.
Gathering Your Simple Ingredients

- 6 to 7 large apples (Granny Smith or Honeycrisp)
- 1 cup of old-fashioned rolled oats
- 1 cup of all-purpose flour
- 1 cup of packed light brown sugar
- 1/2 cup of cold unsalted butter, cut into small cubes
- 1 tablespoon of ground cinnamon
- 1/2 teaspoon of salt
- 1 tablespoon of lemon juice
- 2 tablespoons of white sugar
These ingredients are simple but they do a big job. The oats are very important for the crunch. Make sure you use old-fashioned oats and not the quick-cooking kind. Quick oats are too thin and can make the topping feel like wet paper. The brown sugar adds a deep flavor that tastes like caramel. This is much better than using only white sugar. The cold butter is what makes the topping stay in little clumps instead of melting into a flat sheet.
Recipe Quick Info
- Prep Time: 20 minutes
- Cook Time: 45 minutes
- Servings: 8 people
- Difficulty: Easy
Preparing the Apple Filling

First, you need to wash your apples very well. Even if you peel them, it is good to have them clean. Peel the skin off if you want a very smooth dessert. Then, cut the apples into slices that are about half an inch thick. Try to make them all the same size so they cook at the same speed. If some are huge and some are tiny, the tiny ones will burn before the big ones are soft. Put all the slices into a big bowl and pour the lemon juice over them.
The lemon juice does two things. It stops the apples from turning brown and it adds a little zing. Next, sprinkle the white sugar and a little bit of cinnamon over the apples. Stir them around until every slice is coated. This creates a sweet syrup as the apples bake. I once skipped the lemon juice because I ran out. The crisp was still okay, but it tasted a bit flat. The acid from the lemon really makes the fruit flavors pop out. Pour the apples into a baking dish and spread them out flat.
Making the Perfect Streusel Topping

This is my favorite part of the whole process. Take another bowl and mix the oats, flour, brown sugar, and the rest of the cinnamon. Stir them together until the color is even. Now, take your cold butter cubes and drop them in. Use your fingers to squish the butter into the dry mix. You want the mixture to look like wet sand with some pea-sized lumps of butter still showing. These lumps of butter will melt in the oven and create little pockets of crispy goodness.
One mistake I made when I was younger was using melted butter. I thought it would be faster. But melted butter makes the topping greasy and flat. It won’t be a ‘crisp’ if the butter is already liquid! You want that cold butter to fight against the heat of the oven. This creates the ‘streusel’ texture that people love. If your hands get too warm and the butter starts to melt, put the bowl in the fridge for ten minutes. It is very important to keep it cool until it goes into the oven. FYI, you can also use a pastry cutter if you don’t want to get your hands messy.
Baking to Golden Perfection

Turn your oven to 375 degrees Fahrenheit. This is a good temperature because it cooks the apples through without burning the oats too fast. Sprinkle your topping evenly over the apples in the dish. Do not press it down! You want it to stay loose so air can move through the crumbs. Put the dish in the middle of the oven and set a timer for 40 minutes. You will know it is done when you see juice bubbling up around the sides and the top looks like a golden cookie.
Every oven is a little bit different. My oven at home runs a bit hot, so I always check at the 35-minute mark. If the top is getting too dark but the apples still feel hard when you poke them with a fork, cover the dish with foil. The foil will stop the top from burning while the fruit finishes softening. This is a practical tip most people skip, but it saves your dessert from becoming a charred mess. Let the crisp sit on the counter for at least 15 minutes after you take it out. This lets the juices thicken up so it is not watery.
Serving Your Warm Apple Crisp

You can eat this plain, but why would you? The best way to serve apple crisp is with a big scoop of vanilla ice cream. The cold ice cream melts into the warm apples and creates a creamy sauce. If you don’t like ice cream, a dollop of whipped cream is also very tasty. Some people even like to pour a little bit of heavy cream or caramel sauce over their bowl. It makes the dessert feel very fancy even though it was easy to make.
This dish is best when it is still warm. If you have leftovers, they make a great breakfast the next day with a bit of yogurt. I think the oats make it almost like oatmeal, right? That is what I tell myself anyway! It will stay good in the fridge for about three days. Just make sure to cover it tightly so it doesn’t pick up smells from other food. When you want to eat it again, put a slice in the microwave for 30 seconds or back in the oven for a few minutes to get the crunch back.
Pro Baking Tips
- Butter Temperature: Always use butter straight from the fridge for the best crunch.
- Apple Variety: Mix tart and sweet apples for a better flavor profile.
- Thickening: If your apples are very juicy, add 1 tsp of cornstarch to the fruit mix.
Variations and Substitutions

You can change this recipe to fit what you have in your house. If you don’t have apples, you can use pears or peaches. Pears work very well with the same cinnamon topping. If you need to make it gluten-free, you can use a gluten-free flour blend instead of regular flour. Just make sure your oats are also certified gluten-free. The texture might change a tiny bit, but it will still taste delicious because the fruit and sugar do most of the work.
Adding nuts is another great way to change things up. I love adding half a cup of chopped pecans or walnuts to the streusel. It adds a different kind of crunch and a nice earthy flavor. If you like things a bit spicy, you can add a pinch of ground ginger or nutmeg to the apple mix. This makes it taste even more like the holidays. Just don’t go overboard with the spices or you will lose the fresh taste of the fruit. This recipe is your canvas, so feel free to paint it how you like!
Frequently Asked Questions
Can I use quick oats instead of rolled oats?
You can, but the topping will be softer. Rolled oats give the best crunch. Quick oats might make the topping feel a bit gummy or thin after baking.
Do I have to peel the apples?
No, you do not have to peel them. The skins get soft in the oven. Peeling just makes the dessert smoother. It is a personal choice based on how much work you want to do.
How do I keep the topping from getting soggy?
Keep your butter cold and do not over-mix the topping. Also, let the crisp cool for 15 minutes before serving so the juices can set and not soak the topping.
Can I freeze apple crisp?
Yes, you can freeze it before or after baking. If freezing before, wait to bake until you are ready. If after, thaw it and reheat in the oven to get the crunch back.
What are the best apples for baking?
Granny Smith, Honeycrisp, and Braeburn are great. They stay firm and don’t turn into mush. Avoid soft apples like Red Delicious for the best results.
The Final Word on Apple Crisp
This warm apple crisp is a simple joy that anyone can make. It uses basic items and turns them into a special treat. Whether you share it with friends or eat it on the couch, it is sure to make you smile. Enjoy every bite!