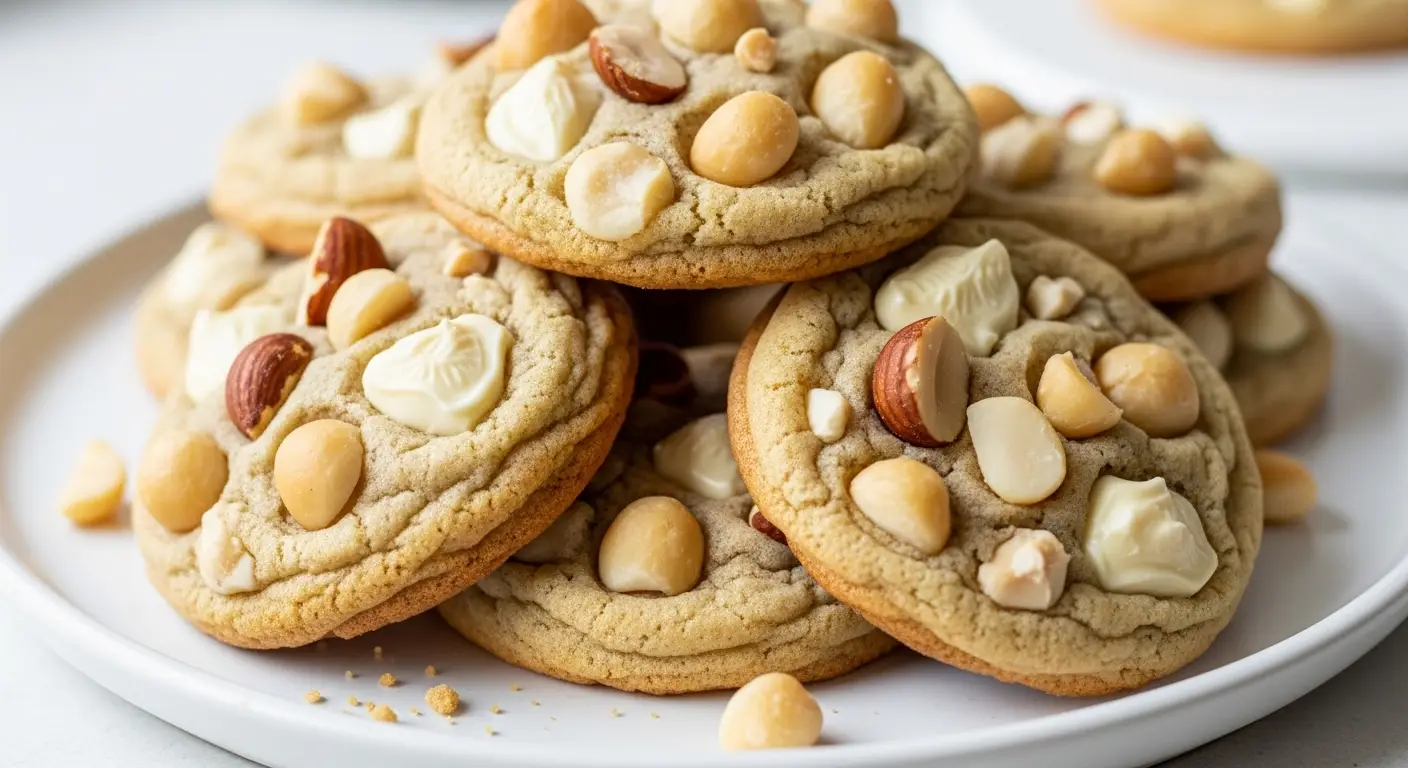
White Chocolate Macadamia Nut Cookies: Sweet and Salty
I love a good cookie that feels like a fancy treat. Most people think making bakery-style cookies at home is hard, but it is actually very easy. These white chocolate macadamia nut cookies are the perfect mix of sweet and salty. You get a soft bite from the cookie dough and a nice crunch from the nuts. They are my favorite thing to bake when I want to impress my friends or just treat myself after a long day.
In this guide, I will show you exactly how to make these cookies from start to finish. You do not need any special skills to get them right. I will talk about the best ingredients to use and how to keep the cookies from getting too flat. By the time you finish reading, you will be ready to bake a batch that looks just like the ones in a professional shop. Let’s get into the kitchen and start baking together.
Check out the steps below to make your own batch of delicious cookies today!
Getting Your Kitchen Ready for Success
Before you start mixing, you need to make sure you have everything ready. Baking is like a science project where the measurements really matter. If you forget to preheat the oven or miss an ingredient, the cookies might not turn out right. I always lay everything out on my counter first so I do not have to hunt through my cabinets with messy hands. It makes the whole process much faster and more fun.
One thing I learned the hard way is that temperature is very important. Most people try to use butter straight from the fridge because they are in a hurry. I did this once, and my cookies stayed in hard little balls instead of spreading out. Now, I always make sure my butter is soft before I begin. It should be squishy but not melted. This small step makes a huge difference in the texture of your final treat.
The Ingredients You Will Need

To make these cookies, you will need a few basic things from the store. Most of these are likely in your pantry already. You will need 2 and 1/4 cups of all-purpose flour and 1 teaspoon of baking soda. For the flavor, grab 1/2 teaspoon of salt, 1 cup of softened unsalted butter, and 3/4 cup of white sugar. You also need 3/4 cup of packed brown sugar to make them chewy. To finish the base, get 1 teaspoon of vanilla extract and 2 large eggs.
The stars of the show are the mix-ins. You will need 1 cup of white chocolate chips and 1 cup of chopped macadamia nuts. Use high-quality chips if you can find them because they melt better and taste less like wax. I prefer using salted macadamia nuts because the extra salt balances the sweet chocolate perfectly. If you only have unsalted nuts, you can add an extra pinch of salt to the dough. Using fresh nuts is also better than using old ones from the back of the pantry.
- 2 1/4 cups all-purpose flour
- 1 tsp baking soda
- 1/2 tsp salt
- 1 cup unsalted butter, softened
- 3/4 cup granulated sugar
- 3/4 cup brown sugar, packed
- 1 tsp vanilla extract
- 2 large eggs
- 1 cup white chocolate chips
- 1 cup macadamia nuts, chopped
How to Mix the Dough Properly

First, you want to cream the butter and sugars together. This means mixing them until they look light and fluffy. Do not just stir them for a few seconds. You want to see the color change to a pale yellow. This process adds air to the dough, which helps the cookies stay soft. I usually use a hand mixer for this part because it saves my arm from getting tired. If you use a stand mixer, use the paddle attachment for the best results.
After the butter and sugar are ready, add the eggs one at a time. Mix well after each egg so it fully combines. Then, stir in the vanilla extract. In a separate bowl, whisk your flour, baking soda, and salt. Slowly add the dry flour mix into the wet butter mix. Stop mixing as soon as you do not see any more white flour streaks. If you mix too much, your cookies will turn out tough like bread instead of tender and chewy.
Recipe Quick Info
- Prep Time: 15 minutes
- Cook Time: 10 minutes
- Servings: 24 cookies
- Difficulty: Easy
Folding in the Chips and Nuts

Now comes the best part. Pour in your white chocolate chips and the macadamia nuts. Do not use the electric mixer for this step. Instead, use a big spoon or a spatula to fold them in by hand. This ensures that the nuts stay in big, crunchy pieces and the chocolate chips do not break apart. I like to make sure the nuts are spread out evenly so every bite has a bit of everything. It is very sad to get a cookie that has no nuts in it!
When I first started baking, I used to buy the pre-chopped nuts. I realized later that buying whole nuts and chopping them myself is much better. You can choose how big you want the pieces to be. I like some big chunks and some tiny crumbs. The tiny crumbs flavor the whole dough, while the big chunks give you that satisfying crunch. Give it a try next time you shop. FYI, it is often cheaper to buy them whole too.
Step-by-Step Baking Instructions

Follow these steps to bake your cookies to perfection. Make sure your oven is hot before the pans go in. If the oven is still warming up, the cookies will melt too fast and turn into one giant pancake on the tray.
- Preheat your oven to 350 degrees F.
- Line two large baking sheets with parchment paper or silicone mats.
- Scoop rounded tablespoons of dough and place them 2 inches apart on the sheets.
- Bake for 10 to 12 minutes. Look for the edges to turn a very light golden brown.
- Let the cookies sit on the hot baking sheet for 5 minutes after taking them out.
- Move them to a wire rack to cool completely.
Do not overbake these! They will look a little soft and underdone in the middle when you take them out. That is okay. They continue to cook on the hot tray for a few minutes. This is the secret to a chewy cookie. If they look fully browned in the oven, they will be hard and crunchy once they cool down. I prefer them when they are still a bit pale in the center.
Tips for the Best Texture

One great tip is to chill your dough. If you have time, put the bowl of dough in the fridge for 30 minutes before scooping. Cold dough spreads less, which makes the cookies thicker. I know it is hard to wait when you want a cookie right now, but it really helps. Another tip is to use a cookie scoop. This makes all the cookies the same size so they all finish baking at the exact same time. No one wants half a tray of burnt cookies and half a tray of raw ones.
If your cookies come out of the oven looking a bit wonky or not perfectly round, you can fix them. Take a round glass or a large circular cookie cutter and place it over the hot cookie. Gently move the glass in a circle. This scoots the edges in and makes the cookie a perfect circle. I do this every time I bake to make them look like they came from a fancy bakery. It is a simple trick that most people do not know about!
Serving and Storage Ideas

These cookies are amazing when they are still a little warm. I love serving them with a cold glass of milk or a cup of coffee. The bitterness of coffee goes great with the sweet white chocolate. If you are having a party, you can even use them to make ice cream sandwiches. Just put a scoop of vanilla ice cream between two cookies and press down. It is a huge hit with kids and adults alike.
To keep them fresh, put them in an airtight container once they are totally cool. They will stay soft for about 3 to 4 days at room temperature. If you want them to last longer, you can freeze the baked cookies. They stay good in the freezer for up to 3 months. Just take one out and let it thaw for 20 minutes, or pop it in the microwave for 10 seconds to make it gooey again. IMO, a frozen cookie is a great snack to have hidden away for emergencies.
Making the Most of Your Baking
Baking is supposed to be a stress-free activity. Do not worry if your first batch is not perfect. Every oven is a little different, and you will learn how yours works over time. Some ovens have hot spots that might brown one side faster than the other. I always rotate my pans halfway through the baking time to make sure everything gets even heat. It is a small habit that saves a lot of cookies from getting ruined.
You can also play around with the recipe once you feel comfortable. Maybe you want to add some dried cranberries for a bit of tartness. Or maybe you want to use dark chocolate instead of white. The base dough is very strong and works with many different mix-ins. Just keep the total amount of “extras” to about 2 cups so the dough can still hold everything together. Happy baking!
Pro Baker Secrets
- Don’t Overmix: Only stir until the flour disappears to keep cookies tender.
- Salt Matters: Use a tiny sprinkle of sea salt on top for a gourmet look.
- Freshness: Check your baking soda by putting a pinch in vinegar; if it bubbles, it is good!
How to Handle Sticky Situations

Sometimes things go wrong, and that is okay. If your dough feels too sticky to roll into balls, your kitchen might be too warm. Just pop the dough in the fridge for a bit to firm up the butter. If your cookies spread too much and touch each other, you might have used butter that was too melty or your flour measurement was a bit low. You can still eat them! Just cut them into squares while they are warm and call them “cookie bars.”
Another common issue is cookies sticking to the pan. This is why I always suggest using parchment paper. It is a special paper that nothing sticks to. It also makes cleanup very easy because you just throw the paper away when you are done. If you don’t have parchment paper, you can grease the pan with a little bit of butter, but be careful. Too much grease can make the cookies spread even more than they should. In my experience, parchment is always the winner.
Why This Combo Works

You might wonder why we use macadamia nuts specifically. These nuts are very buttery and rich. They have a softer texture than almonds or walnuts, which matches the soft cookie dough. When you pair that with the creamy sweetness of white chocolate, it creates a very rich flavor. The salt in the dough and on the nuts cuts through all that sugar so it is not too overwhelming. It is a very balanced cookie.
This recipe is great for people who find dark chocolate too bitter. It is also a nice change from the standard chocolate chip cookie everyone usually makes. Because macadamia nuts are a bit more expensive, these cookies feel like a special treat. They are perfect for holiday gift boxes or a birthday party. Everyone always asks me for the recipe when I bring these to a potluck. They are simple but they taste like you spent hours making them.
Common Questions About This Recipe
Can I use salted butter instead?
Yes, you can. Just leave out the extra 1/2 teaspoon of salt mentioned in the recipe so the cookies do not get too salty.
What if I don’t have macadamia nuts?
You can use walnuts or pecans instead. The flavor will be different, but the cookie will still be very tasty and crunchy.
How do I make them extra chewy?
Add an extra egg yolk to the dough. The extra fat in the yolk makes the texture much richer and more chewy.
Can I make the dough ahead of time?
Yes! You can keep the dough in the fridge for up to 3 days. This actually makes the flavor better as it sits.
Why did my cookies turn out flat?
Your butter might have been too soft or melted. Try chilling the dough for 30 minutes before baking to fix this.
The Best Way to Enjoy Your Cookies
These white chocolate macadamia nut cookies are a classic for a reason. They offer the perfect mix of textures and a flavor that feels a bit more special than your average snack. Whether you bake them for a friend or keep them all for yourself, I know you will love the results. Just remember to use soft butter and don’t overbake them. Enjoy your sweet and salty treats!