Zesty Key Lime Cheesecake for a Tropical Twist
Are you looking for a dessert that tastes like a sunny beach day? This Key lime cheesecake is exactly what you need. It is smooth, creamy, and has just the right amount of tang. I love making this when the weather gets warm because it feels so fresh and light. Most people think making a cheesecake is hard, but I promise you can do it with a little patience.
In this guide, I will show you how to build a thick crust and a filling that never fails. You do not need to be a pro baker to get a great result. We will go over every step from mixing the crumbs to squeezing those tiny limes. By the time you finish reading, you will know how to make a dessert that looks like it came from a fancy shop.
Ready to get baking? Let us gather our tools and start this tropical treat!
Why This Recipe Works So Well
This recipe is special because it balances sugar and acid perfectly. Real Key limes are much smaller and more sour than regular limes. This sour juice cuts through the heavy cream cheese. It makes the cake feel less heavy on your stomach. I have tried many versions of this cake, and the secret is always in the lime-to-sugar ratio. If you use too much sugar, you lose that famous zing. If you use too little, it is too sharp.
Another reason this works is the crust. A good cheesecake needs a sturdy base to hold the weight of the filling. We use extra butter to make sure the crumbs stay together. It acts like a crunchy plate for the soft lime center. I once made the mistake of not pressing the crust down hard enough. The whole thing fell apart when I cut it! Now, I always make sure to pack it tight with the bottom of a glass.
What You Need to Get Started

Before you start, make sure you have everything on your counter. It is much easier to bake when you do not have to hunt for a spoon in the middle of a step. You will need a springform pan for this recipe. This is a special pan where the sides pop off. It is the only way to get the cake out without breaking it. If you do not have one, you can use a regular pie dish, but it will be harder to serve pretty slices.
- 2 cups of graham cracker crumbs
- 1/2 cup of melted butter
- 1/4 cup of white sugar for the crust
- 3 packs of full-fat cream cheese (8 ounces each)
- 1 cup of granulated sugar for the filling
- 3 large eggs at room temperature
- 1/2 cup of fresh Key lime juice
- 1 tablespoon of lime zest
- 1 teaspoon of vanilla extract
- 1 cup of sour cream
Preparing the Graham Cracker Crust

The crust is the foundation of your cake. Start by mixing your crumbs, melted butter, and sugar in a medium bowl. It should feel like wet sand. If it is too dry, it will crumble later. If it is too greasy, it will be hard to eat. I like to use a fork to mix it so every crumb gets coated in butter. This ensures a golden brown finish once it comes out of the oven.
Press the mixture into the bottom of your 9-inch pan. You can also push it an inch up the sides if you like a lot of crust. Use the flat bottom of a measuring cup or a glass to pack it down very firmly. Bake this for about 10 minutes at 350 degrees. This “pre-baking” step keeps the crust from getting soggy when you add the liquid filling. Let it cool completely while you work on the next part.
Making the Creamy Lime Filling

Now comes the fun part. Beat your cream cheese and sugar together until there are no lumps left. This is very important. If the cheese is cold, you will have tiny white dots in your cake that will not go away. I always take my cheese out of the fridge two hours before I start. It should be very soft. Mix in the sour cream and vanilla next. The sour cream adds a nice tang and makes the texture extra velvety.
Add the eggs one at a time. This is a common place where people mess up. Do not over-mix once the eggs are in! If you beat it too much, you add too much air. Air makes the cake puff up like a balloon and then crack as it cools. Just mix until the yellow disappears. Finally, stir in that fresh lime juice and zest by hand. The smell will be amazing, and it will turn the batter a very light, pretty green color.
Recipe Quick Info
- Prep Time: 30 minutes
- Cook Time: 55 minutes
- Servings: 12 people
- Difficulty: Medium
The Best Baking Method

To get a perfect top with no cracks, I recommend a water bath. This sounds scary, but it is just a big pan of water. Wrap the outside of your cheesecake pan in two layers of heavy-duty foil. This keeps the water from leaking into your crust. Place the cake pan inside a larger roasting pan and pour hot water into the big pan until it reaches halfway up the sides of the cake pan. IMO, this is the only way to get that professional look.
Bake the cake for about 50 to 60 minutes. You will know it is done when the edges are set but the middle still jiggles a little bit. It should look like Jello in the center. Do not wait for it to be solid! It will continue to cook as it cools down. If the top starts to brown, you have cooked it too long. Switch the oven off and crack the door open a few inches. Let it sit there for an hour. This slow cooling prevents the cake from shrinking too fast and cracking.
Chilling for Perfect Slices

Patience is the hardest ingredient in this recipe. You cannot eat this cake warm. It needs to set in the fridge for at least six hours, but overnight is much better. During this time, the flavors meld together and the texture firms up. If you try to cut it too soon, it will be a gooey mess. I usually make my cheesecakes the day before a party so I do not have to worry about them.
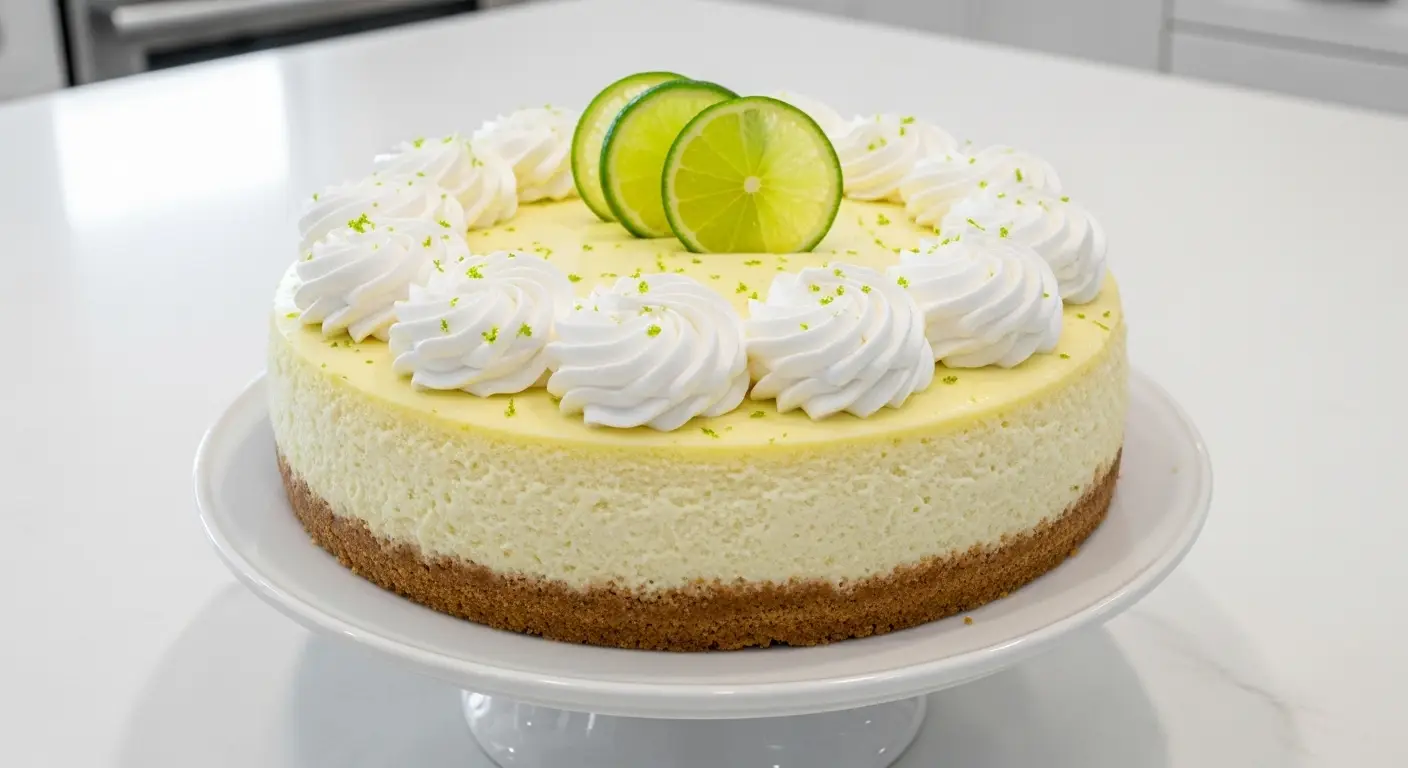
When you are ready to serve, run a thin knife around the edge of the pan before you open the spring. This stops the cake from sticking and tearing. To get those clean slices you see in pictures, dip your knife in hot water and wipe it dry between every single cut. It takes a little longer, but it looks so much better on the plate. Your guests will think you are a master baker!
Topping and Decoration Ideas

A plain cheesecake is tasty, but toppings make it a star. I love adding a big pile of homemade whipped cream. Just beat heavy cream with a little powdered sugar until it is fluffy. You can pipe pretty stars around the edge or just spread it all over the top. I also like to add extra lime zest for a pop of bright green color. It tells people exactly what flavor to expect before they even take a bite.
If you want to get fancy, you can use thin lime slices or even some toasted coconut. The coconut adds a nice crunch and fits the tropical theme. Some people like a drizzle of white chocolate, but I think that makes it too sweet. Keep it simple so the lime flavor can shine. Remember, the goal is a refreshing dessert that feels like a vacation in every bite. Feel free to get creative with how you arrange the fruit!
How to Handle Leftovers

If you have any cake left, you need to keep it cold. It will stay fresh in the fridge for about five days. Make sure to cover it tightly with plastic wrap or put it in a container. If you leave it uncovered, it will soak up smells from other food like onions or leftovers. Nobody wants a lime cake that tastes like yesterday’s dinner! FYI, you can also freeze this cheesecake if you want to save it for later.
To freeze it, wrap individual slices in plastic wrap and then put them in a freezer bag. They will stay good for two months. When you want a treat, just pull a slice out and let it thaw in the fridge for an hour. It is a great way to have a quick dessert ready whenever you have a craving. I sometimes eat the slices half-frozen on hot summer days. It tastes almost like a lime ice cream bar!
Storage and Make-Ahead Tips
- Fridge Life: Keep covered for up to 5 days.
- Freezing: Freeze slices for up to 2 months in airtight bags.
- Make-Ahead: Best if made 24 hours before serving.
- Avoid Moisture: Do not add whipped cream until right before serving.
Key Lime vs Regular Lime

You might wonder if you can just use the big limes from the grocery store. You can, but the taste will be different. Regular limes (called Persian limes) are more floral and less acidic. Key limes are very small, have more seeds, and a much sharper juice. If you use regular limes, the cake will be sweet but might lack that “punch.” If you cannot find fresh Key limes, look for bottled Key lime juice in the baking aisle. It is a great shortcut!
Juicing those tiny limes is a lot of work. It might take 15 or 20 of them just to get half a cup of juice. I learned a lesson the hard way: do not try to squeeze them by hand if you have any small cuts on your fingers. It hurts a lot! Use a small hand juicer if you have one. If you use the bottled juice, make sure it is 100% juice and not a sugary mixer. This ensures your cake has the authentic flavor of the Florida Keys.
Common Questions About This Cake
Can I make this without a water bath?
Yes, but the top might crack. You can place a pan of water on the bottom rack of the oven instead of putting the cake directly in it. This adds moisture without the risk of leaks.
What if I don’t have graham crackers?
You can use vanilla wafers or ginger snaps. Just crush them up the same way. Ginger snaps add a nice spicy kick that goes great with lime.
Why did my cheesecake sink in the middle?
This usually happens if you beat too much air into the eggs or if the cake cooled down too fast. Try mixing on low speed and letting it sit in the oven after turning the heat off.
Is there a substitute for sour cream?
Plain Greek yogurt works well. It has a similar thick texture and tang. Make sure to use the full-fat version so the cake stays creamy.
How do I tell if the limes are ripe?
Key limes actually turn a bit yellow when they are ripe. Pick the ones that feel heavy for their size. This means they are full of juice.
Time to Enjoy Your Tropical Dessert
This Key lime cheesecake is a wonderful way to bring a bit of the tropics into your home. It takes some time and effort, but the creamy and tart result is worth it. Follow the steps, keep an eye on your oven, and enjoy every bite!