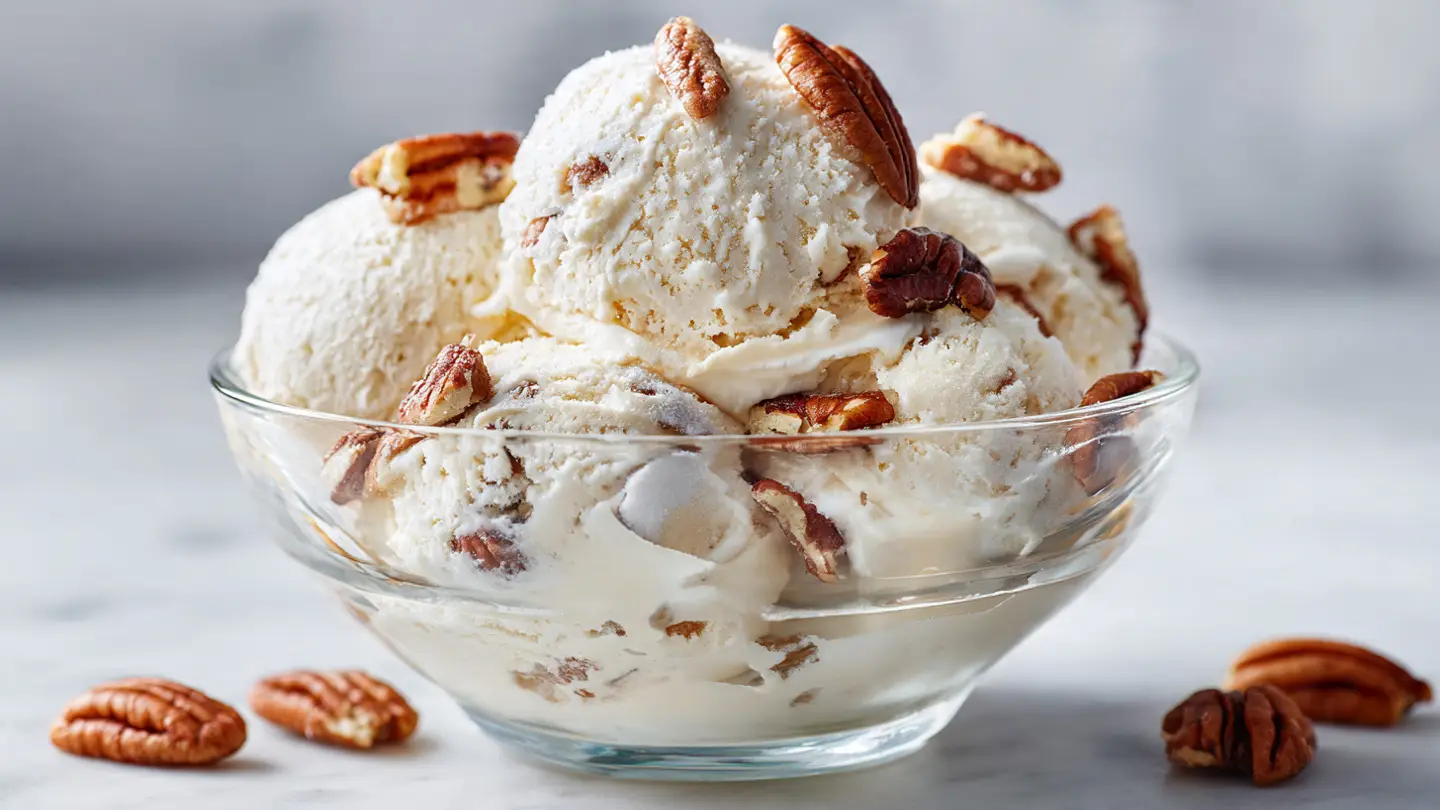
Buttery Butter Pecan Ice Cream with Toasted Nuts
Making ice cream at home is one of the best things you can do in your kitchen. There is something so special about watching liquid cream turn into a thick, cold snack. I love the smell of butter and nuts cooking on the stove. It makes the whole house smell like a bakery. You are going to learn how to make the richest, most buttery ice cream ever. This is not like the stuff you buy at the store. It is much better because we use real ingredients and lots of love.
I remember the first time I tried to make this flavor. I was so excited that I forgot to cool the nuts down before adding them to the milk. The whole batch turned into a weird, warm soup. It was a big mess! But I learned my lesson. Now I know the secrets to getting that perfect crunch and that deep, brown butter taste. I want to share those secrets with you today so your ice cream turns out perfect on the first try.
Get your ice cream maker ready and grab a big spoon. We are going to make a treat that will make everyone smile. This recipe is easy to follow, and I will guide you every step of the way. Let’s get started on this cold and crunchy adventure!
Recipe Quick Info
- Prep Time: 30 minutes
- Cook Time: 15 minutes
- Servings: 8 people
- Difficulty: Medium
Gathering Your Fresh Ingredients
Before you start, you need to make sure you have everything on your counter. Using fresh milk and good butter makes a huge difference in how this tastes. You do not want to use old nuts because they can taste bitter. Check your pantry for sugar and salt, too. Having everything ready makes cooking much more fun and less stressful. If you have to run to the store halfway through, the ice cream might not turn out right.
The Shopping List for Success

To make this ice cream, you will need some basic things from the store. Most of these are easy to find. I like to get the best butter I can find. It really helps the flavor pop. Here is what you need to put in your cart:
- 2 cups of heavy whipping cream
- 1 cup of whole milk
- 3/4 cup of packed brown sugar
- 1/2 cup of white sugar
- 1/2 cup of unsalted butter
- 1 1/2 cups of chopped pecans
- 4 large egg yolks
- 1 teaspoon of vanilla extract
- 1/2 teaspoon of salt
Each of these parts has a job. The cream makes it smooth. The brown sugar gives it a deep, dark sweetness. The egg yolks make it thick like a custard. If you skip the salt, the ice cream will taste too sweet and flat. Salt is the secret to making all the other flavors stand out. IMO, the pecans are the stars of the show, so do not be shy with them.
Choosing Your Kitchen Tools

You do not need a lot of fancy machines, but a few tools are very important. The most important thing is an ice cream maker. If you have the kind with a bowl that needs to freeze, put it in the freezer the night before. I once tried to make ice cream with a bowl that was only half-frozen. It stayed liquid for an hour! It was very sad to see all that work go to waste.
You will also need a saucepan to heat the milk. A whisk is great for mixing the eggs. A fine-mesh strainer is a good idea too. It helps catch any tiny bits of cooked egg so your ice cream is super smooth. Lastly, get a container with a lid to store the finished treat in the freezer. A metal pan works best because it gets cold very fast.
The Cooking Process Step by Step
Now that we have our tools and food, it is time to cook. This part is where the magic happens. We have to be careful not to rush. Making a custard takes a little bit of patience. If you heat the eggs too fast, they will turn into breakfast! We want a smooth sauce, not scrambled eggs. Just follow these steps and you will be fine.
Toasting the Nuts and Butter

The first step is to make the pecans taste amazing. Raw pecans are okay, but toasted pecans are incredible. Put your butter in a small pan over medium heat. Let it melt until it starts to bubble and turn a little brown. This is called brown butter. It smells like nuts and toasted bread. It is one of my favorite smells in the world.
- Add the pecans to the melted butter in the pan.
- Stir them around for about 5 to 7 minutes.
- Wait until you can smell the nuts toasting.
- Sprinkle a little salt over them while they cook.
- Take the pan off the heat.
- Drain the nuts and save the butter that is left over!
Do not throw away that butter. That butter is full of pecan flavor. We will put it into the ice cream mix later. Let the nuts cool on a plate. If they are hot when they go into the ice cream, they will get soggy. We want them to stay crunchy when you bite into them. This is a big step that many people skip, but it is the secret to a great batch.
Making the Sweet Custard Base

Next, we make the base. This is the liquid that will freeze into ice cream. Put your milk, half of the cream, and all the sugar into a pot. Heat it up until it is hot but not boiling. While that heats up, put your egg yolks in a bowl and whisk them until they are smooth. This is the part where we have to be gentle.
Slowly pour a little bit of the hot milk into the eggs while you whisk. This warms the eggs up slowly. Then, pour the egg mix back into the big pot. Cook it on low heat. Stir it the whole time with a wooden spoon. You will know it is ready when it gets thick enough to coat the back of the spoon. If you see bubbles, it is too hot! Turn the heat down. Once it is thick, pour it through a strainer into a clean bowl. Mix in the rest of the cold cream and that yummy leftover pecan butter.
Pro Tip for Smooth Base
- The Ice Bath: To cool your custard fast, put the bowl inside a larger bowl filled with ice and water. Stir it for 10 minutes. This stops the cooking and keeps it safe.
Chilling and Churning the Mix

You cannot put warm custard into the ice cream maker. It just won’t work. You need to put the bowl in the fridge for at least 4 hours. Over-night is even better. The colder the mix is, the smaller the ice crystals will be. Small crystals mean the ice cream feels like silk on your tongue. Large crystals make it feel like frozen slush. Nobody wants that!
When the mix is very cold, pour it into your ice cream machine. Turn it on and let it spin. It usually takes about 20 to 30 minutes. You will see it grow in size as air gets mixed in. It will start to look like soft-serve ice cream. This is the most exciting part to watch. Just when it looks almost done, it is time to add the final touch. Pour in those toasted pecans you made earlier. Let the machine mix them in for just one minute so they spread out evenly.
Serving and Enjoying Your Treat
You might want to eat the ice cream right out of the machine. I know I always do! But it is usually very soft at this point. If you want real scoops that sit on a cone, you have to wait a little longer. Put the ice cream in a container and freeze it for a few more hours. This makes it firm and perfect. It is hard to wait, but it is worth it.
The Best Ways to Serve

When you are ready to eat, take the container out of the freezer for five minutes. This makes it easier to scoop. You can serve it in a bowl or a waffle cone. I think it tastes best with a little bit of warm caramel sauce on top. The salt in the pecans and the sweet caramel go together perfectly. Real butter makes the flavor very deep.
You can also serve this with a warm slice of apple pie or a brownie. It is a very rich flavor, so a little goes a long way. If you have friends over, they will be so impressed that you made this from scratch. It tastes like a fancy dessert from a high-end restaurant. FYI, this ice cream stays good in the freezer for about two weeks, if you don’t eat it all first!
How to Store Your Ice Cream

Store your ice cream in the coldest part of your freezer. Do not put it in the door because the temperature changes every time you open it. To prevent ice from growing on top, press a piece of plastic wrap right onto the surface of the ice cream before you put the lid on. This keeps the air out. Air is the enemy of fresh ice cream.
If your ice cream gets too hard to scoop, just leave it on the counter for a few minutes. Don’t use the microwave! That will melt the edges and leave the middle like a rock. Just be patient. Homemade ice cream doesn’t have the chemicals that store-bought brands use to stay soft. That is actually a good thing. It means you are eating real food. Patience is the key to the best scoop.
Trying New Variations

Once you master the basic recipe, you can try new things. Some people like to add a little bit of cinnamon to the milk while it heats up. This gives it a warm, spicy flavor that is great in the fall. You could also swap the pecans for walnuts or almonds if you like those better. Just make sure to toast them in butter first!
Another fun idea is to add chocolate chips at the very end. The dark chocolate tastes great with the salty nuts. Or, you can use maple syrup instead of white sugar for a different kind of sweetness. There are so many ways to make this recipe your own. I like to experiment with different amounts of salt to see how it changes the taste. Cooking is all about finding what you like best.
Fun Facts About Butter Pecan
Did you know that butter pecan is one of the most popular flavors in America? It has been around for a long time. People love it because it feels cozy and fancy at the same time. The pecans we use mostly grow in the southern part of the United States. They have a lot of healthy fats, but let’s be honest, we are here for the butter and sugar! It is okay to have a treat sometimes.
Why Homemade is Better

When you buy ice cream at the store, read the label. You will see a lot of long words that are hard to say. In this recipe, we only use things you know. We use real eggs, real cream, and real butter. You can taste the difference immediately. The texture is much heavier and more satisfying. Fresh ingredients always win.
Also, you get to control the nuts. I hate it when I buy a pint of ice cream and there are only three tiny nut pieces. When you make it yourself, you can put in as many as you want. I like a lot of crunch, so I always add extra. You are the boss of your kitchen! Making your own food is a great way to learn how flavors work together.
Creative Questions About This Recipe
Can I make this without an ice cream maker?
Yes, but it is harder. You have to put the mix in a pan and stir it every 30 minutes by hand while it freezes. It takes all day and might not be as smooth.
What if I have a nut allergy?
You can skip the pecans and just make brown butter ice cream. It still tastes like toasted toffee and is very delicious on its own.
Why did my custard turn lumpy?
The heat was likely too high. You cooked the eggs! You can try to fix it by putting the mix in a blender, but it is best to cook it low and slow next time.
How long do the toasted pecans last?
They are best fresh. If you have extras, keep them in a jar for up to a week. They are a great snack on their own too!
Can I use milk instead of heavy cream?
You can, but it will be very icy. The fat in the cream is what makes it creamy. If you use only milk, it will feel more like an ice pop than ice cream.
Happy Scooping and Sharing
I hope you enjoy making this butter pecan ice cream as much as I do. It is a rich and creamy treat that brings people together. Remember to toast those nuts and keep the heat low for the best results. Enjoy your delicious homemade dessert!