Flaky Fruit Danishes for a Perfect Brunch
I love waking up to the smell of butter and sugar. There is something special about a warm pastry on a Sunday morning. You do not have to be a master baker to make these at home. I used to think danishes were too hard to make myself. I was wrong and I want to show you why.
In this guide, you will learn how to make flaky fruit danishes from scratch. We will talk about the dough, the sweet cheese filling, and the bright fruit toppings. You will see how simple steps lead to a beautiful breakfast. These treats look fancy but they are very friendly for beginners.
Grab your apron and get ready to bake something your family will love. Scroll down to see what you need to start.
Getting Started with Your Brunch Pastries
Making danishes is a fun way to spend a morning. I remember the first time I tried this. I was so scared the dough would not rise. I watched the oven like a hawk. When I took them out, they were golden and crisp. My whole house smelled like a French bakery. It was a proud moment for me.
You might think you need a lot of fancy tools. You really do not. A rolling pin and a baking sheet are the main things. I like using fresh fruit because it looks like a jewel in the middle of the bread. If you are nervous, just take it one step at a time. Baking is just following a map to a yummy place.
Recipe Quick Info
- Prep Time: 40 minutes
- Cook Time: 20 minutes
- Servings: 12 danishes
- Difficulty: Medium
Gather Your Ingredients

First, you need to check your pantry. Most of these things are likely in your kitchen right now. You need all-purpose flour for the base. This flour is strong enough to hold the butter but soft enough to stay light. You also need sugar to make the dough a little sweet. Do not forget salt because it makes all the other flavors pop. Salt is a secret hero in baking.
The most important part is the butter. Use unsalted butter so you can control the salt yourself. It needs to be cold. If the butter gets too warm, the pastry will be greasy instead of flaky. You also need milk and one large egg. For the fruit, you can pick berries, peaches, or even canned pie filling if you are in a rush. Here is a full list to help you shop:
- 3 cups all-purpose flour
- 1/4 cup granulated sugar
- 1 packet instant yeast (about 2.25 teaspoons)
- 1 teaspoon salt
- 1 cup cold unsalted butter (cut into small cubes)
- 1/2 cup cold milk
- 1 large egg
- 8 ounces cream cheese (softened)
- 1/4 cup powdered sugar
- 1 cup fresh berries or sliced fruit
Making the Pastry Dough

Start by mixing your flour, sugar, yeast, and salt in a big bowl. Give it a quick stir. Now, take your cold butter cubes and toss them in. Use your fingers or a fork to smash the butter into the flour. You want the pieces to be about the size of peas. If they are too small, you lose the flakes. If they are too big, they might leak out while baking. IMO, this is the most relaxing part of the whole process.
Next, pour in your milk and the egg. Stir it until a shaggy dough forms. It will look a bit messy and that is okay. Turn it out onto a floured surface. I learned a lesson early on: do not overwork the dough. If you touch it too much, the heat from your hands melts the butter. Just press it together into a square. Wrap it in plastic and let it chill in the fridge for at least thirty minutes. This rest time lets the flour soak up the liquid.
The Secret of Folding

This is where the magic happens. We call this laminating. It sounds fancy but it just means folding. Take your chilled dough out and roll it into a long rectangle. Fold the top third down to the middle. Then fold the bottom third up over that. It looks like a letter you are putting in an envelope. This creates layers of butter between layers of dough. When the heat hits the oven, the water in the butter turns to steam and puffs the layers up.
Turn the dough and do it again. Roll it out and fold it one more time. This is my favorite part because you can see the dough getting smooth. If the dough feels sticky, add a tiny bit of flour. Put it back in the fridge for another twenty minutes. Chilling is the key to success here. If you skip the chill, your danishes might come out flat. Patience is a big part of being a good baker.
Preparing the Sweet Cheese Filling

While the dough rests, make the filling. Put your softened cream cheese in a bowl. Add the powdered sugar and a splash of vanilla. Mix it until it is very smooth. You can use a spoon or a small hand mixer. I like to taste a little bit to make sure it is sweet enough. It should taste like a light cheesecake. This filling acts like a bed for your fruit to sit on.
You can change the flavor if you want. Some people like to add a little lemon zest for a bright kick. Others might add a pinch of cinnamon. This is your chance to be creative. Just make sure the cream cheese is soft before you start. If it is cold, you will have lumps. Lumpy filling is not very fun to eat. Make sure you set this aside at room temperature so it stays easy to spread.
Cutting and Shaping the Pastry

Now we get to build the danishes. Roll your dough out into a large square about half an inch thick. Use a knife or a pizza cutter to cut it into smaller squares. I usually aim for four-inch squares. To make the classic shape, take two opposite corners and fold them into the center. Press them down firmly so they do not pop open. You can also just fold all four corners in if you want a rounder look.
Place these shapes on a baking sheet lined with parchment paper. Leave some space between them because they will grow. Use your thumb to make a small dent in the middle of each square. This is where the cheese and fruit will go. FYI, if the dough feels too soft again, put the whole tray in the fridge for ten minutes. Keeping the dough cold until it hits the oven is the best tip I can give you.
Adding the Fruit Toppings

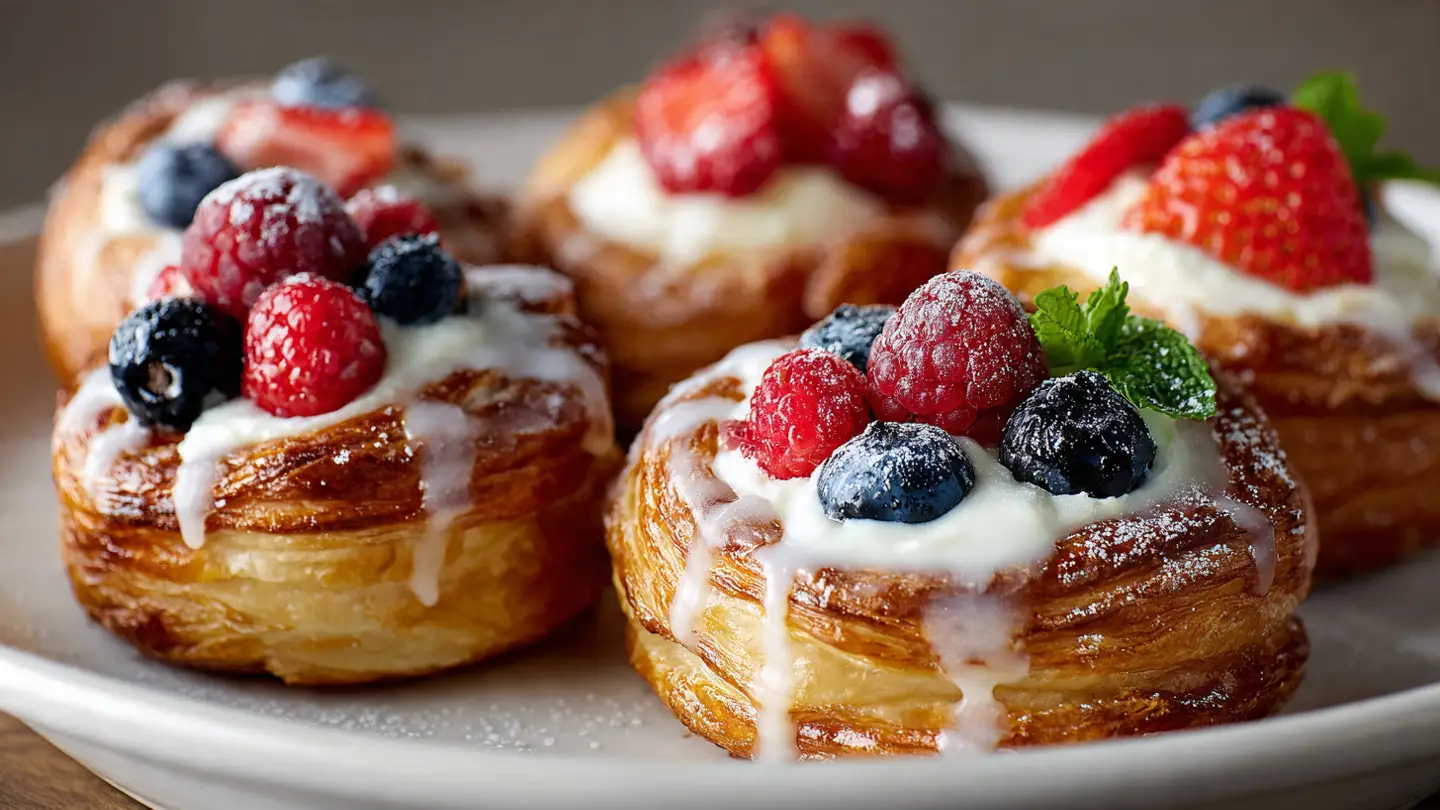
Take a spoonful of your cream cheese mixture. Drop it right into the center of each dough square. Do not use too much or it will spill over the sides. Then, press your fruit into the cheese. I love using raspberries and blackberries because they look so pretty. If you use larger fruit like peaches or apples, slice them thin. This ensures they cook at the same speed as the pastry.
One mistake I once made was using frozen fruit that was still wet. It turned the dough soggy. If you use frozen berries, let them thaw and pat them dry with a paper towel first. Fresh is always better if you can find it. The colors of the fruit will get darker and deeper as they bake. It makes the danishes look like they came from a high-end shop. Your friends will be very impressed when they see these.
Expert Baking Tips
- Egg Wash: Brush the edges of the dough with a beaten egg for a shiny golden finish.
- Cold Trays: Never put dough on a warm baking sheet. It melts the butter instantly.
- Oven Temp: Make sure your oven is fully heated before you put the tray inside.
Baking to Golden Perfection

Heat your oven to 400 degrees. This high heat is what makes the pastry puff. Before you put them in, brush the edges of the dough with a little bit of beaten egg. This gives them a beautiful shine and a deep golden color. Bake them for about 15 to 20 minutes. You want the bottoms to be firm and the tops to be brown. Watch them closely in the last few minutes because sugar can burn fast.
When you pull them out, the smell will be amazing. Let them sit on the tray for a few minutes. If you try to move them right away, they might break. They are very delicate when they are hot. As they cool, the pastry will settle and become extra crunchy. This is a great time to make some coffee or tea. A warm danish and a hot drink are the best pair for a slow morning.
The Final Sweet Glaze

To make them look extra special, you can add a simple glaze. Mix a cup of powdered sugar with a tablespoon of milk. Stir it until it is thick but can still run off a spoon. Drizzle it over the danishes once they have cooled down a bit. If you do it while they are too hot, the glaze will just melt and disappear. You want to see those pretty white lines on top of the fruit.
I like to use a fork to flick the glaze back and forth. It does not have to be perfect. Messy lines look rustic and home-made. This adds one last hit of sweetness that balances the tangy cream cheese. If you don’t like too much sugar, you can skip this step. The fruit and pastry are already very good on their own. But for a real brunch treat, the glaze is the cherry on top.
Serving Your Brunch Treats

Danishes are best eaten the same day you bake them. That is when they are the crispest. Put them on a big platter and let people grab their favorite fruit. These are great for a holiday breakfast or a birthday treat. If you have leftovers, you can keep them in an airtight container. To make them crunchy again the next day, put them in a toaster oven for a few minutes. Avoid the microwave because it makes them soft and chewy.
I once served these at a party and everyone thought I bought them. When I told them I made the dough, they could not believe it. It feels good to share something you made with your own hands. You can also serve these with a side of Greek yogurt or some extra fresh fruit. They are light enough that you can eat more than one. I usually end up eating two myself!
Common Questions About Baking Danishes
You might have some questions before you start your baking day. It is normal to feel a bit unsure when working with yeast or puff pastry. I have gathered the most common things people ask me. These answers will help you feel like a pro in the kitchen. Remember, even if they do not look perfect the first time, they will still taste delicious.
Can I use store-bought puff pastry instead?
Yes! If you are short on time, use frozen puff pastry. Just thaw it out and follow the shaping and filling steps. It will still be very tasty and saves about an hour of work.
What other fruits can I use for the middle?
You can use almost any fruit. Apricots, cherries, and thinly sliced apples work great. Just make sure the fruit is not too watery so the pastry stays crisp while baking.
Why did my danishes leak butter on the tray?
This usually happens if the dough gets too warm before baking. The butter melts instead of steaming. Always keep your dough cold and make sure your oven is fully preheated to 400 degrees.
How do I store the leftovers for later?
Keep them in a sealed container at room temperature for two days. For longer storage, put them in the fridge. Always reheat them in an oven or air fryer to bring back the flaky texture.
Happy Baking to You
Baking these danishes is a great way to show love to your friends and family. You now know the secrets of folding dough and making a creamy filling. Take your time and enjoy the process. I hope your kitchen smells like butter and joy today. Enjoy every single bite of your home-made pastry!