Homemade Cosmic Brownies (A Nostalgic Treat)
Do you remember finding a small, shiny foil bag in your lunchbox at school? Inside was a thick, dark square of chocolate cake. It had a smooth chocolate top and bright rainbow candy bits. These were the famous cosmic brownies. Most kids loved them because they were so chewy and sweet. Today, I am going to show you how to make them at home. They taste even better when you make them in your own kitchen.
Making these at home is very easy. You do not need a big mixer or fancy tools. I like this recipe because it uses simple things from the pantry. You will learn how to get that special chewy texture that makes these brownies different from regular cake. We will also make a very smooth chocolate topping that stays soft but does not run off the sides. It is a fun project for a rainy day or a weekend treat.
Get your apron ready and clear off your counter. We are going to make a dessert that feels like a trip back in time. It is time to bake some magic.
Tell me, are you ready to start baking?
Brownie Quick Info
- Prep Time: 15 minutes
- Cook Time: 25 minutes
- Servings: 16 brownies
- Difficulty: Easy
The Secrets to the Perfect Fudgy Base
A cosmic brownie is not like a regular brownie. It is much denser and more like fudge. If you bake a normal boxed brownie, it might be too light or airy. To get the right feel, we have to change how we mix the ingredients. I found that using more sugar and less flour helps a lot. It makes the brownie heavy in a good way. You want it to feel substantial when you take a bite.
I once made the mistake of over-baking my first batch. They came out dry and crumbly like a cookie. That was a sad day. I learned that taking them out of the oven early is the key. They should still look a little soft in the middle. They will firm up as they cool down on the counter. This is what keeps them moist and chewy for days. If you wait until they look totally done, you have waited too long.
The Ingredients You Will Need

You only need a few basic things to make these brownies. Most of these are already in your kitchen. You will need butter, sugar, eggs, and vanilla. For the dry parts, you need cocoa powder, flour, and a little salt. I suggest using unsweetened cocoa powder for the best chocolate flavor. It gives the brownies that deep dark color we all remember from the store-bought ones. Make sure your eggs are at room temperature so they mix in well.
One thing that makes this recipe work is cornstarch. Adding just a little bit of cornstarch makes the brownies very tender. It stops the flour from getting too tough. This is a small trick that most people skip, but it makes a huge difference. You also need heavy cream and chocolate chips for the frosting on top. Do not forget the rainbow candy coated chocolate chips! Those are the most important part for the look. FYI, you can find those candy bits in the baking aisle or online.
How to Mix the Batter Properly

Start by melting your butter. I usually do this in the microwave in short bursts. You do not want the butter to be boiling hot, just melted and warm. Stir in your sugar and cocoa powder while the butter is still warm. This helps the cocoa powder dissolve and release its flavor. It smells amazing when the chocolate hits the warm butter. After that, add your eggs one at a time and whisk them in by hand. You do not need an electric mixer for this part.
When you add the flour and salt, stop whisking and use a spoon or a spatula. You want to fold the flour in gently. If you mix it too much, the brownies will get tough like bread. Mix until you do not see any more white streaks of flour. The batter should look very thick and shiny. It will be much thicker than a cake mix. This thickness is what gives the brownie its fudgy heart. Once it is mixed, spread it into a pan lined with parchment paper. Parchment paper is great because it lets you lift the whole block out later.
Baking Tips for the Best Texture

Preheat your oven to 350 degrees. Most ovens take about ten minutes to get hot enough. Put your pan in the middle rack so the heat hits it evenly. I usually bake mine for about 22 to 25 minutes. Every oven is a little bit different, so keep an eye on them. If you use a glass pan, it might take a few minutes longer than a metal pan. Metal heats up faster and gives the edges a nice little crunch. I prefer metal pans for these brownies.
Check the brownies with a toothpick near the end. You want the toothpick to come out with a few moist crumbs on it. If it comes out totally clean, they might be getting dry. If it comes out with wet batter, they need more time. This may not work if your oven runs very hot or very cold. If you are worried, buy a cheap oven thermometer to check the temperature. Once they are done, let them cool in the pan for at least an hour. They need to be totally cold before we add the chocolate layer.
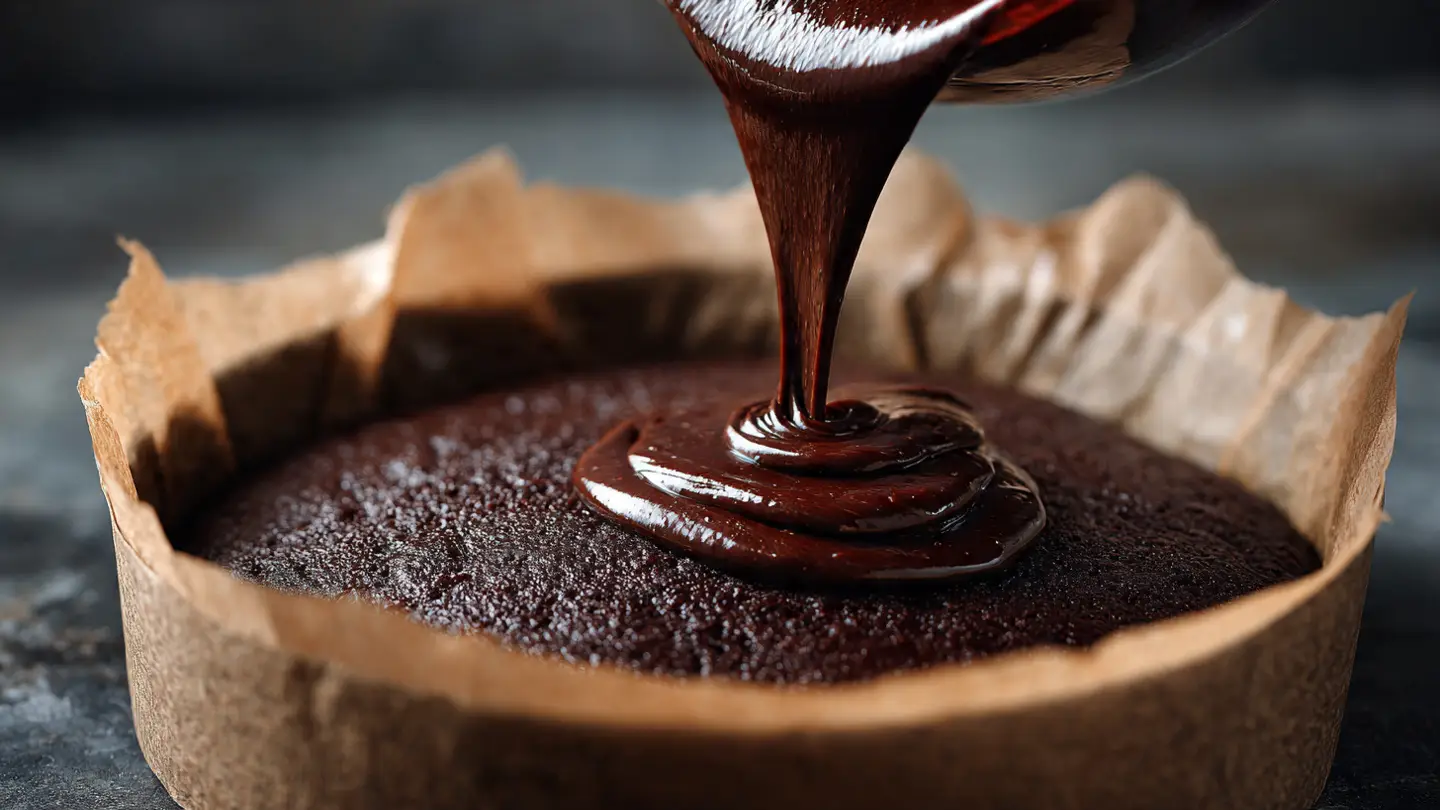
The Famous Ganache Topping
The best part of a cosmic brownie is the thick layer of chocolate on top. It is not like regular frosting that is fluffy and full of air. This is called a ganache. It is made of just two things: chocolate and cream. When you mix them together, they create a silky smooth coating that sets into a soft fudge. It is very rich and tastes much better than the frosting from a can. You will feel like a professional baker when you see how shiny it looks.
I love making ganache because it is very fast. You just have to be careful not to burn the chocolate. If you get water in the chocolate, it will get clumpy and weird. This is called seizing. Make sure your bowl and spoon are totally dry before you start. If you make a mistake and it gets clumpy, you can sometimes fix it by adding a tiny bit more warm cream and stirring fast. But it is better to just keep everything dry from the start. IMO, this is the most satisfying part of the whole recipe.
Preparing the Chocolate Ganache

Put your chocolate chips in a heat-proof bowl. I like to use semi-sweet chips because they balance the sweet brownie well. Heat your heavy cream in a small pot on the stove. Watch it closely. You want it to just start bubbling around the edges. Do not let it come to a big rolling boil. Once it is hot, pour the cream over the chocolate chips. Let it sit there for five minutes without touching it. This lets the heat from the cream melt the chocolate all the way through to the middle.
After five minutes, take a whisk or a spoon and start stirring in the middle of the bowl. At first, it will look like a mess. Keep stirring slowly. Suddenly, the cream and chocolate will come together and turn into a dark, glossy liquid. It should be smooth with no lumps. If you still see some bits of chocolate, you can put the bowl over a pot of warm water for a minute. This is a gentle way to finish the melting. This ganache is what makes the brownies look so professional and tasty.
Adding the Finishing Touches

Once your brownies are cool and your ganache is ready, it is time to put them together. Pour the warm ganache right over the top of the brownies in the pan. Use a flat knife or a spatula to push it to the corners. You want a thick, even layer of chocolate everywhere. It will look like a mirror when you are done. This is the moment where you have to be patient. Do not put the candy on yet if the chocolate is too thin and hot, or they might sink to the bottom.
Wait about five or ten minutes for the chocolate to cool down just a little bit. Now, grab your rainbow candy chips. Sprinkle them all over the top. You can use as many as you want. I like to cover the whole surface so every bite has a crunch. The bright colors look so pretty against the dark chocolate. After the candy is on, put the whole pan in the fridge. The ganache needs to set for at least two hours. If you try to cut them now, the chocolate will just slide everywhere and make a big mess.
Cutting and Serving the Brownies

Cutting these brownies can be tricky because the chocolate is sticky. Here is a practical cooking tip most blogs skip: use a hot knife. Run your knife under hot water for a few seconds, then wipe it dry with a towel. The heat from the metal will slide through the chocolate like butter. This gives you those perfectly sharp, clean edges that look like they came from a store. Wipe the knife clean after every single cut. It takes a little more time, but the results are worth it.
I usually cut mine into small squares. Since they are very rich, a small piece is usually enough to make someone happy. You can see the dark fudgy bottom and the thick chocolate top. They look exactly like the ones from the box but they smell much fresher. If you are serving them at a party, you can put them on a big plate. They stay good at room temperature for a while, but I think they taste best when they are slightly cool. They are great with a big glass of cold milk.
Storage and Keeping Them Fresh

If you have any brownies left over, you need to store them the right way. These brownies have a lot of moisture, so they can get soft if left out in the air. Put them in a container with a tight lid. You can keep them on the counter for about three days. If you want them to last longer, put the container in the fridge. They will stay fresh for up to a week in the refrigerator. The cold also makes them even chewier, which some people really like.
You can even freeze these brownies if you want to save them for a long time. Wrap each square in plastic wrap and then put them in a freezer bag. They will stay good for two months. When you want one, just let it sit on the counter for thirty minutes to thaw out. It is a great way to have a snack ready whenever you have a chocolate craving. Just make sure you hide them in the back of the freezer, or your family might eat them all before you get a chance!
Pro Baker Tips
- Use a Metal Pan: Metal pans help the edges get that classic chewy texture better than glass does.
- Don’t Over-Mix: Only stir until the flour disappears to keep the brownies from becoming like bread.
- Chill Before Cutting: Always let the ganache set in the fridge so your squares stay neat and pretty.
Fun Ways to Change the Recipe
Once you know the basic recipe, you can try different things. You do not have to stick to the rainbow candy if you want to try something new. I sometimes change the toppings based on the holiday. For example, you can use red and green candies for Christmas or orange and black for Halloween. It makes the brownies feel special for any time of year. You can also change the flavor of the ganache by adding a little bit of peppermint or orange extract to the cream.
If you do not have heavy cream, you can use a different method. You can melt chocolate chips with a little bit of butter or even a spoonful of corn syrup. It will not be exactly the same as ganache, but it will still be a yummy chocolate coating. Some people also like to add nuts to the brownie batter. Walnuts or pecans give a nice crunch to the soft base. However, the classic version is usually a favorite for most people because it brings back so many childhood memories.
Making a Dairy-Free Version

If you cannot eat milk or butter, you can still enjoy these treats. I have tried making them with vegan butter and it works very well. For the ganache, you can use full-fat coconut milk from a can instead of heavy cream. Just make sure you use the thick white part at the top of the can. It melts the chocolate just as well and makes a very shiny topping. The flavor will have a tiny hint of coconut, but the chocolate usually hides it well.
For the brownie base, you can use a light oil like avocado oil instead of butter. The texture will be a little different, but still very fudgy. Just be sure to find candy bits that do not have milk in them. There are many brands now that make chocolate candies for people with allergies. This way, everyone at the party can have a brownie without feeling left out. It is always nice to have a recipe that you can change for your friends.
Giant Cosmic Brownie Cake
If you are having a birthday party, you can turn this recipe into a giant cake. Instead of using a square pan, use a round cake pan. You might need to bake it for a few extra minutes since it will be thicker. Once it is cool, pour the ganache over the whole thing and let it drip down the sides. It looks very fancy and fun. You can even write a name on top with some extra frosting or more candy bits.
A brownie cake is much easier to make than a regular layered cake. You do not have to worry about layers sliding or frosting falling off. It is sturdy and easy to carry to a friend’s house. I like to serve slices of the brownie cake with a scoop of vanilla ice cream. The cold ice cream melts a little bit on the chocolate and makes a perfect sauce. It is a real crowd-pleaser for kids and adults. You can even put a candle in the middle and make a wish!
Common Baking Questions
Why are my brownies cakey and not fudgy?
You might have used too much flour or mixed the batter too long. Use a scale for flour and stop mixing as soon as the white streaks go away.
Can I use milk chocolate instead of semi-sweet?
Yes, you can. It will make the brownies much sweeter. Semi-sweet is best for that classic dark chocolate look and taste.
What if I cannot find the rainbow candy chips?
You can use regular mini chocolate gems or even colorful sprinkles. They will still taste great even if the look is a little different.
How do I get the brownies out of the pan easily?
Always use parchment paper. Leave some paper hanging over the edges like handles. You can lift the whole block out once they are cold.
Do I have to use heavy cream for the top?
Heavy cream makes the best ganache. If you use milk, the topping will be too thin and won’t set properly in the fridge.
Time to Enjoy Your Treats
Baking these brownies at home is a great way to bring back a favorite childhood memory. They are rich, fudgy, and much better than the store version. I hope you enjoy sharing these colorful treats with your family and friends. Happy baking!