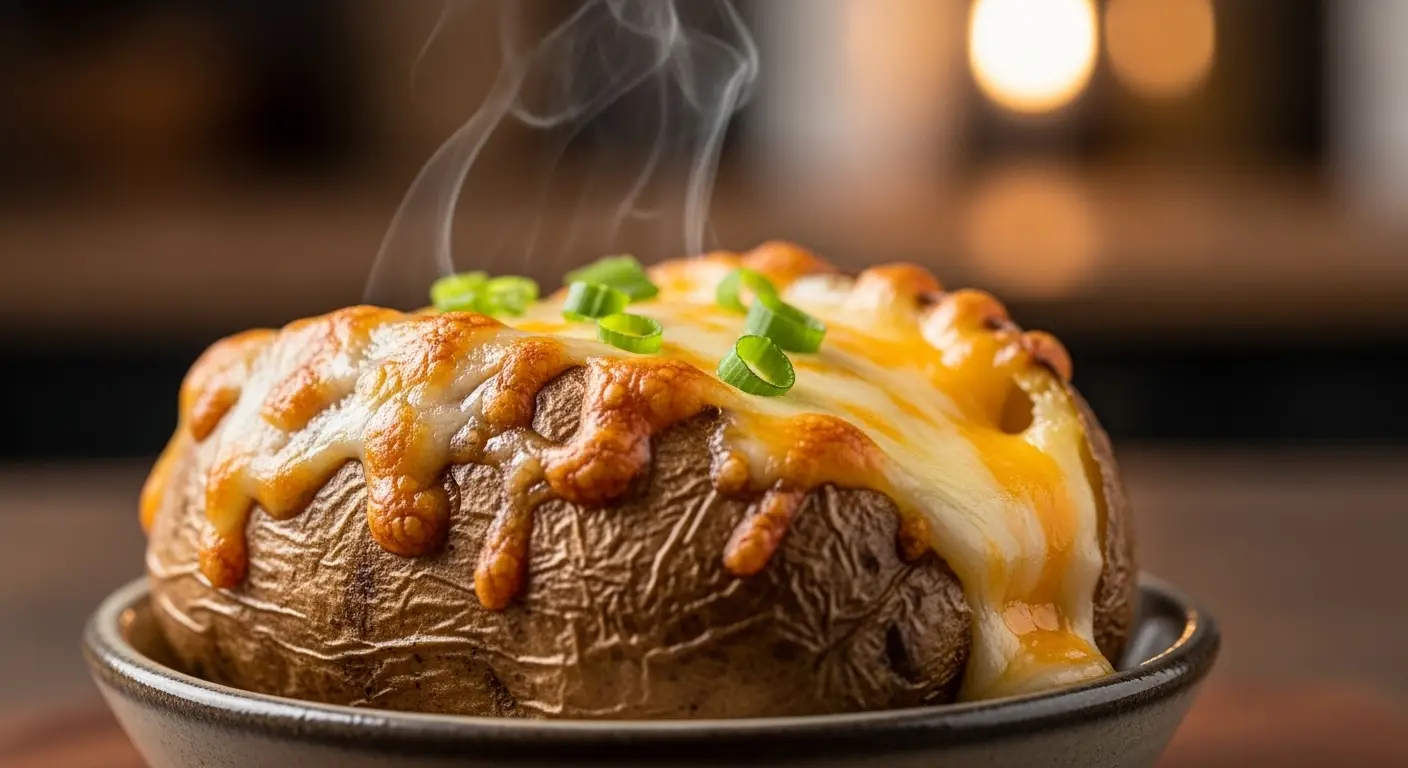
Loaded Potato Skins
Potato skins are the best snack for a hungry crowd. They are crispy on the outside, soft on the inside, and full of tasty toppings. Many people love them at restaurants. I think they are even better when you make them in your own kitchen. You do not need fancy tools or hard skills to get them right every single time.
In this guide, I will show you how to prepare the best skins. You will learn the secret to getting the potato shell just right so it stays crunchy. Once you know the basics, you can add your favorite meats or veggies. Get ready to cook a snack that everyone will love.
Check out the steps below to start your cooking project.
All About the Perfect Potato
Choosing the right potato matters a lot for this dish. You want a potato that holds its shape well when you scoop out the middle. This ensures your skins do not break or get soggy. I always use russet potatoes because they have a thick skin and a fluffy center.
Recipe Quick Info
- Prep Time: 15 minutes
- Cook Time: 60 minutes
- Servings: 8 skins
- Difficulty: Easy
Ingredients for Your Skins

To make these, you only need a few simple things. Go to the store and pick up four large russet potatoes. You also need oil to rub on the skin for crunch. Salt makes the flavor pop. For the inside, grab cheddar cheese, cooked bacon, and green onions. Sour cream is the final touch for serving.
- 4 large russet potatoes
- 2 tablespoons olive oil
- 1 teaspoon salt
- 1 cup shredded cheddar cheese
- 6 strips of cooked bacon
- 3 stalks of green onions
- 1/2 cup sour cream
Once you gather these, you are ready to start. Make sure your potatoes are clean and dry before you begin. Washing the dirt off is a step you should never skip.
Step-by-Step Instructions

First, heat your oven to 400 degrees. Poke holes in the potatoes with a fork so steam can escape. Bake them for one hour until they feel soft. Let them cool down for a few minutes so you do not burn your hands.
- Slice the baked potatoes in half lengthwise.
- Use a spoon to scoop out most of the inside, but leave a thin layer of potato against the skin.
- Brush both sides of the potato shells with oil and sprinkle with salt.
- Place the skins face down on a baking sheet and bake for 10 more minutes to crisp up.
- Flip the skins over, add cheese and bacon, and bake until the cheese melts.
- Top with chopped green onions and a dollop of sour cream.
If you have any leftover potato, do not throw it away! You can make mashed potatoes with it for dinner the next day. This is a great way to save money and reduce food waste.
Tips for Success and Variety
Cooking is all about finding what works for your taste. Sometimes, even the best cook makes a mistake. I once left my oven on too high, and the skins got burnt. Now, I always watch the timer closely during that last bake step. This keeps the cheese melty without burning the edges.
Tips and Variations

You can change the toppings to fit what you have in the fridge. Try adding black beans and jalapeños if you want a spicy kick. If you want something different, use mozzarella cheese and pepperoni for a pizza-style snack. FYI, turkey bacon works just as well as pork bacon if you prefer a lighter option.
One tip most people skip is drying the skins well before adding the oil. If the skin is wet, it will not get crispy. Use a paper towel to pat them dry after you scoop them out. This small step makes a big difference in the final texture.
Cooking Hacks
- Skin Crispiness: Always place the empty shells face down first. This allows the heat to hit the skin directly.
- Batch Prep: You can bake the potatoes a day ahead. Just keep them in the fridge until you are ready to fill and crisp them.
Serving Suggestions

These skins are best served right when they come out of the oven. The cheese should be bubbly and warm. I like to serve them on a large platter so people can grab their own. If you have guests, set out a few different sauces like ranch or salsa.
You can also serve these as a main meal with a fresh side salad. Because they are filling, two or three skins per person is usually enough. Just make sure to have plenty of napkins handy because they can be a little messy to eat!
Common Mistakes to Avoid

One common mistake is scooping out too much of the potato. If you remove all of it, the skin will collapse and become very thin. You need to leave a little bit of the potato flesh to give it structure. A good rule of thumb is to leave about 1/4 inch of potato in the shell.
Another issue is not using enough salt. Potatoes need a good amount of salt to taste good. Do not be afraid to season both the inside and the outside of the skins. This creates a much better flavor profile in every single bite.
Frequently Asked Questions
Can I make these in an air fryer?
Yes! Air fryers work great. Set it to 400 degrees and cook for about 8 to 10 minutes after you have scooped and oiled them. Watch them closely so they do not get too dark.
How do I store the leftovers?
Keep them in an airtight container in the fridge for up to 3 days. To reheat, put them back in the oven or air fryer until they are hot and crispy again.
Can I use sweet potatoes?
You can, but the flavor will be much sweeter. They also soften faster than russets, so check on them early while baking. They pair well with savory toppings like black beans.
What if the skins are not crispy enough?
Brush them with a little more oil and bake them for a few more minutes. Ensure your oven is fully preheated before you put the tray inside.
Are these healthy?
They are a treat! You can make them lighter by using less cheese, more veggies, and skipping the bacon. It all depends on what toppings you choose to add.
Final Thoughts on Potato Skins
Making loaded potato skins is a fun way to spend time in the kitchen. You get a crunchy, cheesy snack that tastes better than anything from a box. Remember to keep the heat high and the skins dry for the best result. Enjoy your cooking and have fun sharing these with friends or family.