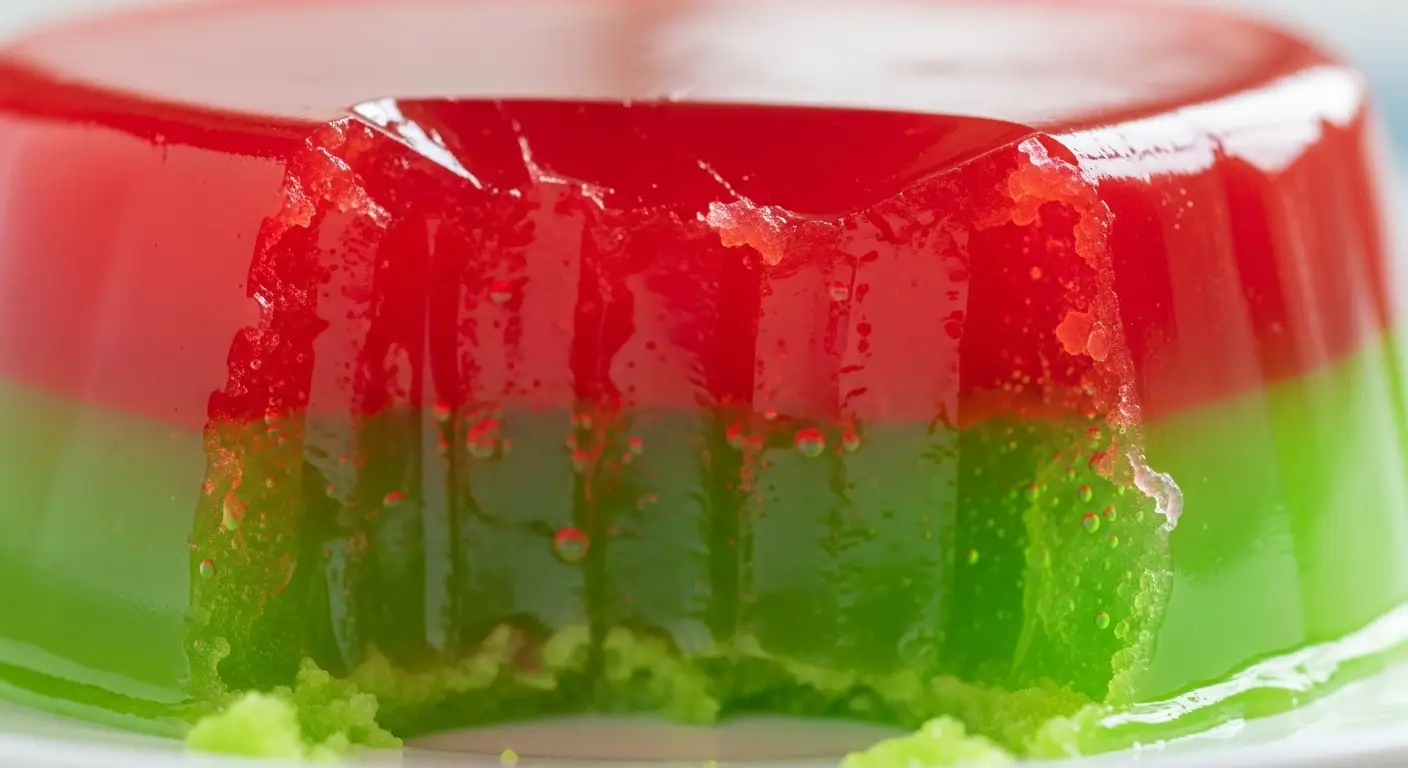
Red White Blue Finger Jello
Are you looking for a snack that is bright, fun, and very wiggly? You have come to the right place. Today I am showing you how to make Red White Blue Finger Jello. This treat is not like the soft jello you eat with a spoon. It is firm enough to pick up with your fingers. That makes it perfect for parties where people are walking around and talking.
I remember making this for the first time for a backyard picnic. I wanted something that looked like the American flag but tasted like candy. The kids went crazy for it, but honestly, the adults ate just as many pieces. It is a great way to bring some color to your table without spending a lot of money on fancy decorations. Plus, you can make it a day early so you are not busy in the kitchen when your friends arrive.
In this post, you will learn the secret to making those perfect, straight layers. I will also tell you how to keep the white layer from mixing with the colors. By the time we are done, you will be a jello pro. If you want to see how easy it is to make a snack that wiggles, keep reading!
Check out the simple steps below to get started on your own batch of finger jello.
The Magic of Layered Gelatin
Layered jello looks like it takes a long time to make. People often think it is hard because the lines are so straight. I used to think the same thing! I was afraid the colors would all run together and turn into a purple mess. But there is a trick to it. You just need a little bit of patience and a cold fridge. When you see those bright red, white, and blue stripes, you will feel like a kitchen superstar.
This recipe uses extra gelatin. That is why we call it finger jello. Regular jello from the box is too soft to hold. If you tried to pick it up, it would slide through your fingers. By adding unflavored gelatin, we make it tough. It feels a bit like a gummy bear but softer. It is a very cool texture that kids find super funny. Let’s look at what you need to get these layers started.
What You Will Need for Your Jello

To make this recipe, you need a few basic things from the store. You will need two boxes of red jello. Strawberry or cherry works best. You also need two boxes of blue jello. I usually pick the berry blue flavor because the color is very bright. These boxes provide the flavor and the main colors. For the white layer, you need unflavored gelatin. This comes in small paper packets inside a box. It has no taste or color on its own.
The secret ingredient for the white layer is sweetened condensed milk. This is very thick, sweet, and sticky. It makes the white layers look solid and creamy. You will also need plenty of water. I like to use a glass 9×13 inch pan. Using a clear pan is smart because you can see the layers from the side as they grow. Make sure you have enough room in your fridge for the pan to sit flat. If the pan is tilted, your layers will be crooked!
- 2 boxes (3 oz each) Red Gelatin (Strawberry or Cherry)
- 2 boxes (3 oz each) Blue Gelatin (Berry Blue)
- 4 packets (0.25 oz each) Unflavored Gelatin
- 1 can (14 oz) Sweetened Condensed Milk
- Boiling water and cold water
Recipe Quick Info
- Prep Time: 20 minutes
- Cook Time: 4 hours (chilling time)
- Servings: 24 squares
- Difficulty: Easy
Setting Up Your Kitchen Workspace

Before you start boiling water, clear off a spot on your counter. You need space to mix things. You also need to make sure your fridge has a flat shelf ready. I once tried to make this when my fridge was full of leftovers. I had to balance the pan on a carton of eggs. It was a disaster! The jello spilled, and the layers ended up looking like a slide. Now, I always check the fridge first.
I find it helps to have all my bowls ready. You will be mixing the red, then the white, then the blue. It is easier if you don’t have to wash the same bowl ten times. Also, grab a good whisk. A whisk helps get rid of the little clumps of powder. If you don’t mix it well, you will find hard bits of gelatin in your snack. Nobody wants a crunchy jello cube. FYI, a light spray of cooking oil on the pan helps the pieces come out later.
How to Make the Red Bottom Layer

We start with the red layer. Take one box of red jello and half a packet of unflavored gelatin. Mix them in a bowl with one cup of boiling water. Stir it slowly until you can’t see any powder at the bottom. This usually takes about two minutes. Once it is smooth, pour it into your glass pan. It will look like a thin red lake.
Put the pan in the fridge. It needs to stay there for about 15 to 20 minutes. You want it to be firm enough that it doesn’t move when you shake the pan, but still a little sticky on top. This stickiness helps the next layer stay attached. If you let it get too hard, the layers might slide apart when you cut them. I learned that lesson the hard way at a 4th of July party. My jello fell apart like a deck of cards!
Mixing the Creamy White Layer

While the red is getting cold, you can make the white mixture. This is the most important part because it makes the colors pop. In a clean bowl, mix two packets of unflavored gelatin with half a cup of cold water. Let it sit for a minute so the gelatin can soak up the water. This is called blooming. Then, add one and a half cups of boiling water and stir until it is clear.
Now, pour in the whole can of sweetened condensed milk. This is the best part! It turns the clear water into a beautiful, milky white liquid. Stir it well so the milk and gelatin are totally mixed. You need to let this mixture cool down to room temperature. If you pour hot white liquid onto the cold red jello, the red will melt. You will end up with a pink muddy mess. Take your time here. Let it sit on the counter for a bit.
Adding the Blue Top Layer

Once your red layer is ready and your white mixture is cool, pour half of the white mixture over the red. Use a large spoon to help. Pour the liquid onto the back of the spoon so it hits the red layer softly. Put it back in the fridge for another 20 minutes. After that, you will repeat the process with the blue jello. Mix the blue powder with unflavored gelatin and boiling water just like you did with the red.
Wait for the blue liquid to cool down before pouring it over the white layer. This layer-by-layer work is what makes the treat look so good. It feels like a science project. You are building a tower of colors. Once the blue is on top, let the whole pan sit in the fridge for at least three or four hours. Overnight is even better. The colder it is, the easier it will be to cut into squares.
Expert Jello Tips
- Temperature Check: Always make sure the liquid you are pouring is not hot. Room temperature is perfect.
- Air Bubbles: If you see bubbles on top, pop them with a toothpick for a smooth look.
- Perfect Squares: Use a sharp knife dipped in warm water to get clean cuts.
Serving and Storing Your Squares

When the jello is very firm, it is time to cut it. I like to use a long, thin knife. Run it along the edges of the pan first to loosen things up. Then, cut straight lines across and down to make squares. You can make them big or small. Small cubes are great for kids because they can pop the whole thing in their mouth. IMO, the smaller squares look more like fancy candy.
To store them, keep the squares in a sealed container in the fridge. They will stay good for about five days. Don’t leave them out on a hot table for too long. Even though they are firm, they can still get soft if it is very warm outside. If you are taking them to a park, put the container in a cooler with some ice. They taste best when they are cold and snappy.
Secrets to Perfect Layers
The most common mistake people make is rushing. I know it is hard to wait for things to get cold. You want to see the final result! But if you pour the layers too fast, they will mix. You will get a blurry line instead of a sharp one. If you want that professional look, use a timer on your phone. It helps you stay on track and reminds you when it is time for the next step.
Another thing to watch out for is the amount of gelatin. Some people try to use less because they want it to be softer. Don’t do that! This recipe needs the extra unflavored gelatin to hold the shape. Without it, you will just have a messy pile of fruit gelatin. This version is meant to be handled. It should feel sturdy, almost like a piece of fudge but with a jello bounce.
Variations for Other Holidays

Once you learn how to do this, you can change the colors for any event. You can use orange and black for Halloween. You can use green and red for Christmas. The white layer stays the same because the milk makes it look great with every color. I once made a rainbow version with six different layers. It took all day, but it was the talk of the party! Just remember that more layers mean more waiting time.
You can also change the flavor of the white layer. If you don’t like the taste of condensed milk, you can use coconut milk instead. It won’t be as sweet, but it will still be white and creamy. Some people even add a tiny bit of vanilla extract to the white mixture. It makes it taste like a creamsicle. Playing with flavors is half the fun of cooking.
Common Mistakes to Avoid

One big mistake is using too much water. If you follow the directions on the back of the jello box, the jello will be too soft. You must use my measurements instead. We use less water so the gelatin is very strong. Also, make sure you stir the unflavored gelatin really well. If you see little clear clumps, they will be chewy and gross in the final snack. Stir until everything is totally liquid.
Another issue is the “skin” that forms on the white mixture while it sits. If you let the white mixture cool on the counter for too long, a thin film might grow on top. Just stir it back in before you pour. If it is too thick, you can scoop it out with a spoon. Your jello will still taste great even if a little bit of the film gets in. It is all about making it work for you!
Frequently Asked Questions
Can I use sugar-free jello for this?
Yes, you can use sugar-free gelatin. The colors will still be bright, but the texture might be slightly different. The milk layer still needs the regular condensed milk for the best look.
How do I get the jello out of the pan easily?
Dip the bottom of the pan in warm water for about 10 seconds. This melts the very bottom just enough to let the squares slide out without sticking to the glass.
Can I make this in a different shape?
Totally! You can use cookie cutters to make stars or hearts. Just make sure the jello is very cold and firm before you press the cutters into it.
Why are my layers sliding apart?
This happens if the bottom layer gets too cold and hard before you add the next one. Try to add the next layer when the bottom one is just barely set and still a bit tacky.
How long does it stay fresh?
It stays fresh for about 5 to 7 days in the fridge. Keep it covered so it does not pick up any smells from other food like onions or leftovers.
Enjoy Your Wiggly Treat
Making Red White Blue Finger Jello is a fun way to bring color to any party. It takes a little time to wait for the layers, but the result is a beautiful snack that everyone loves to eat. It is cold, sweet, and very fun to hold. I hope you have a blast making these wiggly squares in your own kitchen!