Classic Rich Chocolate Fudge
Making fudge is like magic in your own kitchen. You take a few simple items and turn them into a thick, sweet treat that melts in your mouth. Many people think it is too hard to make, but I promise it is quite easy once you know the tricks. I am going to show you exactly how to get that perfect bite every single time.
Today you will learn how to pick the right chocolate and how to keep your fudge from getting grainy. We will walk through the steps together so your dessert looks and tastes like it came from a fancy shop. This is a great skill for any home baker to have in their pocket.
Check out the steps below to start your chocolate adventure!
Why Homemade Fudge is Better Than Store Bought
When you buy fudge at a store, it often has things in it to make it stay fresh for months. These things can make the fudge taste a bit like wax or plastic. When I make it at home, I use real butter and high-quality chocolate. The flavor is much deeper and the texture is much smoother than anything you can find in a box. It makes a huge difference in how much people enjoy the treat.
Another great thing about making it yourself is that you can change it up. If you want it a little less sweet, you can use darker chocolate. If you love salt, you can sprinkle a little on top. It gives you all the power over your snack. Plus, your house will smell amazing while the chocolate melts. It is a win for everyone involved.
The Science of Smooth Fudge

Fudge is all about sugar crystals. If the crystals get too big, the fudge feels like sand in your mouth. We want tiny crystals that you cannot even feel on your tongue. This happens by heating the sugar and then letting it cool down slowly without stirring it too much at the wrong time. It sounds like science class, but it is just about being patient with your pot.
I remember the first time I tried making fudge. I was so excited that I stirred the pot the whole time it was boiling. Big mistake! My fudge turned out like a dry brick of sugar. I learned that you have to let the bubbles do their work while the mix is hot. Once it cools down a bit, then you can beat it to make it thick and creamy. It is all about timing.
Gathering Your Simple Ingredients

You do not need a long list of fancy things to make this recipe. In fact, keeping it simple is usually better. The main star is the chocolate. I like using semi-sweet chocolate chips because they melt fast and have a balanced taste. You also need a can of sweetened condensed milk. This is the secret to a smooth texture without having to use a candy thermometer every time.
- 3 cups of semi-sweet chocolate chips
- 1 can (14 ounces) of sweetened condensed milk
- 1/4 cup of unsalted butter
- 1 teaspoon of pure vanilla extract
- 1/4 teaspoon of fine salt
Using real butter is very important here. Do not use margarine or oil spread. Butter adds a rich flavor and helps the fudge set firmly. Also, make sure your condensed milk is the sweetened kind. Evaporated milk is different and will not work the same way. If you use the wrong milk, your fudge will stay liquid and you will end up with a chocolate soup instead of a solid block.
Preparing Your Baking Pan

Before you even turn on the stove, you must get your pan ready. Fudge sets pretty quickly once it starts to cool, so you won’t have time to faff around with paper later. Use an 8×8 inch square pan for thick pieces. If you want thinner pieces, you can use a 9×9 pan. I always line my pan with parchment paper. This is a pro tip that makes your life much easier later on.
Leave a little bit of the paper hanging over the edges. These act like handles. When the fudge is hard, you can just lift the whole block out of the pan. No more digging around with a knife and scratching your good pans! If you do not have parchment paper, you can use aluminum foil. Just make sure to rub a little butter on the foil so the chocolate does not stick to it.
Recipe Quick Info
- Prep Time: 10 minutes
- Cook Time: 5 minutes
- Servings: 25 pieces
- Difficulty: Easy
Melting the Chocolate and Milk

Now we get to the fun part. Put your chocolate chips, condensed milk, and butter into a pot. Keep the heat on low. If the heat is too high, the chocolate will burn and taste bitter. Nobody likes burnt chocolate! Use a heavy pot if you have one. It spreads the heat more evenly so you don’t get hot spots that scorch the bottom of the mix.
Stir the mix slowly. You will see the chips start to lose their shape and blend with the milk. It will look a bit messy at first, but keep going. Soon it will turn into a dark, shiny liquid. This usually takes about five minutes. As soon as all the lumps are gone, take the pot off the heat. You don’t want to cook it longer than you have to.
Adding the Finishing Touches

Once the pot is off the stove, it is time for the flavor boosters. Stir in your vanilla extract and the salt. The salt might seem weird for a sweet treat, but it actually makes the chocolate taste stronger. It balances out all that sugar so the fudge doesn’t feel too heavy. FYI, a little salt goes a long way, so don’t dump the whole shaker in!
If you want to add nuts or marshmallows, now is the time to fold them in. Walnuts are a classic choice. They add a nice crunch that breaks up the soft fudge. Just make sure your nuts are chopped into small pieces. If the pieces are too big, the fudge will fall apart when you try to cut it later. Keep the extras to about one cup so the fudge stays held together.
Setting and Cooling the Fudge

Pour the warm mix into your prepared pan. Use a spatula to push it into the corners. You can smooth the top with the back of a spoon to make it look nice and flat. Now comes the hardest part of the whole recipe: waiting. You cannot cut the fudge while it is warm. It needs time for the fats to get solid again.
Let the pan sit on your counter for about an hour to lose the heat. Then, put it in the fridge for at least two to three hours. I usually leave mine overnight if I can wait that long. If you try to cut it too soon, it will be sticky and won’t hold its shape. Patience is a virtue, especially when it comes to chocolate! IMO, the texture is much better after a long chill in the fridge.
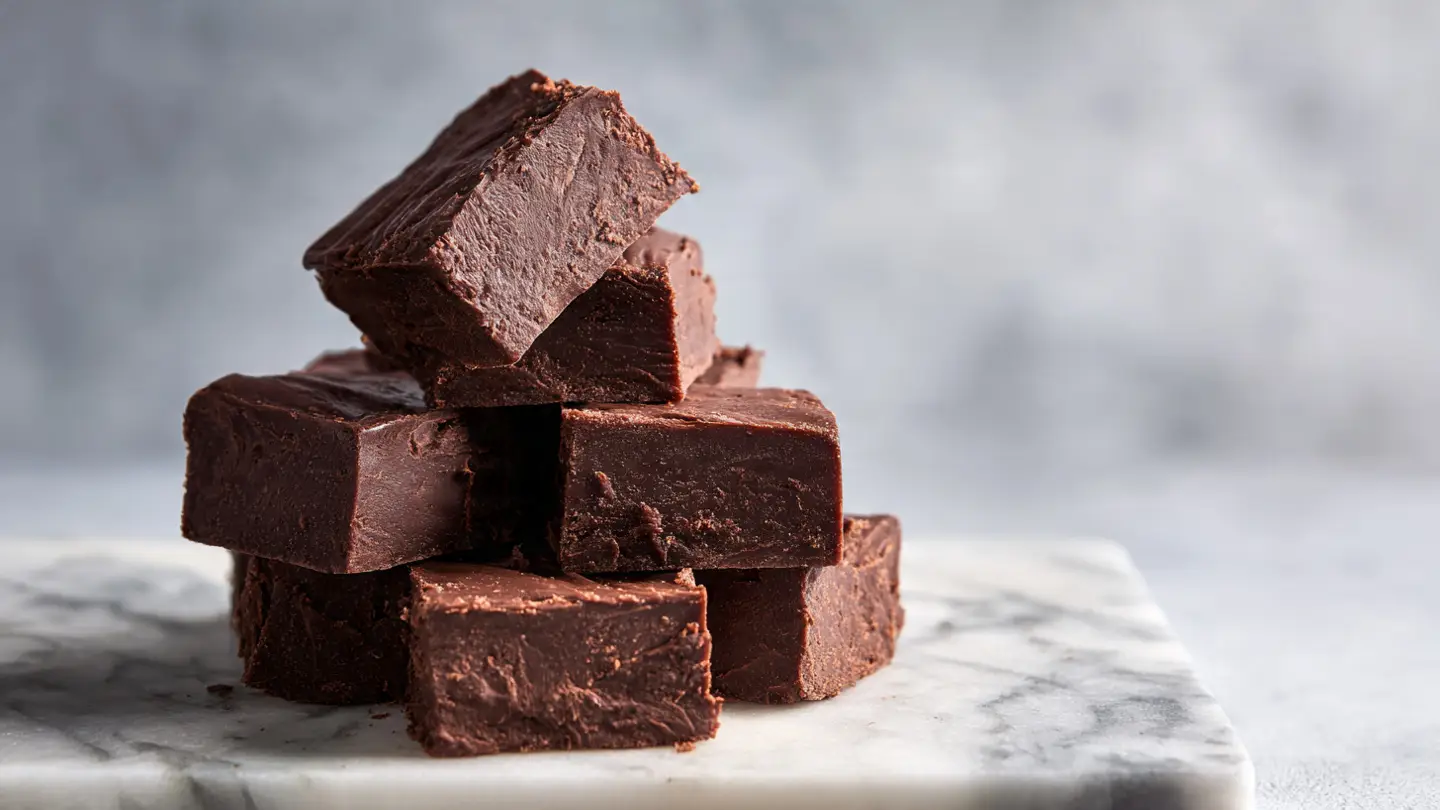
Perfect Cutting Techniques

Once the fudge is cold and firm, use those paper handles to lift it out of the pan. Put the whole block on a cutting board. To get those perfect, clean edges you see in photos, use a big sharp knife. Here is a trick most people skip: dip your knife in hot water and wipe it dry before every single cut. The heat from the metal will glide through the fudge like butter.
Cut the block into small squares. Fudge is very rich, so small pieces are usually best. I like to cut mine into one-inch squares. This recipe makes about twenty-five pieces. If you see the fudge sticking to the knife, just wash it and start again. Taking your time here makes the final plate look much more professional and appetizing for your guests.
Storage and Keeping it Fresh

Fudge can last a long time if you take care of it. Put the squares in an airtight container. If you are stacking them, put a piece of wax paper between the layers. This stops them from sticking together into one giant lump. You can keep the container on the counter for about a week, or in the fridge for up to three weeks.
Storage Secrets
- Room Temp: Keeps fudge soft and creamy for 7 days.
- Fridge: Keeps fudge firm for up to 21 days.
- Freezer: Wrap tightly to store for up to 3 months.
You can even freeze fudge! Just wrap the pieces tightly in plastic wrap and then put them in a freezer bag. This is great for when you want a sweet treat but don’t want to eat the whole pan at once. When you want a piece, just let it sit on the counter for twenty minutes to soften up. It tastes just as good as the day you made it.
How to Fix Common Fudge Problems
Sometimes things go wrong, and that is okay. If your fudge did not set and is still soft like frosting, you can use it as a fruit dip or a cake filling. It is still delicious chocolate! Most of the time, this happens because the mix did not get hot enough or there was too much liquid. You can try to melt it down again and add a few more chocolate chips to thicken it up.
If your fudge is too hard or dry, you might have cooked it for too long. Next time, try taking it off the heat as soon as the chips melt. You can also add a tiny bit more butter to the mix to keep it soft. Cooking is a skill that takes practice. Even I make mistakes sometimes, but the good news is that even “failed” fudge usually tastes pretty great.
Fun Variations to Try

Once you master the basic recipe, you can start to play around. I love making “Rocky Road” fudge by adding mini marshmallows and peanuts. You can also swap the semi-sweet chips for white chocolate chips to make a creamy vanilla fudge. Just remember that white chocolate melts much faster, so you have to be even more careful with the heat.
Another fun idea is to swirl in some peanut butter. Drop small spoonfuls of peanut butter onto the top of the wet fudge in the pan. Use a toothpick to drag the peanut butter through the chocolate to make pretty swirls. It looks like a work of art and tastes even better. There are so many ways to make this recipe your own once you know the basics.
The Best Way to Serve Your Treat

Fudge is very sweet, so it goes perfectly with a cold glass of milk or a hot cup of coffee. I like to serve it on a small plate after dinner. Because it is so rich, you only need one or two pieces to feel satisfied. It also makes a wonderful gift. You can put a few squares in a clear bag with a pretty ribbon for birthdays or holidays.
If you are having a party, you can put the fudge out on a big tray with some fresh berries. The tart taste of a strawberry or raspberry cuts through the heavy sweetness of the chocolate. It makes the whole dessert feel a bit more fancy and balanced. No matter how you serve it, people are going to be impressed that you made it from scratch by yourself!
Frequently Asked Questions
Can I use milk chocolate chips instead?
Yes, but the fudge will be much sweeter and a bit softer. You might want to add a tiny bit more chocolate to help it set firmly in the fridge.
Why is my fudge grainy?
Grainy fudge happens when sugar crystals grow too large. This usually comes from stirring too much while the chocolate is boiling or heating it too fast.
Do I have to use a microwave or stove?
Both work! The stove is safer to avoid burning, but you can microwave in 30-second bursts, stirring in between until the mix is smooth.
Can I make this dairy-free?
You can use dairy-free chocolate chips and sweetened condensed coconut milk. The texture will be slightly different but still very tasty.
How do I stop the fudge from sticking to the pan?
Always use parchment paper or greased foil. Leave extra paper over the sides to use as handles so you can lift the whole block out easily.
Start Your Baking Adventure Today
Making your own fudge is a fun and rewarding way to spend time in the kitchen. It is a simple recipe that brings a lot of joy to friends and family. Once you taste that first smooth, rich bite, you will never want to go back to the store-bought kind again. Grab your chocolate chips and give it a try today!