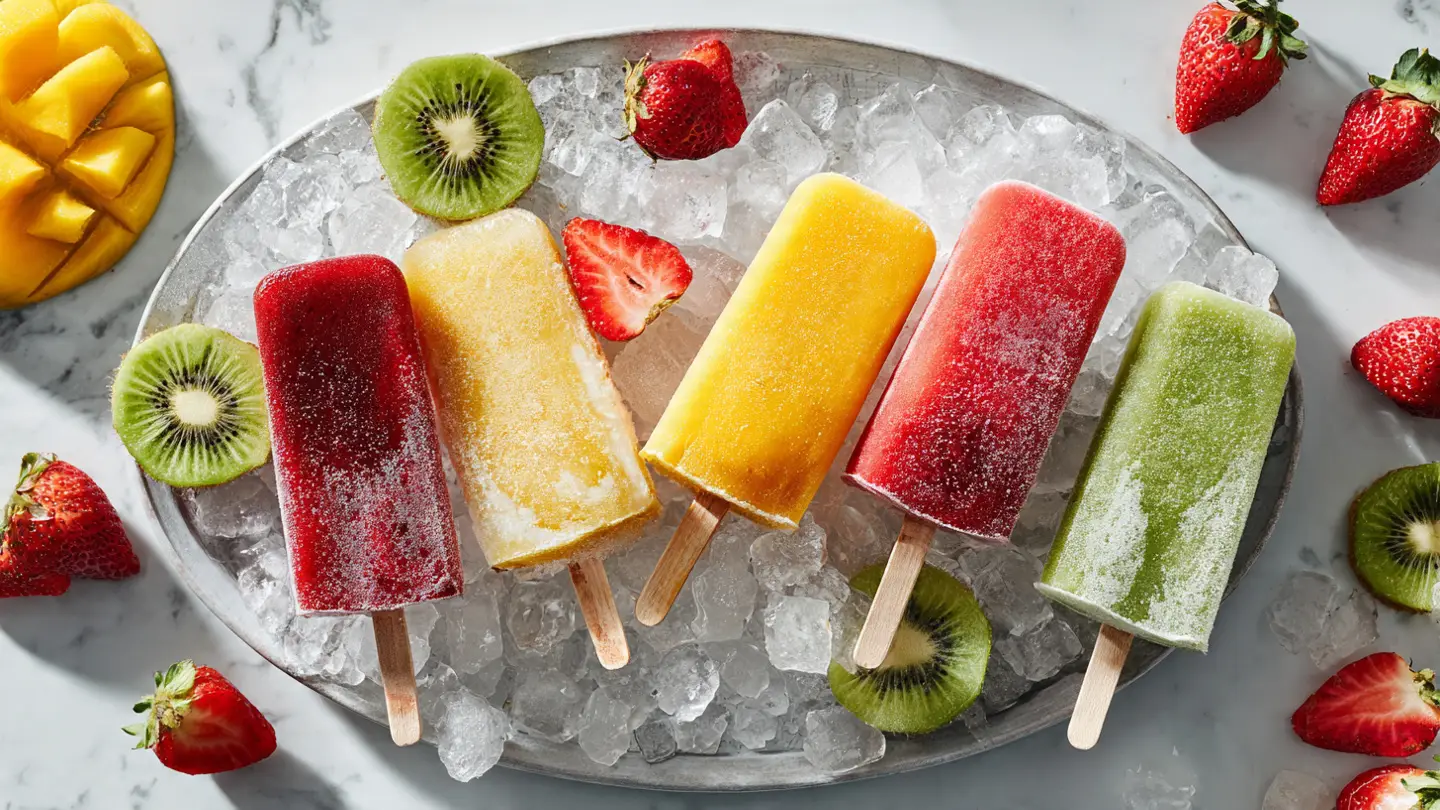
7 Refreshing Homemade Popsicles with Real Fruit
Summer heat can be very tough. When the sun is hot, my kids and I always want something cold to eat. I used to buy boxes of popsicles from the store every week. Then I looked at the box and saw so many long words I could not say. Most store popsicles are just sugar water and fake colors. That is why I started making my own fruit popsicles at home with real food.
Making popsicles is very easy and fun. You do not need to be a chef to do this. You just need some fruit, a little bit of juice or yogurt, and a freezer. My kitchen gets messy sometimes when I cook, but these are hard to mess up. I will show you seven ways to make these snacks. They taste better than the ones from the store because the fruit is fresh and sweet. You will learn how to mix flavors and how to get the pops out of the molds without breaking them.
Grab your blender and some fruit from the fridge. Let’s make some cold treats that your whole family will love!
Popsicle Quick Info
- Prep Time: 15 minutes
- Freeze Time: 6 hours
- Servings: 6 to 10 pops
- Difficulty: Very Easy
The Best Fruits to Use for Your Freezer Pops
Choosing the right fruit is the first step to a good popsicle. Some fruits are very juicy and work well when you blend them. Others are thick and creamy. I like to use fruit that is very ripe. Ripe fruit has the most sugar, so you do not have to add much honey or maple syrup. If your berries are a little soft, do not throw them away. They are perfect for freezing! FYI, frozen fruit works just as well as fresh fruit if you want to save some money.
I once tried to make popsicles with just big chunks of apple. It did not go well. The apple turned brown and got very icy. I learned that blending the fruit or using small pieces is much better. You want every bite to taste the same. Mixing a watery fruit like watermelon with a thick fruit like banana creates a great texture. Here are my favorite seven ideas for your next batch of treats.
1. Creamy Strawberry and Yogurt Pops

These are a classic choice for kids. They taste like a frozen smoothie on a stick. I use Greek yogurt because it is thick and has protein. If you want them to be extra sweet, you can add a tiny bit of honey. My daughter loves these for breakfast on very hot mornings. They are filling and cold at the same time.
To make these, you blend the berries until they are smooth. Then you stir in the yogurt slowly. If you mix it too fast, you get too many air bubbles. Air bubbles make the popsicle feel like ice instead of cream. I like to leave a few small berry bits in the mix for a nice look. These pops work for almost anyone who likes dairy. If you do not eat milk products, you can use coconut yogurt instead.
2. Zesty Watermelon Lime Chiller

Watermelon is the king of summer fruits. It is mostly water, so these pops are very hydrating. I love adding a squeeze of lime juice. The sour lime makes the sweet watermelon taste even better. This is a very light snack that won’t make you feel heavy. It is also very cheap to make since one watermelon makes a lot of popsicles.
One mistake I made early on was leaving the seeds in. Even the small white ones can feel weird when they are frozen. I now use a seedless melon or pour the juice through a mesh screen. This makes the popsicle very smooth and easy to eat. These are great for people who want a low-calorie treat. They are basically a frozen drink on a stick!
3. Tropical Mango and Pineapple Punch

If you want to feel like you are at the beach, try this mix. Mango becomes very creamy when you blend it. It almost feels like ice cream even though there is no milk in it. Pineapple adds a bit of a tang that wakes up your tongue. I find that this combo is the most popular at backyard parties.
Mangoes can be hard to peel. I usually buy frozen mango chunks to save time. It is a great hack for busy parents. Just let the frozen fruit sit on the counter for ten minutes before you blend it. If the mix is too thick, add a little bit of orange juice. This helps the blender spin better and adds more vitamin C to your snack.
4. Berry Blast with Whole Blueberries

These popsicles look like art. I use a mix of blueberries, raspberries, and blackberries. The deep purple color is beautiful. Instead of blending everything, I drop whole blueberries into the molds first. Then I pour the juice over them. When you bite into the pop, the frozen berries pop in your mouth.
This is a great way to use up berries that are starting to get soft. IMO, the skins of the berries add a nice texture that most kids actually enjoy. If you have a child who is picky about bits of food, you should blend these and strain them. But for most of us, the chunks are the best part. These are full of antioxidants which are good for your body.
5. Peachy Keen Honey Pops

Peaches are only perfect for a few weeks a year. When I find good ones, I buy a whole bag. These popsicles capture that summer flavor perfectly. I leave the skins on the peaches because they have a lot of vitamins. Plus, the red skins make the orange pops look really pretty. I add a tiny bit of honey to help the peaches stay soft while frozen.
One thing to watch out for is the ripeness. If a peach is hard, it will not have much flavor when frozen. Wait until they are soft and smell sweet. If your peaches are a bit dry, add a splash of white grape juice. This keeps the flavor light and sweet without changing the peach taste. These are very soothing for a sore throat too.
6. Kiwi and Green Apple Refresher

Not many people think of green fruit for popsicles. But kiwi and green apple are very refreshing together. The kiwi gives the pop a cool look with its tiny black seeds. The green apple gives it a tart kick. This is a very “grown-up” tasting popsicle that isn’t too sweet. It is great for a hot afternoon when you need a pick-me-up.
Kiwi is very easy to mash with a fork. You don’t even need a blender for this one if you are feeling lazy! I usually peel the kiwi and just squash it in a bowl. Then I mix it with some clear apple juice. It is simple and fast. These pops are a bit more icy than the mango ones, so they are very crunchy and fun to eat.
7. Banana Chocolate Chip Treat

This is the closest thing to a dessert on this list. Bananas are naturally creamy when frozen. If you blend a ripe banana with a little milk or almond milk, it turns into a thick custard. I stir in some mini chocolate chips at the end. It tastes just like a frozen chocolate-covered banana but it is much easier to eat.
Be careful not to use too many chocolate chips. They can fall to the bottom of the mold before the juice freezes. I usually pour a little banana mix in, add some chips, then pour more mix. This keeps the chips spread out. This is my favorite “cheat” snack when I want ice cream but want to stay healthy. It is very satisfying and sweet.
Pro Popsicle Tips
- Easy Release: Run the outside of the mold under warm water for 5 seconds to pop them out easily.
- Sweetener Check: Taste your fruit mix before freezing. Cold food tastes less sweet, so add a bit more honey than you think you need.
- Leave Space: Liquids expand when they freeze. Do not fill your molds all the way to the top!
Secrets for the Perfect Homemade Popsicle
Getting the popsicles out of the plastic molds can be the hardest part. I used to pull on the sticks as hard as I could. Often, the stick would come out but the fruit would stay stuck inside! That was so frustrating. Now I know the secret. You just need a little bit of warm water. Dip the bottom of the mold into a bowl of warm water for a few seconds. The edges will melt just enough to let the popsicle slide right out.
Another thing to think about is the stick. If your mold does not have a lid to hold the sticks up, wait until the pops are half-frozen. Put them in the freezer for about an hour. Then, push the wooden sticks in. They will stay straight and won’t sink to the bottom. I also suggest using a tray under your molds in the freezer. It catches any drips if you spill while walking to the fridge. Trust me, cleaning frozen juice off the bottom of a freezer is no fun.
If you don’t have fancy molds, don’t worry. You can use small paper cups or even an ice cube tray. Just put a piece of foil over the top of the cups and poke the stick through the foil. The foil will hold the stick in the middle while it freezes. This is a great way to make small snacks for toddlers who can’t finish a big popsicle. It also saves you money because you don’t have to buy special gear.
Lastly, remember that homemade popsicles don’t have preservatives. This means they might get “freezer burn” if you leave them in there for too long. I try to eat mine within two weeks. If you make a big batch, you can take them out of the molds and put them in a zip-top bag. This keeps them tasting fresh and saves space in your freezer drawer. Wrap each one in a little bit of parchment paper so they don’t stick together in the bag.
Common Questions About Fruit Popsicles
How long do fruit popsicles take to freeze?
Most popsicles take about 6 hours to freeze completely. It is best to leave them in the freezer overnight to make sure they are solid all the way through.
Can I use canned fruit for popsicles?
Yes, you can use canned fruit. Just make sure to drain the syrup first if you want to keep it healthy. Canned peaches and pears work very well when blended.
Do I have to add sugar to the fruit?
No, you do not have to add sugar. If your fruit is very ripe, it will be sweet enough. You can add a little honey or maple syrup if the fruit is tart.
Why is my popsicle so hard and icy?
Popsicles become icy if there is too much water. To make them creamier, use thick fruits like bananas or mangoes, or add a little yogurt or coconut milk to the mix.
What if I don’t have a popsicle mold?
You can use small paper cups or an ice cube tray. Use plastic wrap or foil over the top to hold the sticks in place while they freeze in the fridge.
Start Your Summer Snack Making Now
Making your own fruit popsicles is a win for everyone. You save money and eat better food. Plus, you get to be creative with different fruit mixes. These seven ideas are just the start of what you can do. Go ahead and try mixing your favorite fruits today. You will be very happy when the sun gets hot and you have a cold treat waiting for you. Happy freezing!