Best Ever Healthy Banana Bread Cake with Cream Cheese Icing
Banana bread is a classic snack that almost everyone loves. It smells amazing while it bakes in the oven. Most people make it in a tall loaf pan, but today I want to show you how to turn it into a cake. This version is better because it feels like a real dessert but stays healthy. You get all the sweet flavor of ripe bananas without too much sugar or oil. It is the perfect treat for kids and grown-ups who want something sweet but good for them.
I have spent many years trying to make the perfect banana bread. Some were too dry and some were too mushy. After many tries, I finally found the right mix of ingredients. This recipe uses whole wheat flour and natural sweeteners to keep things light. You will learn exactly how to mash the bananas, mix the batter, and whip up a fluffy cream cheese icing that tastes like a dream. It is simple enough for a beginner baker to try today.
Check out the steps below to make your new favorite snack!
Recipe Quick Info
- Prep Time: 20 minutes
- Cook Time: 35 minutes
- Servings: 12 slices
- Difficulty: Easy
Gathering Your Baking Supplies and Ingredients
Before you start cracking eggs, you need to get everything ready on your counter. Using the right tools makes baking much faster and more fun. You will need a big bowl for the wet stuff and a medium bowl for the dry stuff. A whisk or a big spoon works great for mixing. For the icing, a hand mixer helps make it really smooth, but you can use a fork and some muscle if you need to. Make sure your oven is hot before the cake goes in so it rises high and stays fluffy.
The Main Ingredients You Need

To make this cake, you need a few basic things from your pantry. First, get three or four very ripe bananas. They should have lots of brown spots on the skin. Those brown spots mean the banana is extra sweet and soft. You also need whole wheat flour. This flour has more fiber than white flour, which makes it a healthier choice for your body. If you do not have whole wheat, you can use regular white flour too. Both work well, but the texture will change just a little bit.
Next, you will need a sweetener like maple syrup or honey. I like these better than white sugar because they have a deeper flavor. For the fat, we use applesauce or a tiny bit of melted coconut oil. Applesauce is a secret trick that keeps the cake moist without adding a lot of fat. You also need two large eggs, a splash of vanilla, and some baking soda to help the cake grow. Do not forget a pinch of salt and a lot of cinnamon. Cinnamon makes the whole house smell like a bakery!
Preparing Your Baking Pan

The shape of your pan matters a lot for this recipe. Instead of a loaf pan, use a square baking dish or a round cake pan. A square pan is great because you can cut the cake into even little squares later. Before you pour the batter in, you must grease the pan. You can use a little bit of butter or a spray. I like to line my pan with parchment paper. This is a special paper that stops the cake from sticking to the bottom. It makes it very easy to lift the whole cake out once it is cool.
One mistake I made once was forgetting to grease the sides. The cake stuck and broke into pieces when I tried to take it out. It still tasted good, but it looked like a mess! Now, I always make sure the paper covers the bottom and the sides. If you use a glass pan, it might take a few extra minutes to bake compared to a metal pan. Just keep an eye on it through the oven door. Once your pan is ready, set it aside while you mix the batter.
Mixing and Baking Your Healthy Cake
Mixing the batter is the most important part of the whole process. You want to mix it just enough so everything is combined, but not too much. If you mix it for a long time, the cake can become tough like bread instead of soft like cake. We start with the bananas because they provide the base for everything else. Mashing them well ensures there are no big slimy chunks in your dessert. It is a great job for kids to help with because they love squishing things!
How to Mash Bananas Perfectly

Start by peeling your bananas and putting them in your big bowl. Use a sturdy fork or a potato masher to crush them. You want to keep going until they look like a thick, lumpy liquid. If you have a few small lumps, that is totally fine. It adds a nice texture to the cake. FYI, the darker the bananas, the easier they are to mash. If your bananas are still yellow and hard, they will not be sweet enough for this recipe. You can put them in a paper bag for a day to help them ripen faster.
Once the bananas are mashed, add your eggs, maple syrup, and vanilla. Stir them all together until the yellow of the eggs disappears. This is also when you add the applesauce or oil. This wet mixture should look smooth and smell very sweet. I love the smell of vanilla and banana together. It is one of the best scents in the world. Make sure your eggs are at room temperature if you can. They mix into the batter much better than cold eggs straight from the fridge.
Combining Dry and Wet Ingredients

In your smaller bowl, whisk together the flour, baking soda, salt, and cinnamon. It is important to mix these first so the baking soda is spread out everywhere. You do not want to bite into a clump of baking soda later because it tastes very bitter! Once the dry stuff is mixed, pour it into the big bowl with the mashed bananas. Use a big spoon to gently fold the flour into the wet mix. Stop stirring as soon as you do not see any more white flour. This keeps the cake light and airy.
If you want to add extras, now is the time. You could throw in a handful of dark chocolate chips or some chopped walnuts. My dad loves walnuts in his banana cake, but I usually keep mine plain. IMO, the plain version lets the banana flavor shine the most. If the batter looks too thick, do not worry. Banana cake batter is usually thicker than pancake batter. Just scrape it all into your prepared pan and smooth out the top with your spoon so it bakes evenly.
Baking the Cake to Perfection

Put your pan in the center of the oven. Most ovens work best when the air can move all around the pan. Set a timer so you do not forget about it. It usually takes about 30 to 40 minutes. You will know it is done when the top is golden brown and the edges pull away from the pan slightly. A great trick to check is using a toothpick. Poke it into the middle of the cake. If it comes out clean or with just a few crumbs, the cake is finished. If it has wet batter on it, let it bake for five more minutes.
One limitation of this healthy recipe is that it can dry out if you leave it in the oven too long. Whole wheat flour drinks up moisture fast. It is better to take it out a minute early than five minutes late. Once it is out, let it sit in the pan on the counter. It needs to cool down completely before you even think about the icing. If the cake is warm, the icing will melt and turn into a runny mess. Be patient! I know it smells good, but waiting makes the final result much better.
The Secret to Fluffy Cream Cheese Icing
Cream cheese icing is the best part of this cake. It is tangy and sweet, which balances the banana flavor perfectly. To keep it healthy, we use less sugar than regular frosting recipes. We also use light cream cheese to save on some fat without losing the creamy feel. This icing is so good you might want to eat it with a spoon, but try to save some for the cake! Making it is very easy and only takes a few minutes once your ingredients are ready.
Making the Healthy Icing Base

You need cream cheese that is very soft. Take it out of the fridge an hour before you need it. If it is cold, it will have lumps that are impossible to get rid of. Mix the soft cream cheese with a little bit of Greek yogurt and some honey or powdered sugar. The Greek yogurt adds more protein and makes the icing extra creamy. Add a splash of vanilla for flavor. Whisk it until it looks like a cloud. It should be thick enough to stay on a spoon but soft enough to spread easily over the cake.
If your icing feels too thin, you can add a little more powdered sugar or put it in the fridge for ten minutes. The cold will help it firm up. If it is too thick, add a teaspoon of milk. This is a very forgiving recipe, so do not stress too much. I once made this and forgot the vanilla, and it still tasted great because the banana cake has so much flavor on its own. Just make sure you taste it as you go to see if it is sweet enough for you.
Pro Baking Tips
- Use Brown Bananas: The blacker the skin, the sweeter the cake will be.
- Room Temp Eggs: This helps the batter stay smooth and rise better in the oven.
- Don’t Overmix: Stir only until the flour disappears to keep the cake soft.
- Cool Completely: Wait at least one hour before icing so the frosting doesn’t melt.
Spreading the Icing on Top

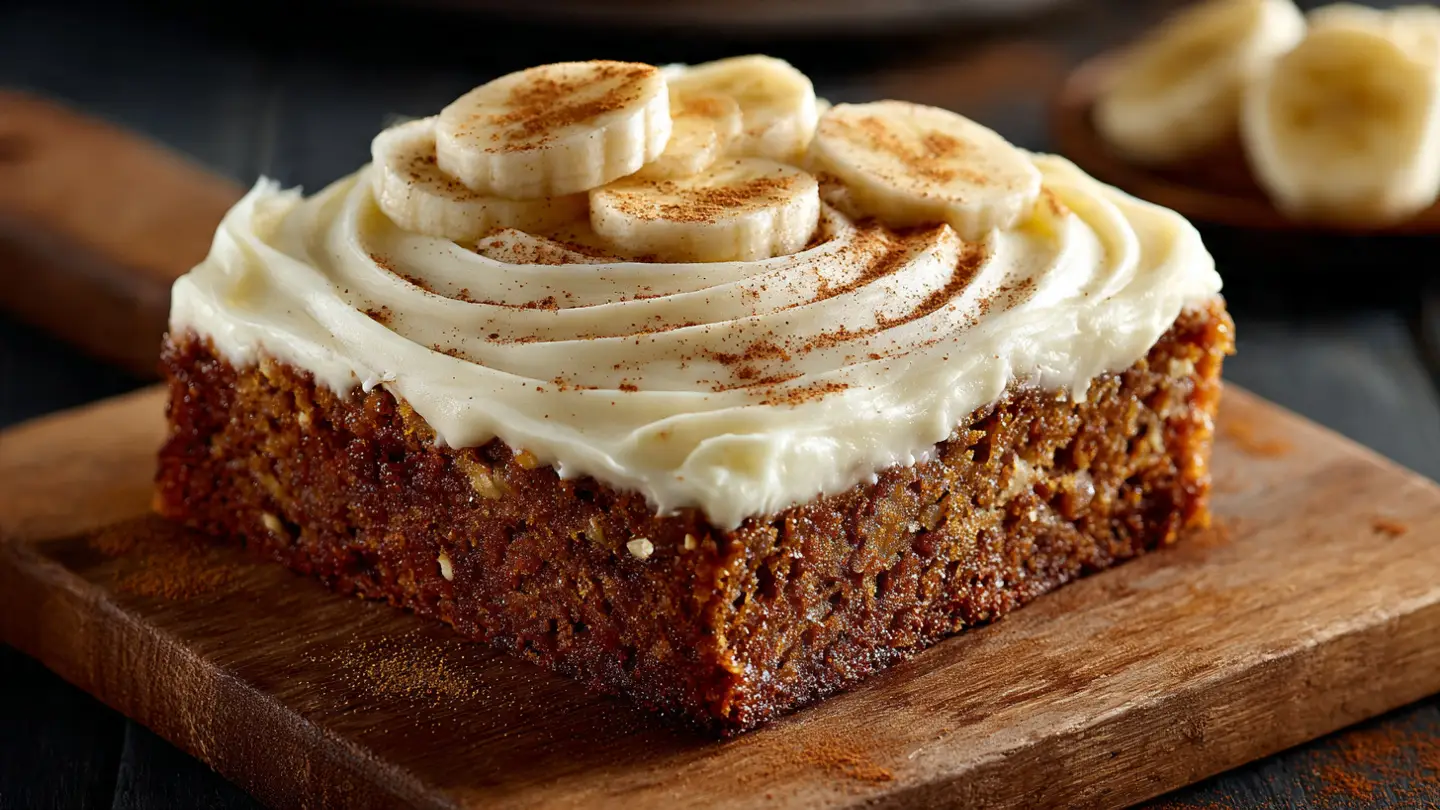
Once the cake is cold, use a spatula to scoop the icing onto the middle of the cake. Spread it out toward the edges in big swirls. You do not have to make it look perfect. A little bit of a messy look makes it feel like a cozy home-cooked treat. I like to put a thick layer on mine. If you used a square pan, you can cut the cake into squares right in the pan. The icing stays on top of each piece perfectly. This cake is very sturdy, so it is easy to serve on small plates.
This cake is great for a birthday or just a Tuesday afternoon. It feels fancy because of the icing, but it is healthy enough for a snack. If you have leftovers, you can put a piece of plastic wrap over the pan. Because of the cream cheese, you must keep this cake in the fridge. It actually tastes even better the second day because the flavors have time to soak into each other. Just take a piece out and let it sit for five minutes before eating so it softens up again.
Serving and Storing Suggestions

You can serve this cake plain or add some toppings. A few slices of fresh banana on top look very pretty. You could also sprinkle some extra cinnamon or chopped pecans over the icing. I think it goes best with a glass of cold milk or a hot cup of tea. Since it is a healthy cake, I sometimes even eat a small piece for breakfast! It has fruit and fiber, so why not? It is a much better choice than a sugary donut from the store.
To store the cake, put it in an airtight container in the refrigerator. It will stay fresh and moist for about four or five days. If you want to keep it longer, you can actually freeze the cake slices. Just wrap them tightly in foil. When you want a treat, let a slice thaw on the counter for an hour. Do not put the iced cake in the microwave, or the cream cheese will melt away! This is a great recipe to make ahead of time if you are having friends over for lunch.
Nutrition Facts (Per Slice)
- Calories: 210
- Total Fat: 8g
- Sugar: 12g
- Fiber: 4g
- Protein: 5g
Common Questions About Banana Cake
Can I use gluten-free flour for this cake?
Yes, you can use a 1-to-1 gluten-free flour blend. The cake might be a little more crumbly, but it will still taste delicious and sweet.
How do I ripen bananas quickly?
Put them in a paper bag with an apple for 24 hours. If you need them now, bake them in their skins at 300 degrees for 15 minutes until black.
Can I make this recipe without eggs?
You can use flax eggs instead. Mix one tablespoon of flax meal with three tablespoons of water for each egg. Let it sit for 5 minutes before adding.
Is this cake okay to leave on the counter?
No, because the icing has cream cheese in it. You must keep it in the fridge so the dairy stays fresh and safe to eat.
What can I use instead of maple syrup?
Honey works very well as a replacement. You can also use agave nectar or even brown sugar if you do not mind a little extra refined sugar.
Enjoy Your Healthy Homemade Treat
This healthy banana bread cake is a wonderful way to use up old fruit. It is sweet, soft, and much better for you than store-bought cakes. I hope you enjoy every bite of this moist cake and its creamy icing with your family today!