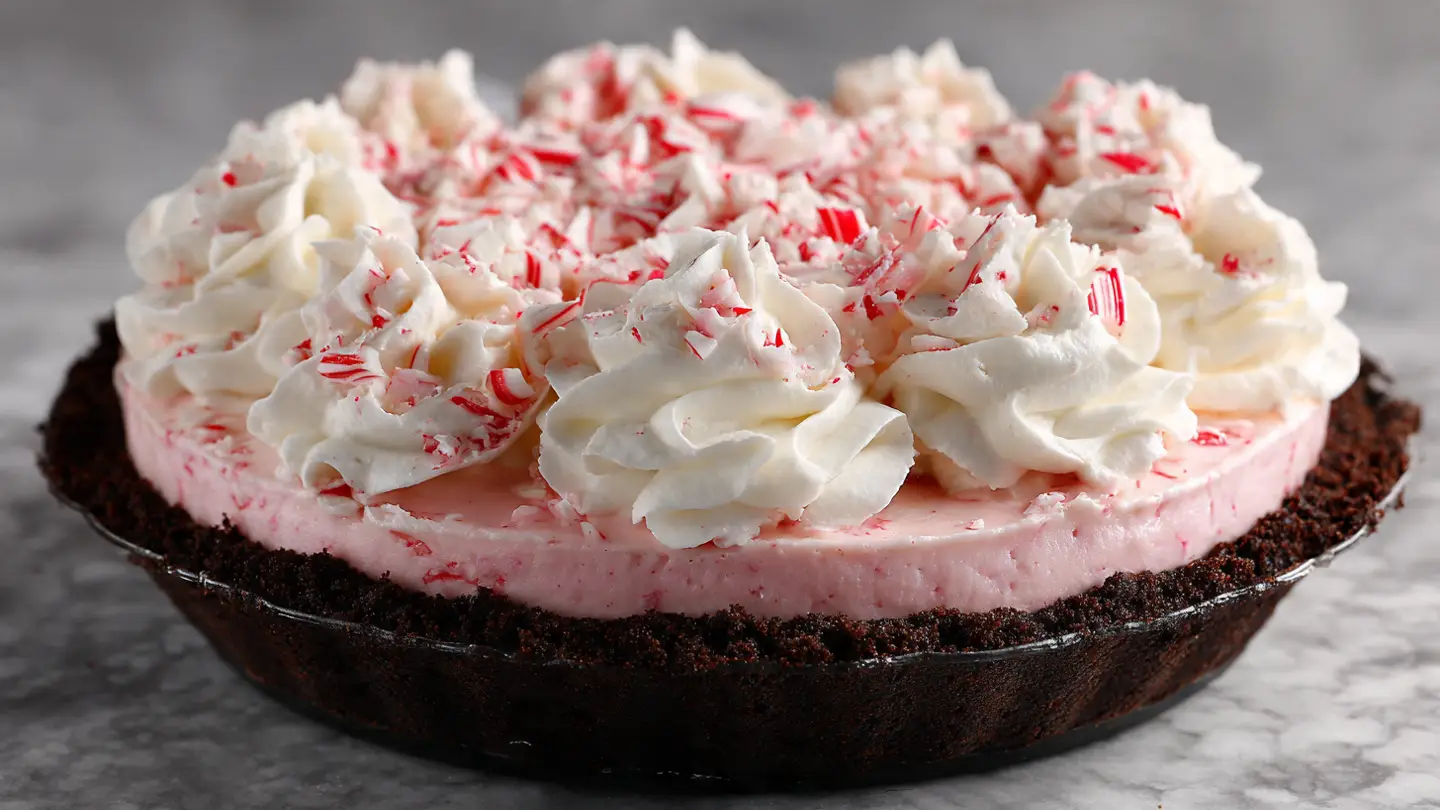
Bakers Square Candy Cane Pie Copycat
I love the holidays because of the treats. One of my favorite things used to be going to Bakers Square for their special holiday pie. The Candy Cane Pie was always the star of the show. It has a dark chocolate crust and a pink minty filling. It looks like a cloud and tastes like Christmas morning. I wanted to see if I could make it in my own kitchen so I did not have to wait for a table in a crowded restaurant. This recipe is the result of many tries and a few messy kitchens.
You are going to learn how to make this famous pie from scratch today. We will talk about the crunchy crust and the fluffy middle. I will show you how to get that perfect pink color and the minty crunch. This is a great dessert for people who do not want to spend hours by a hot oven. Most of it is just mixing and waiting for things to get cold. It is a fun project for kids to help with too.
Grab your apron and get ready to bake some holiday joy with me!
Recipe Quick Info
- Prep Time: 30 minutes
- Chill Time: 4 hours
- Servings: 8 people
- Difficulty: Easy
The Secrets to a Perfect Candy Cane Pie
Making a copycat recipe is all about getting the textures right. The real Bakers Square version is very light. It is not heavy like a thick cheesecake. It feels more like a mousse or a very thick whipped cream. To get this right, you need to be gentle when you mix the ingredients. If you stir too hard, you will lose all the tiny air bubbles that make the pie fluffy. I learned this the hard way when my first pie turned out flat and sad.
Temperature is also a big deal here. You want your cream cheese to be soft, but your heavy cream must be very cold. If the cream is warm, it will not whip up into peaks. I usually put my mixing bowl in the freezer for ten minutes before I start. This little trick helps the cream stay cold while the beaters spin. It makes a big difference in how high the pie stands in the crust.
The Best Ingredients to Use

You do not need many things to make this pie. Since there are only a few items, try to get the good stuff. For the crust, I like using the dark chocolate sandwich cookies with the cream in the middle. You can use the plain chocolate wafers too, but the sandwich cookies make a richer crust. Make sure you crush them into very fine crumbs. Big chunks of cookie will make the crust fall apart when you try to cut a slice.
For the peppermint flavor, use a clear extract if you can find it. Some peppermint oils are very strong, so start with a little bit. You can always add more, but you cannot take it out! I also like to use real candy canes for the crunch. Peppermint round candies work too, but candy canes have that classic holiday look. You will also need a tiny bit of red food coloring to get that pretty pink shade that everyone loves.
Items You Will Need for the Crust

The crust is the base for all the flavor. You will need about two cups of cookie crumbs. This usually takes about 24 sandwich cookies. I put mine in a plastic bag and hit them with a rolling pin. It is a great way to get out some stress! You also need a few tablespoons of melted butter. The butter acts like glue to hold the crumbs together while the pie sits in the fridge.
- 24 chocolate sandwich cookies (crushed)
- 4 tablespoons of melted unsalted butter
- A pinch of salt to balance the sugar
Mix these in a bowl until they look like wet sand. Press them hard into your pie plate. I use the bottom of a measuring cup to push the crumbs down. This makes the crust even and strong. You can bake it for five minutes if you want it extra crunchy, or just put it in the freezer to set. I usually just freeze it because it saves time and keep the kitchen cool.
What Goes Into the Pink Filling

The filling is where the magic happens. You need one block of full-fat cream cheese. Do not use the low-fat kind for this recipe. The fat helps the pie stay firm so it does not turn into a puddle on the plate. You also need powdered sugar. It melts into the cream cheese better than regular grainy sugar does. This keeps the pie smooth and silky on your tongue.
- 8 ounces of softened cream cheese
- 1 cup of powdered sugar
- 1 teaspoon of peppermint extract
- 2 cups of heavy whipping cream
- 2 drops of red food coloring
- 1/2 cup of crushed candy canes
IMO, the best part is the crushed candy canes inside the filling. They melt a little bit over time. This creates tiny swirls of extra mint flavor throughout the pie. If you want the pie to stay very pink, add the food coloring to the cream cheese before you fold in the whipped cream. This helps the color spread out evenly without streaks.
How to Put the Pie Together
Putting the pie together is like a fun art project. Once you have your crust ready and your filling whipped up, it is time to build. You want to work quickly so the whipped cream stays cold. If it sits out on the counter too long, it might start to melt. I always clear a spot in the fridge before I start this step. That way, I can slide the finished pie right in without bumping into the milk carton.
One thing I learned is that you should not overfill the crust. It is tempting to pile it all on, but a flat top looks more professional. You can save any extra filling to eat with a spoon! My kids always wait around the kitchen for the “leftovers” in the bowl. It is a nice little reward for the helpers in your house. Make sure the top is smooth before you add the decorations.
Mixing the Filling Steps

- Beat the soft cream cheese and powdered sugar in a big bowl. It should look smooth and have no lumps.
- In a separate cold bowl, whip the heavy cream until it has stiff peaks. This means when you lift the beaters, the cream stands up straight.
- Add the peppermint extract and red food coloring to the cream cheese mixture and mix well.
- Gently fold the whipped cream into the cream cheese. Use a big spoon or a spatula. Do not use the electric mixer for this part!
- Stir in most of the crushed candy canes. Save a little bit to sprinkle on top later.
Folding is a special way of stirring. You cut through the middle with your spatula and turn the bottom over the top. This keeps the air inside. If you just stir fast in circles, the pie will be heavy and dense. Take your time with this step. It is the secret to that cloud-like texture that Bakers Square is known for.
Setting and Chilling the Pie

This pie needs a nap in the fridge. It needs at least four hours to get firm. If you try to cut it too soon, it will be soft and messy. I think it is even better if you leave it overnight. This gives the candy cane bits time to soften up just a little bit. It makes every bite perfect. Cover it loosely with plastic wrap so it does not pick up any smells from the fridge.
FYI, do not put the extra whipped cream or candy canes on top until right before you serve it. The candy canes on top can melt and get sticky if they sit in the fridge for too long. They will bleed red color onto the white cream. It still tastes good, but it does not look as pretty. I keep my extra toppings in a little bowl on the counter until the very last minute.
How to Decorate and Serve

To make it look just like the restaurant, use a piping bag for the whipped cream. Make big swirls all around the edge of the pie. If you do not have a piping bag, you can use a plastic bag with the corner cut off. It works just as well! Put a whole mini candy cane or a big piece of crushed candy on each swirl. It tells everyone what flavor is inside before they even take a bite.
When it is time to slice the pie, use a sharp knife dipped in hot water. Wipe the knife dry between every single cut. This gives you those clean, sharp edges that look great in photos. The chocolate crust might be a little hard, so press down firmly. Serve each slice on a cold plate if you can. This keeps the minty filling from softening while people are talking at the table.
Common Mistakes to Avoid
- Lumpy Cheese: Always make sure your cream cheese is at room temperature. If it is cold, you will have tiny white lumps in your pink pie.
- Over-mixing: Stop folding as soon as you see no more white streaks of whipped cream.
- Wet Crust: Do not add too much butter to the crumbs. If the crust is greasy, it will stick to the pan and be hard to serve.
Variations for Your Pie

You can change this recipe to make it your own. If you do not like chocolate, you can use a graham cracker crust instead. It will taste more like a peppermint cheesecake. You can also drizzle melted white chocolate or dark chocolate over the top. This adds another layer of flavor and makes it look very fancy. Sometimes I add a half cup of mini chocolate chips right into the filling for extra crunch.
If you want a stronger flavor, you can use crushed peppermint patties instead of candy canes. This makes the pie very rich. For a lighter version, you can use a tub of whipped topping instead of heavy cream. It will not be as creamy, but it is much faster to make. Just remember that the texture will be a bit different if you make these changes. It will still be a hit at the party though!
Frequently Asked Holiday Questions
Can I freeze this pie?
Yes! You can freeze it for up to one month. Wrap it very well in plastic wrap and foil. Thaw it in the fridge for an hour before eating.
What if I cannot find candy canes?
You can use red and white peppermint round candies. Just put them in a bag and crush them with a heavy pan or a hammer.
Is there a way to make it without food coloring?
Yes. The pie will be white instead of pink. It will still taste exactly like peppermint. The pink is just for the look.
How long does the pie stay fresh?
It stays good in the fridge for about three to four days. After that, the crust might get a little soft from the filling moisture.
Can I use a store-bought crust?
Sure! A store-bought chocolate cookie crust works great and saves you ten minutes of work. It is a smart shortcut.
Enjoy Your Holiday Treat
This Bakers Square Candy Cane Pie is a wonderful way to bring a little bit of the restaurant home. It is cool, creamy, and full of holiday spirit. I hope your family loves it as much as mine does. Happy baking and have a great holiday!